LoJ: #424 (Pre-LiDAR #425) / 13,272' Marble Mountain
Range ›
Sangre de Cristo Range
Quadrangle ›
Crestone Peak
Summit Location ›
 N 37° 57' 18.13", W 105° 31' 59.92"
(Not Field Checked)
N 37° 57' 18.13", W 105° 31' 59.92"
(Not Field Checked)
Neighboring Peaks ›
Pico Aislado [Pico Asilado (commonly misspelled)]
Broken Hand Peak
Milwaukee Peak
Peak Summary
The easiest summit in the Music Pass - Sand Creek area. Hardly rates even a Class 2, so save this one for when you need a break or an easy day. Access is by the Music Pass trailhead. 4WD needed to reach the upper trailhead. Passenger cars can make it as far as the lower trailhead where the road intersects the Rainbow Trail. Pre-Lidar elevation was 13,266 ft.
Marble Mtn. West Ridge Route
Class 2

RT From Music Pass:
19.9 mi / 4,230'
RT From
Sand Creek Base Camp
with
Milwaukee Peak+"Pico Asilado (commonly misspelled)":
14.7 mi / 3,530'
From "Pico Asilado (commonly misspelled)":
2.25 mi / 1,050' (One-Way)
-
-
Music Pass TH
From Westcliffe, head south out of town on SH69 as though going to the South Colony Lakes area by the Crestones. Drive 4.4 miles south from the intersection of highways 69 and 96 in town, then turn right onto CR119 (Colfax Lane) and drive 5.5 miles to the junction where if you turn right, you'd be heading for the Crestones and South Colony Lakes. But instead of turning right, turn left, to the east, then in a few hundred yards, (quarter mile) the road again turns abruptly south and in about 5 miles comes to a trailhead parking area where passenger cars should give it up. This is the Rainbow trailhead here. Coordinates for this lower parking area at 9300 ft. are: N37° 55' 49.07" W 105° 27' 26.52".
If you have 4WD with good clearance, then proceed up the steepening 4WD road to the south and west for another 2.5 miles (appx.) to the upper trailhead at the coordinates and elevation given above. Our first drive up this road in 1995 was made in a Jeep Cherokee Sport. We found the road in surprisingly good shape, even though it was a steep single-track type road. In 2005 we returned to the same area in a Toyota T-100 pickup. In those 10 intervening years, the road condition had deteriorated considerably. It proved more of a challenge in our longer-bed vehicle, but we still made it okay. In any event, be prepared for a rough ride on a steep, narrow road with difficult rocky stretches. Reaching this upper parking area will greatly shorten the suggested backpack.
Camping
Primitive camping is available at both the upper and lower trailheads. There are no close by National Forest Service campgrounds.
-
From Music Pass TH via Sand Creek Base Camp & "Pico Asilado (commonly misspelled)":
-
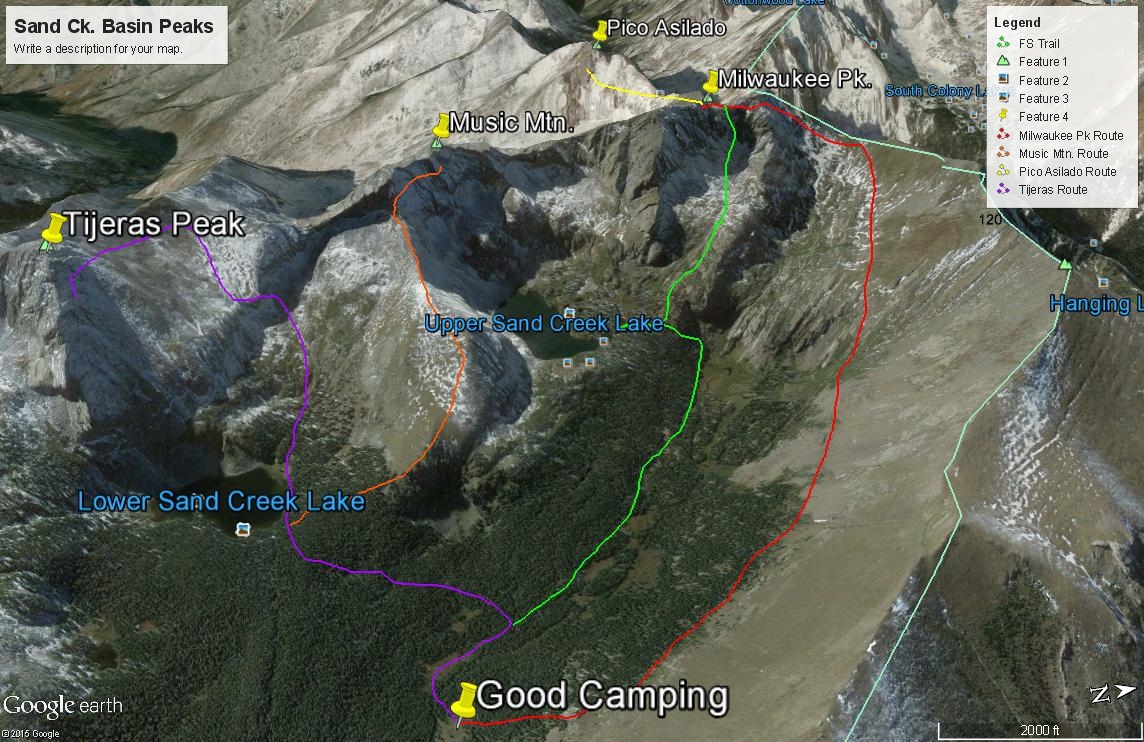
Milwaukee Peak North Ridge Class 4 / 2.55 mi / 2,465’ One-Way
Click thumbnail to view full-size photo + caption
Open This Route in a New WindowLidar measurements now indicate Milwaukee to have only 297 feet of prominence, thus removing it as a ranked summit. Nevertheless, you will likely want to go over Milwaukee in order to reach Pico Aislado. There are two difficulties in describing our route to Milwaukee Peak. The first has to do with the 1967 Crestone Peak quad which shows a trail that leads from near Upper Sand Creek Lake to a pass (Milwaukee Pass) just north of the Milwaukee summit and between it and a northern sub-summit. On that quad, that trail is in a drainage separated from the headwaters of Sand Creek by a prominent ridge. This trail does not seem to actually exist any longer. It appears that a trail route now follows more in the Sand Creek headwaters and comes out at the Milwaukee/Marble saddle. In addition, when we did this climb, as mentioned before, there was so much snow, locating any trail was impossible anyhow. So you might want to supplement our description with the G&M description of Pico Aislado and a report by Ryan Schilling on SummitPost here:
http://www.summitpost.org/east-face-via-music-pass/159342
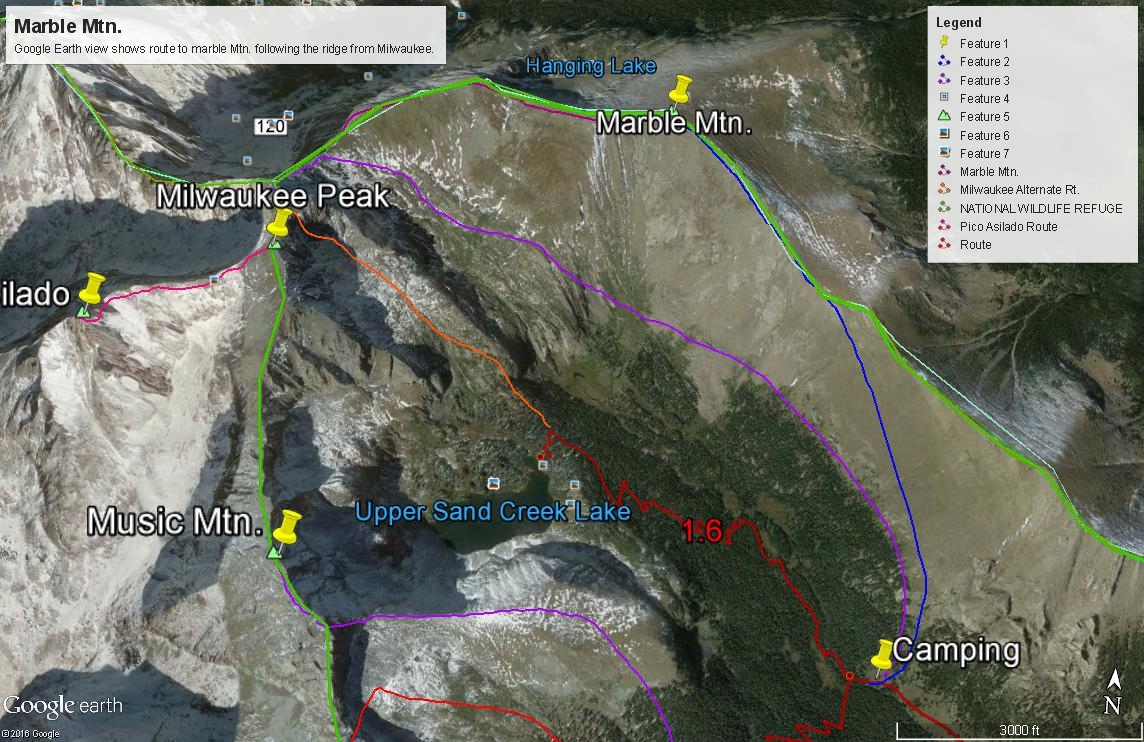
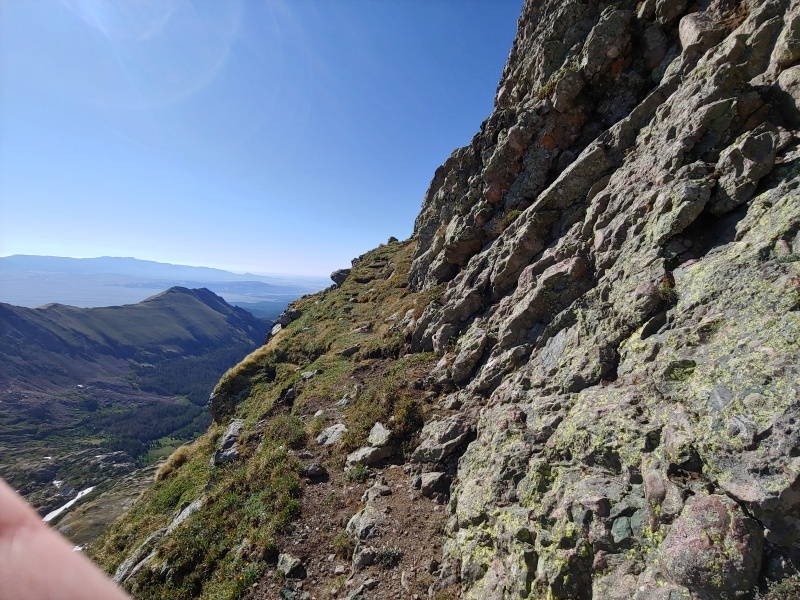
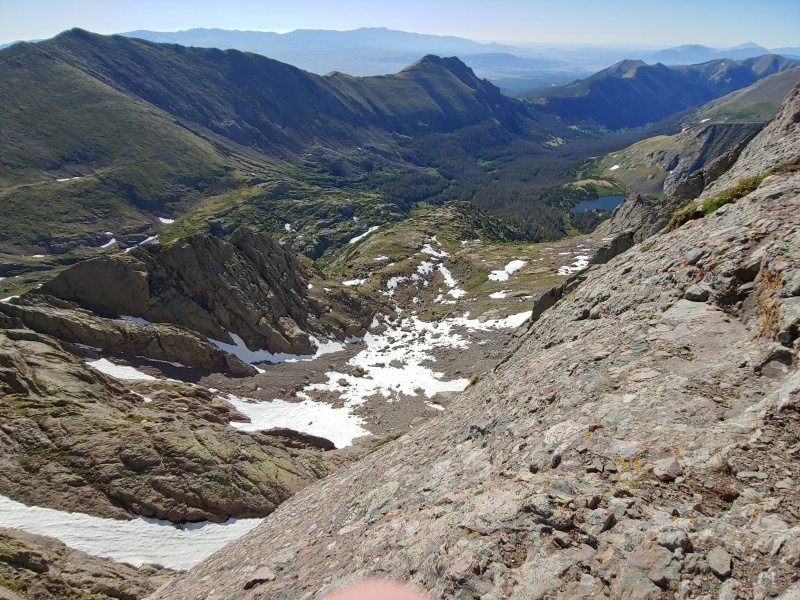
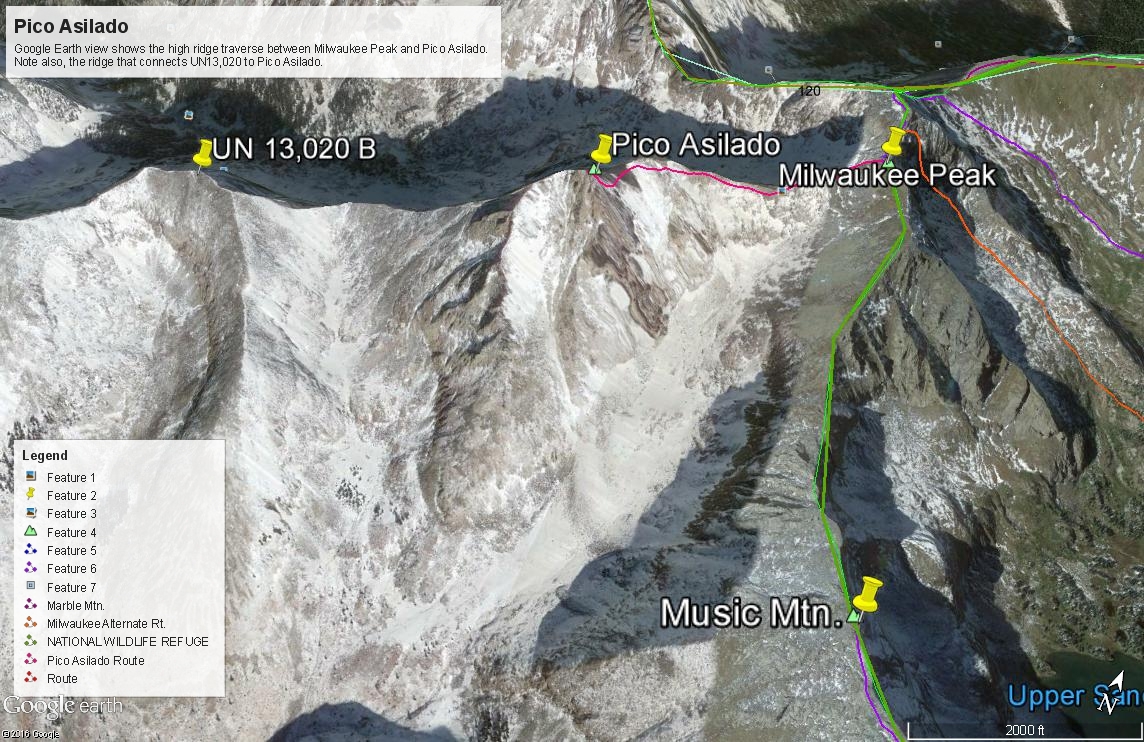
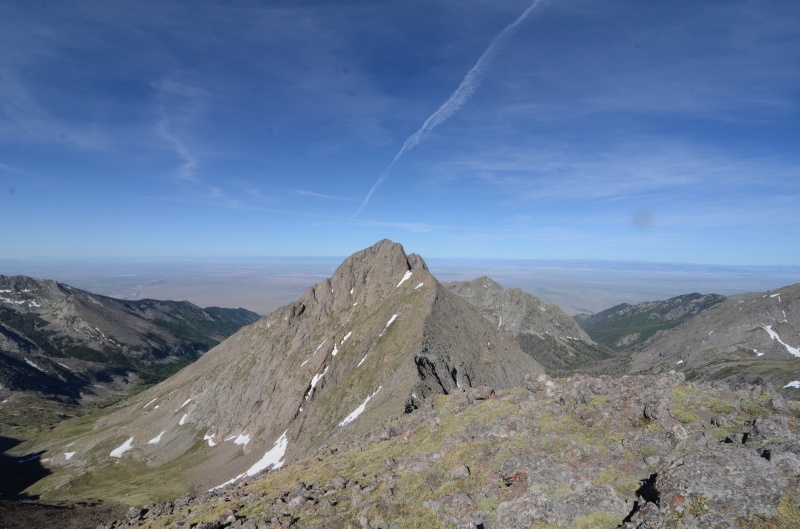
We have sequenced Milwaukee with Pico Aislado and also Marble Mountain. Leaving Marble for another day can easily be done if this 3-peak sequence is too much for one day or weather forces a discretionary retreat, which is what we SHOULD have done. As for our route, because we wanted to avoid snow and willows as much as possible, from a camp location at the end of the long meadow at 11,060 ft., we headed north, first cutting through forest, then hiking along the edge of the forest and took a wide-swinging arch path to the NW, gradually ascending on mostly tundra. At one point we had to cross some talus slopes with rocky rubble, after which, there was a steeper gain into the head of Sand Creek, followed by more tundra hiking (we assume) to the saddle between Marble Mountain and Milwaukee Peak. This route is shown on the Google Earth image by a red line. On the map we supply, we show both possibilities, though most everyone seems to use the trail to the Milwaukee-Marble saddle.
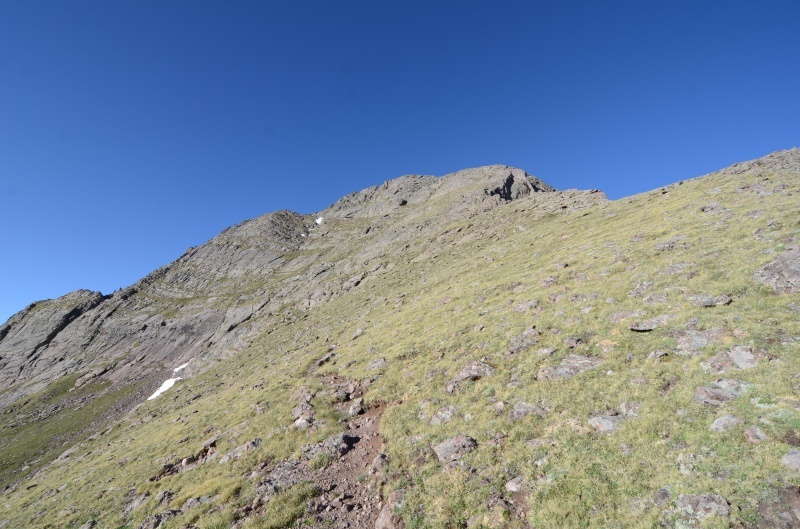
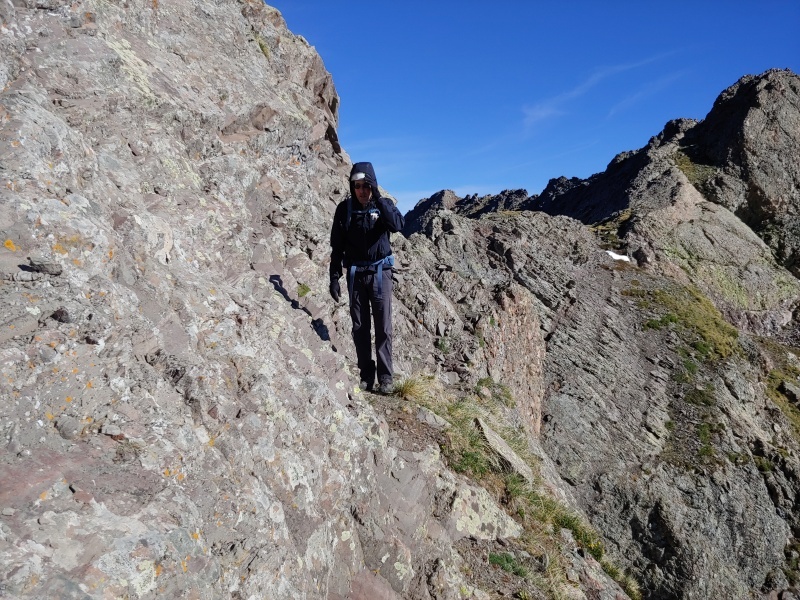
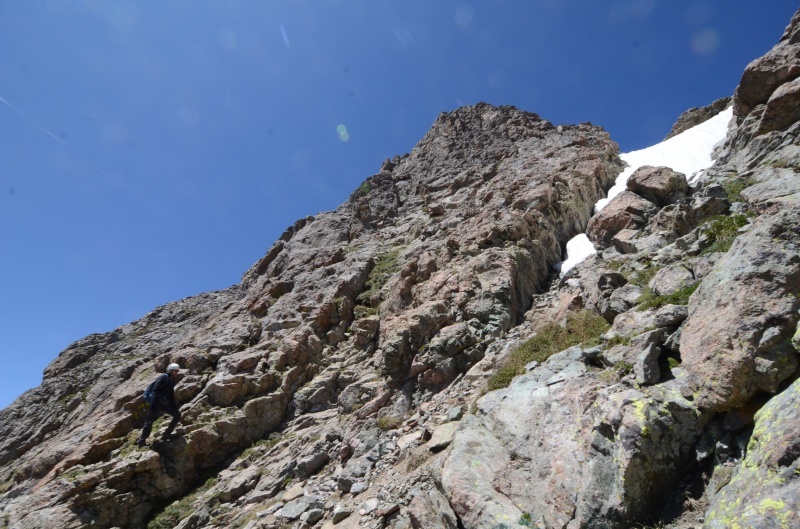
From this saddle, head SSW following the steepening ridge crest on tundra and rock. We crested the false summit north of Milwaukee and picked up the trail coming up from the Cottonwood drainage which we were able to follow for about 100 yards, but then left it to continue along the ridge to a saddle (13,300 ft.) followed by a notch mentioned by G&M and Ryan. Drop (i.e. - downclimb) into the notch and then the challenge begins. It's not that far to the summit, but it won't be easy. Literally climb a short section of rock wall (4th class) and then locate the ramp/ledge that goes south along the east face of the peak. It's very obvious. The ledge is narrow and exposed and can be intimidating for some. This is the crux. We found this ledge to be similar to the ledge you follow on the east side of Pyramid Peak, before you begin the final, more vertical ascent to the summit, but far less extended. The ledge led to an obvious trail that switchbacked up about 20 feet onto steeply pitched rock and tundra ledges. We climbed upward another 30 feet or so before finally reaching terrain where it felt safe to stand and walk. That's the end of the 4th class section. Regaining the summit ridge, from here, stroll/clamber on to the true summit.
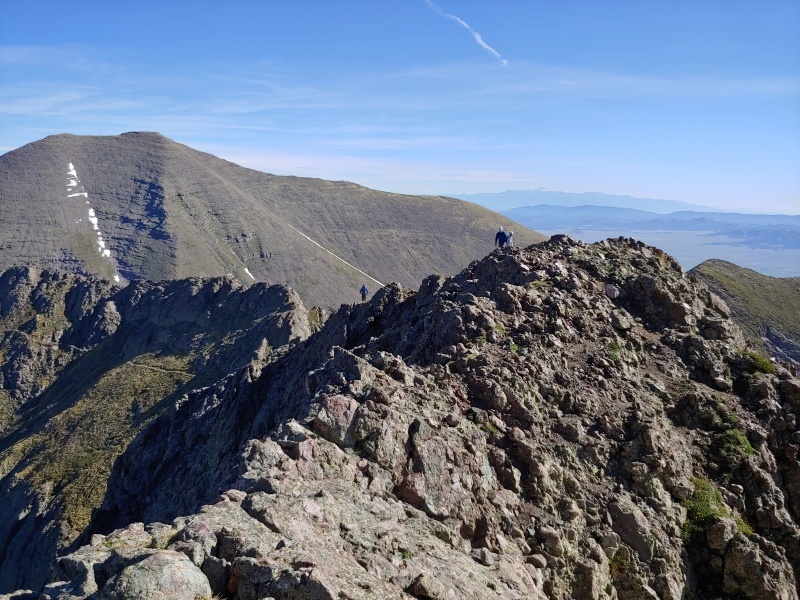
Many if not most climbers, once they top Milwaukee will want to continue on over to Pico Aislado. From Milwaukee, you have a clear view of the route over, so as you rest and munch on your lunch, plot your ascent over. From this perspective, Pico Aislado is very impressive and a little intimidating. To descend Milwaukee, return as you came, but keep in mind that from the Marble-Milwaukee saddle, it's easily possible to hike all long the ridge over to Marble Mountain and then drop back down to the camp location at 11,060 feet.
-
Pico Aislado ENE Ridge Class 4 / 0.65 mi / 400’ One-Way
Click thumbnail to view full-size photo + caption
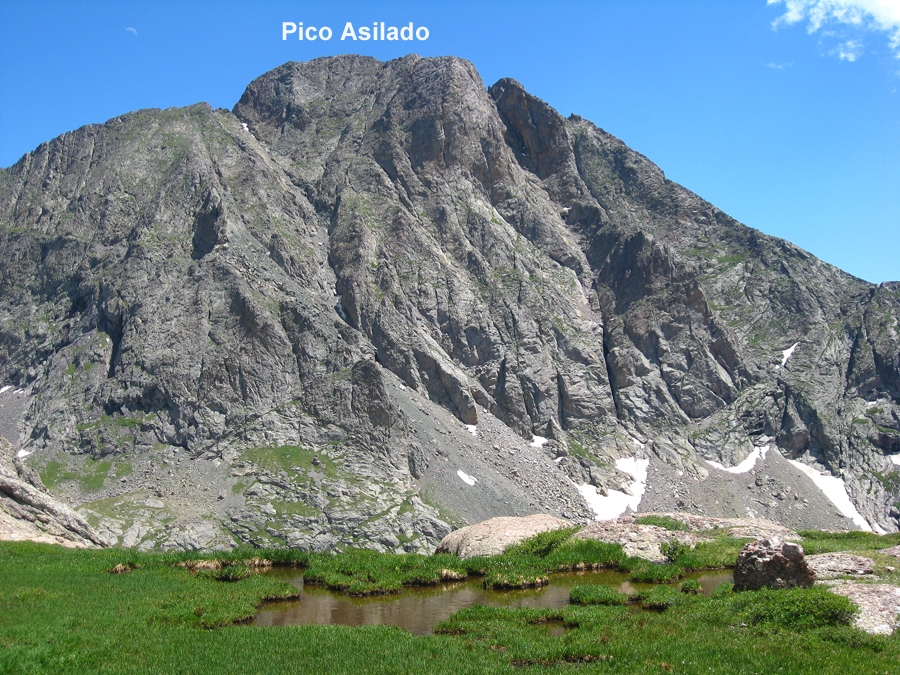
Open This Route in a New WindowThe route we used for Pico Aislado begins from the summit of Milwaukee Peak. We used the route description available in G&M at the time. They described this route as the shorter but more difficult route to Pico Aislado. (Note that in G&M, they used the misspelled USGS Quad name.) As pointed out in the "approach" information, when we did this climb, much of this climb from treeline above was covered in snow.
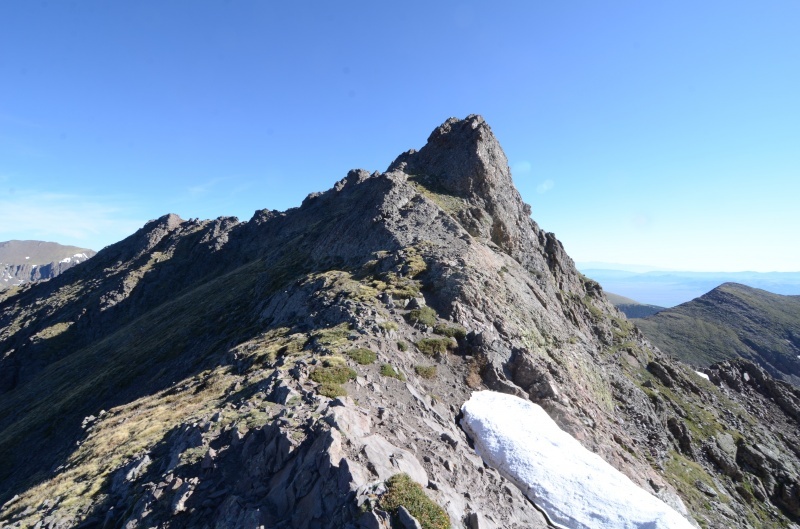
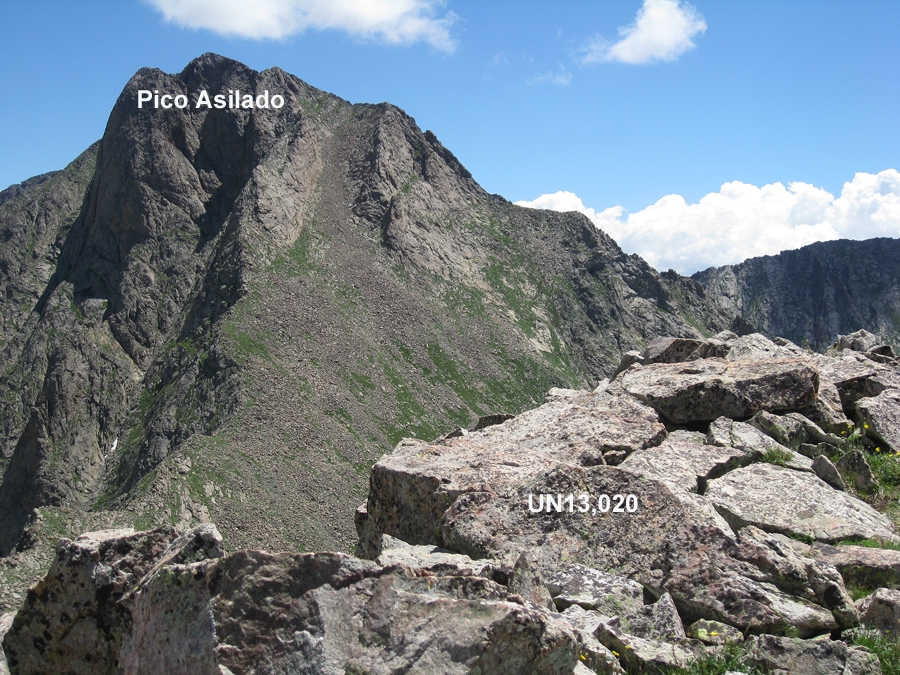
From the summit of Milwaukee, follow the ridge WSW toward Pico Aislado, dropping to a 13,220 foot saddle. For the most part, this will be on easy tundra/rock combination. Continuing beyond there, we encountered a non-negotiable snow cornice all along the ridge that forced us off the ridge on the south side for safety's sake. G&M recommended climbing on the left hand side of the ridge to a small saddle at 13,420 ft., a little below the summit block. Then they had you lose about 100 feet in elevation on the south side to find a series of ledges and narrow gullies that lead back to the ridge. We believe our route as follows avoided that unnecessary drop.
Because of the snow conditions, we chose to contour on the south side of the ridge at about 13,300 feet over to a rock and tundra rib. This left us about 300 feet below the summit. The contour took us across two snowfields and intervening rock. We then turned up the rib and ascended on fairly easy and secure rock and tundra for the first 100 feet. Then we had to ascend on a series of ledges, first to the left, then to the right, and around a steep wall of rock. Once around the wall, we found a steep gully to ascend that was mostly fairly secure rock with some tundra steps. The climbing was basically 3rd class with perhaps a few 4th class moves. As we neared the summit ridge, the climbing turned more consistently to solid rock. The gully took us back to the ridge and then we walked over large blocks of rock for a hundred feet or more to the summit. A report on LoJ mentions two possibly gullies in this area, both of which offer 3rd and 4th class scrambling. See our link to that report.
The summit of Pico Aislado offers an exciting and unique perspective of the Crestone group of summits. Enjoy the view. If time allows, you may want to consider continuing west off the summit and tag UN13,020 which lies about another .6 mile west on a connecting ridge. The return from that summit can be long and difficult, however. Again, see the report on LoJ for a suggestion on how to make the return hike. If not continuing over to UN13,020, then return as you came, back over the summit of Milwaukee Peak.
-
Click thumbnail to view full-size photo + captionRoute Description
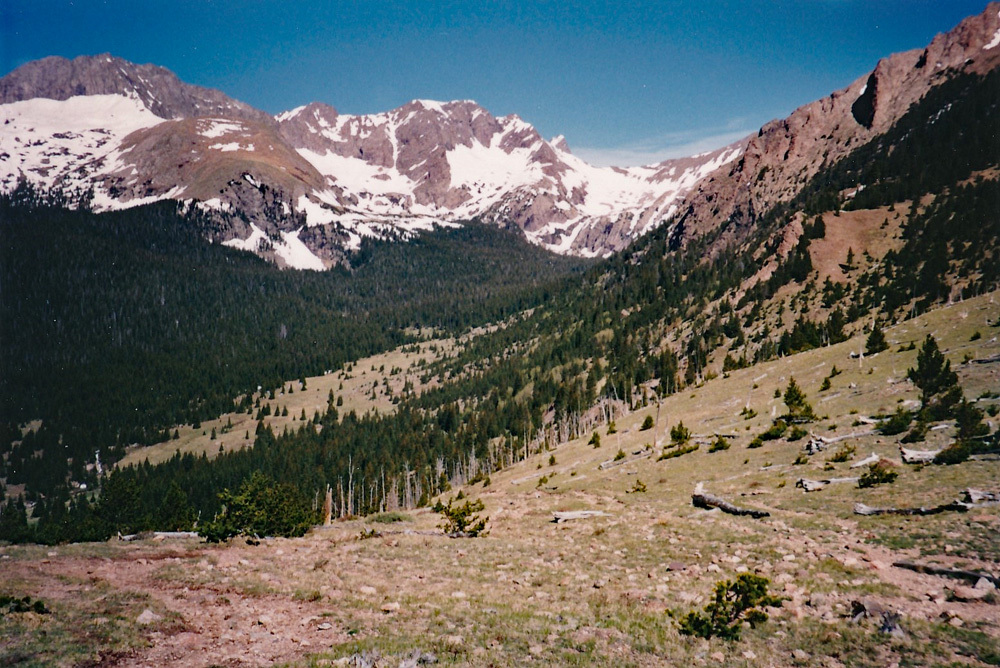
Year Climbed: 1995We climbed Marble Mtn. the same day we also did Milwaukee and Pico Asilado. Marble was the last summit of that day. The year was 1995, which was preceded by one of the snowiest winters on record. We were in this Sand Creek area right at the end of June. There was snow and drifts on the trail up to Music Pass and we camped at the upper end of the long meadow at 11,060 ft. (See "Approach" information.) Beyond there, it was all snow in the trees up to either of the lakes. The upper trails to both lakes and to the Sand Creek/Cottonwood Creek Pass were completely obscured by the snow. Most of the upper Sand Creek basin was still covered in snow. Our route to Marble Mtn. was by following the long ridge that connects Milwaukee to Marble. Because we've included Pico Aislado as second summit in this sequence and you have to return from it back over Milwaukee, the one way mileage and elevation gain to Marble are measured from Aislado and the round-trip mileage and elevation gain assume completion of the full sequence - which can be a pretty long and difficult day. See the last paragraph below for an alternative.
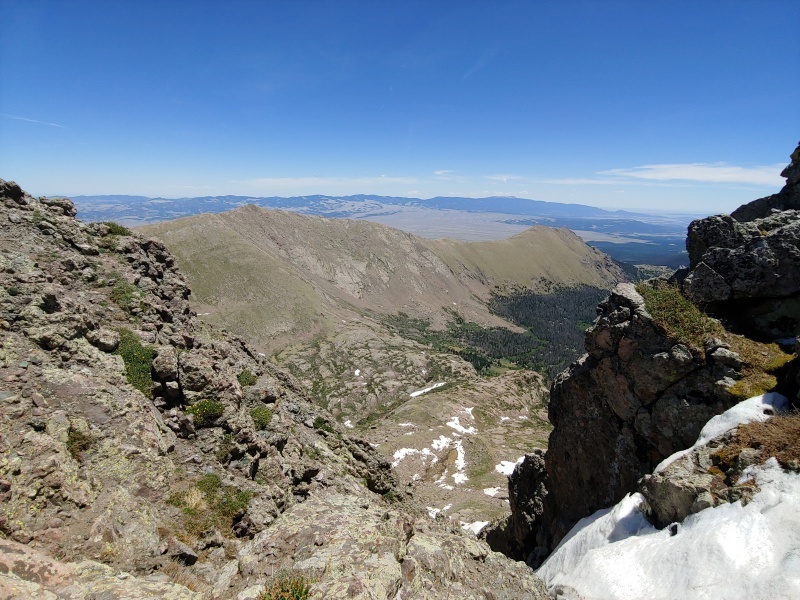
To make this traverse, start from the summit of Milwaukee Peak. You'll need to descend back off the peak to the north following the route suggested by Mike Garrett & Bob Martin and used by us, and return to the saddle where the old trail crosses from Sand Creek into the Cottonwood Creek drainage. From there, you'll need to continue north across a minor high point along the ridge, gaining not quite 200 feet and then drop down following the ridge NNE to the low point saddle between Milwaukee and Marble. Most all of this is on either tundra, rock rubble or a mix. The most difficult part is backtracking off of Milwaukee along the exposed ledge and the downclimbing which are rated at 3rd - 4th Class. Once past the Milwaukee difficulties and to the Milwaukee - Marble saddle, all difficulties are gone and the route is a simple Class 2. From the saddle, just continue walking along the ridge crest all the way around to Marble. It's about 1.6 miles from Milwaukee. All along the way, you'll enjoy great views looking down into the South Colony Creek area. If you're camped in the lower meadow at the coordinates we suggest, then it will be another 1.95 mile from the summit of Marble back to that camp. It's all an easy ridge walk on mostly tundra with some rock thrown in for good measure.
For a descent from Marble just continue from the summit of Marble, following the same ridge crest SE until you reach Pt. 12,620. From there, you can make a gradual descent south back down to the meadow. You may eventually connect with something of a couloir/avalanche chute lower down to finish the hike back to the valley bottom.
Marble Mtn. could also be easily ascended from a camp in the meadow by reversing the descent route described above. This would be a mostly tundra hike with limited amounts of scree or rubble. Round-trip mileage from the camp would be just under 4 miles with 2,205 in elevation gain. Another alternative would be to hike Marble as a round trip from the upper Music Pass trailhead. With this option, you could park at the upper trailhead, walk up to Music Pass and from the pass and just simply follow the ridge in a general NW direction all the way to the summit. You would have some open trees to work through just north of the pass, which you would soon lose, and then the remainder of the hike would be an easy ridge walk. From the upper trailhead, this could be done as a half-day hike.
Additional BETA
Links to other information, routes & trip reports for this peak that may be helpful. -


Warning!
Climbing peaks can be dangerous! By using this site and the information contained herein, you're agreeing to use common sense, good judgement, and to not hold us liable nor sue us for any reason. Legal Notice & Terms of Use.