LoJ: #112 (Pre-LiDAR #113) / 13,793' Potosi Peak
Peak Summary
Potosi Peak offers an interesting 3rd class scramble to reach the relatively large, flat summit and involves encircling much of the main summit few hundred feet down to locate the one non-technical breach that allows access to the summit. Potosi is frequently paired with Teakettle for a full day of dealing with San Juan scree and rotten rock. and a Class 2+ ridge connection. Passenger vehicles can get within a reasonable distance of the trailhead so 4WD is not required but a better ground clearance vehicle is preferable. Camping in the immediate area is very limited and there are private property concerns.
Potosi SE Coulior Route
-
-
Yankee Boy Basin - Mt. Sneffles Trailhead
Road up Yankee Boy has recently been improved as of 2018. The shelf sections are now smooth & graded. There should be no issues for passenger vehicles to continue up to the start of the 4x4 section at the Governor Basin road turnoff (just past the Atlas Mill) other than the washboarded switchbacks and unrelenting steepness.
To access this trailhead, head south out of Ouray on Highway 550 up Red Mountain Pass for 0.4 miles. At the first switchback, take a right onto Ouray County Road 361 (aka 'Camp Bird Road")—a graded dirt road. Immediately after this turn, the road branches with the right fork taking off toward Box Canyon Falls. Take the left fork, (just continue straight ahead actually) which will lead you on a bridge over the creek before beginning the relentless climb up into Yankee Boy Basin. Continue past the turnoffs for Camp Bird Mine & Imogene Pass and across the famous, spectacular shelf section of the Yankee Boy Basin Road (CR 26). Keep going until the road branches to Governor Basin around mile 7.75. Passenger cars shouldn't have any issues making it to this point (usually).
NOTE: The best parking may be just before the Governor Basin Road turnoff back near the Atlas Mill.
If you're driving a 4x4 vehicle, continue right farther up the Yankee Boy Basin Road for approximately another 0.9 miles to a large pullout with a solar vault toilet at around 11,380'. The 4x4 road up to the bathroom is in great condition as of 2018 as well—no obstacles of any real significance. A little clearance and low gears are helpful, but there should be no difficult maneuvers up to the trailhead that a stock 4x4 can't handle. Even some crossover vehicles should be able to make it if driven carefully.
Camping
The only camping allowed in Yankee Boy basin is now restricted to Thistledown and Angel Creek Campgrounds. As of June 2018 the Angel Creek Campground was temporarily closed "due to hazard trees." At Thistledown, there is an overflow area on the north side of the road just past the main campground thta has three or four other sites which are "walk-in" sites.
About 100 yards past the solar vault toilet, a road turns off to the left that drops down a little, crosses a larger puddle and then swings up into an area of trees. There are about five primitive campsites in among these trees. IN 2018, we observed on two separate weekends, various groups openly camping here with tents & RV's. We are not sure if using these spots is truly permissible or not. One Forest Service ranger told us that camping on FS land is not permissible anywhere in the basin, however, she also pointed out that there are all kinds of old claims in this area that are not considered FS land and that some of these areas could be used for camping. That may be the case with the spot described here, however if not on FS land, then you are on a private holding of some kind. On another trip, our son saw several people up at the various turnouts on the 4x4 section camping in their vehicles, but no tents. When he returned to the car after his climb, there was a woman associated with a Yankee Boy Basin conservation group who was checking the area round the restroom and also the trail and level area above it for signs of camping usage. She was photographing and documenting everything. Camp at your own risk on this one!
Campsite Locations
Thistledown › N 37° 59' 37.84", W 107° 42' 01.64"8,760 ft. elevation
-
From Teakettle Mountain
Click thumbnail to view full-size photo + caption
Open This Route in a New WindowNote: The following route descriptionj is provided by Shaun Cooney based on his ascent with Jon Bradshaw, summer of 2018. Carrie & Tim completed this climb in 1994. Any significant variations in the two ascents will be pointed out.
Due to the bevy of cliffs, spires, and steep slopes, there are not a lot of route variations available on Teakettle. Our route follows the "standard" route published by other authors such as Gerry & Jennifer Roach and Mike Garratt & Bob Martin.
To start this route, use the Mt. Sneffles Trailhead (4x4 Parking) at 11,380' in Yankee Boy Basin.
From the parking area, look for a use trail taking off directly across the road near a no camping sign. You can follow this trail, or remnants thereof, for a short distance through the initial stands of pine. Your goal is to reach the ridge coming off of Coffee Pot — a large rock outcropping midway on the ridge between Teakettle & Potosi. Once through the trees, follow the tundra up to a semi-level spot in the ridge around 12,600'.
From here, an ascent straight up the ridge crest is blocked above by a significant cliff band that becomes smaller and more broken as it wraps to the east. Begin angling to the east (right) and pick your way through the rubble toward what remaining tundra you can find. Set your trajectory upward toward a small break in the cliff band. There are two small ribs of rock near this gully that offer some small measure of stability compared to the surrounding slopes. Use these to aid your upward progress where logical. Scramble up the minor cliff band (class 2+) and continue toward Coffee Pot. It is not necessary to climb right to the foot of Coffee Pot. The farther up you go, the poorer the footing will become on the loose, small, broken volcanic rock.
From somewhere near the base of Coffee Pot, You may finally stand more erect and take a moment to survey the remaining route up Teakettle, basically to the left (north). The peak looks rather imposing from here, but the route finds ways to break through the quagmire of cliffs and spires with surprising ease (at least relative to the terrain). The immediate band of cliffs across the basin from you presents your first challenge. This band of cliffs is broken by a rubble-filled gully punctuated with dark rocks (commonly referred to as the "Black Gully"). This gully, while it looks foreboding from your current vantage point, is the route. It will appear easier as you approach.
To approach the black gully, descend a short distance (approximately 200 - 300 vertical feet) down the south ridge of Coffee Pot until a you encounter a break in the cliffs that allows easy access to the upper, rocky slopes of the basin that separates you from the black gully. If the snow has melted, look for a climber's trail skirting across the rock directly toward the black gully. No more than class 2 or easy class 2+ terrain should be needed to make this descent and traverse over to the black gully. NOTE: This slope tends to hold snow later into the summer, so depending on snow levels and time of year, an ice axe may prove exceedingly useful here. (Note: In 1994, Tim & Carrie did not descend down the Coffeepot south ridge but instead traversed around Coffeepot to the NW side of the formation and located another steep, snow-filled couloir to descend that took them to about 100 feet below the Teakettle/Coffeepot saddle.)
Ascend the surprisingly climbable—though still loose—black gully (class 2+) and exit to your left (class 3). Enjoy a briefly level perch and survey the rest of your route.
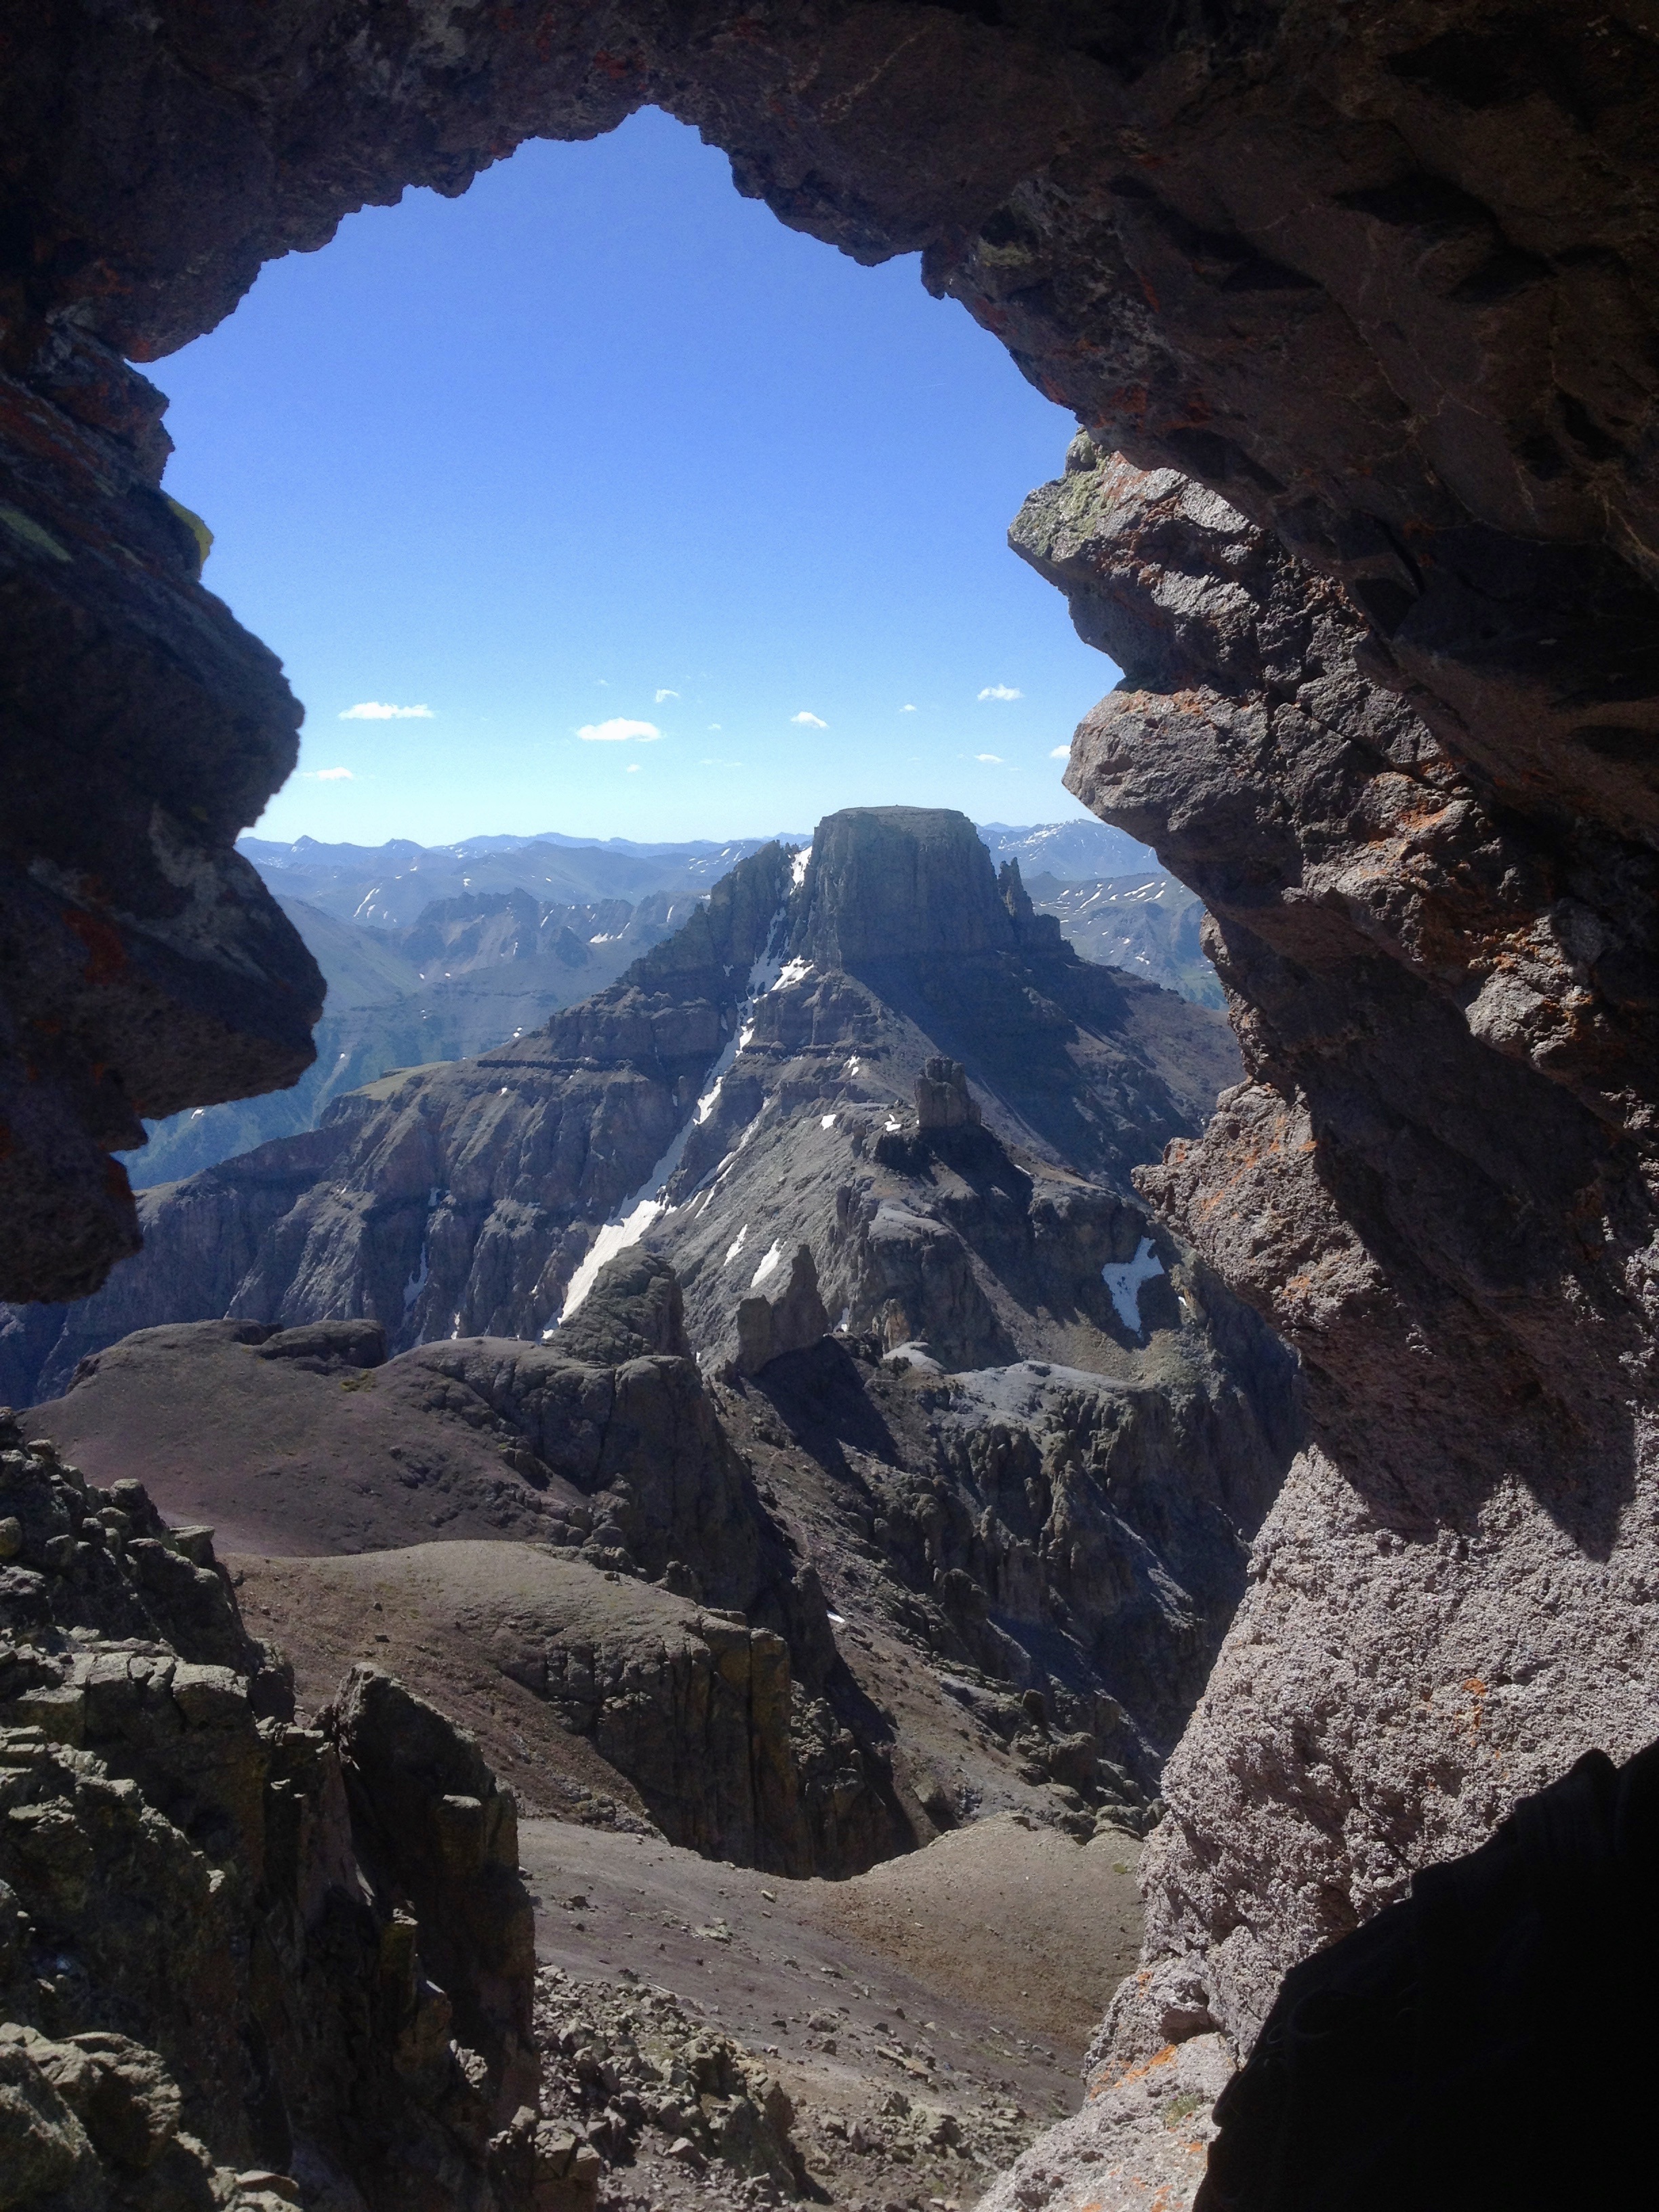
The next spot to aim for is a break to the west in the major band of cliffs now above you. Follow cairns and a use trail as you wrap along a bench of sorts on your way to a wide, sandy gully that breaks through this last major cliff band. Once up through these cliffs, follow the cairns, trail, and the most logical lines up the summit block of Teakettle, which is easily recognizable by the circle-shaped arch on its southern side that forms the "handle" of the teapot. The route will avoid following directly on the ridge line above with its pinnacles.
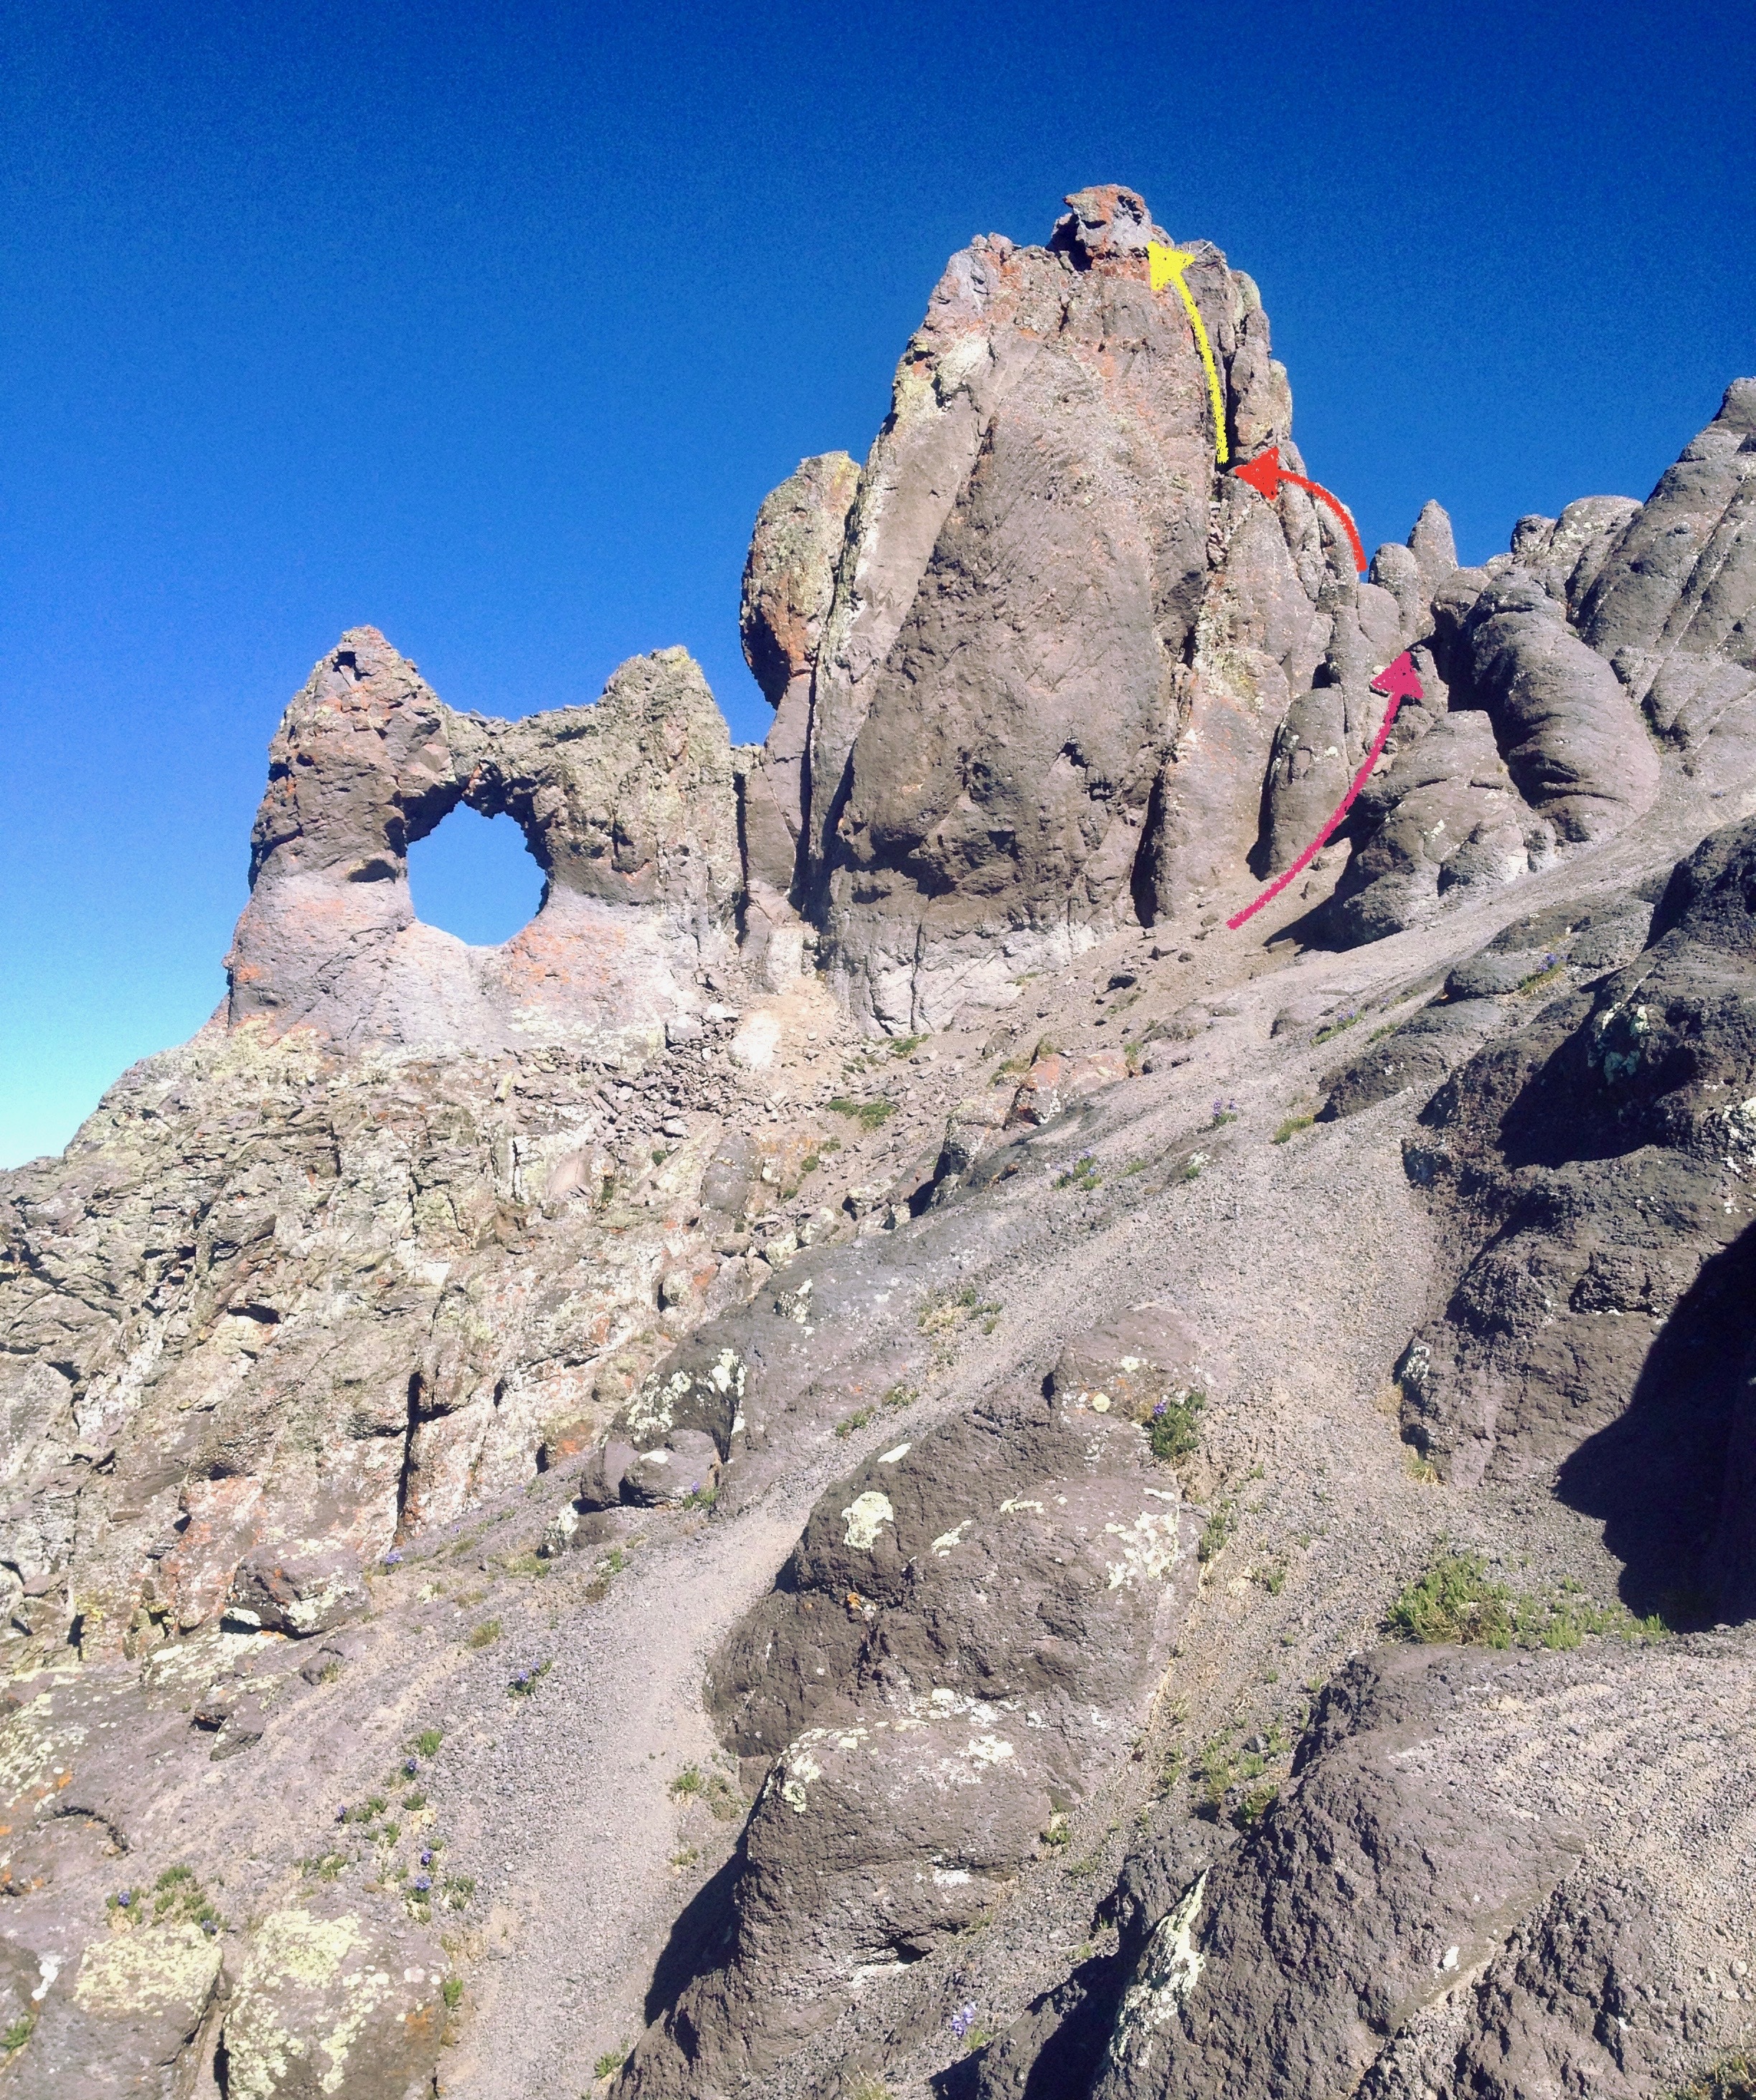
At the summit block, take a moment to survey the remaining 30'. This is the crux of the route. Two main lines emerge as options to ascend this final block, and both converge into a 10' crack immediately below the summit. The first line is a direct crack up to the summit which is punctuated with several tufts of tundra lower down. The second, and probably best, line is to aim for a small "saddle" to the right side of the summit tower. If you intend to rope up or use climbing aid, this is a good spot to ditch your pack and get your gear on.
From this perch, you can ascend an initial block, wrap around a small nose of rock, and reach the upper portion and final 10' of the crack to the summit. The climbing here is only class 4, or maybe low class 5. Experienced climbers will probably not need rope on this short pitch. The final climb up the last 10' of the crack to the summit requires only one major, committing low class 5 move, but the exposure is significant enough that rope may be desired for some. (We're not talking thousands of feet here, just minor exposure. If you fell, you would probably only tumble back to the gravelly slopes below.) Use your best judgement and climb to the top. There's room for only 2-3 people at most. The summit appears like a bunch of sawed-off tops of a pile of boulders.
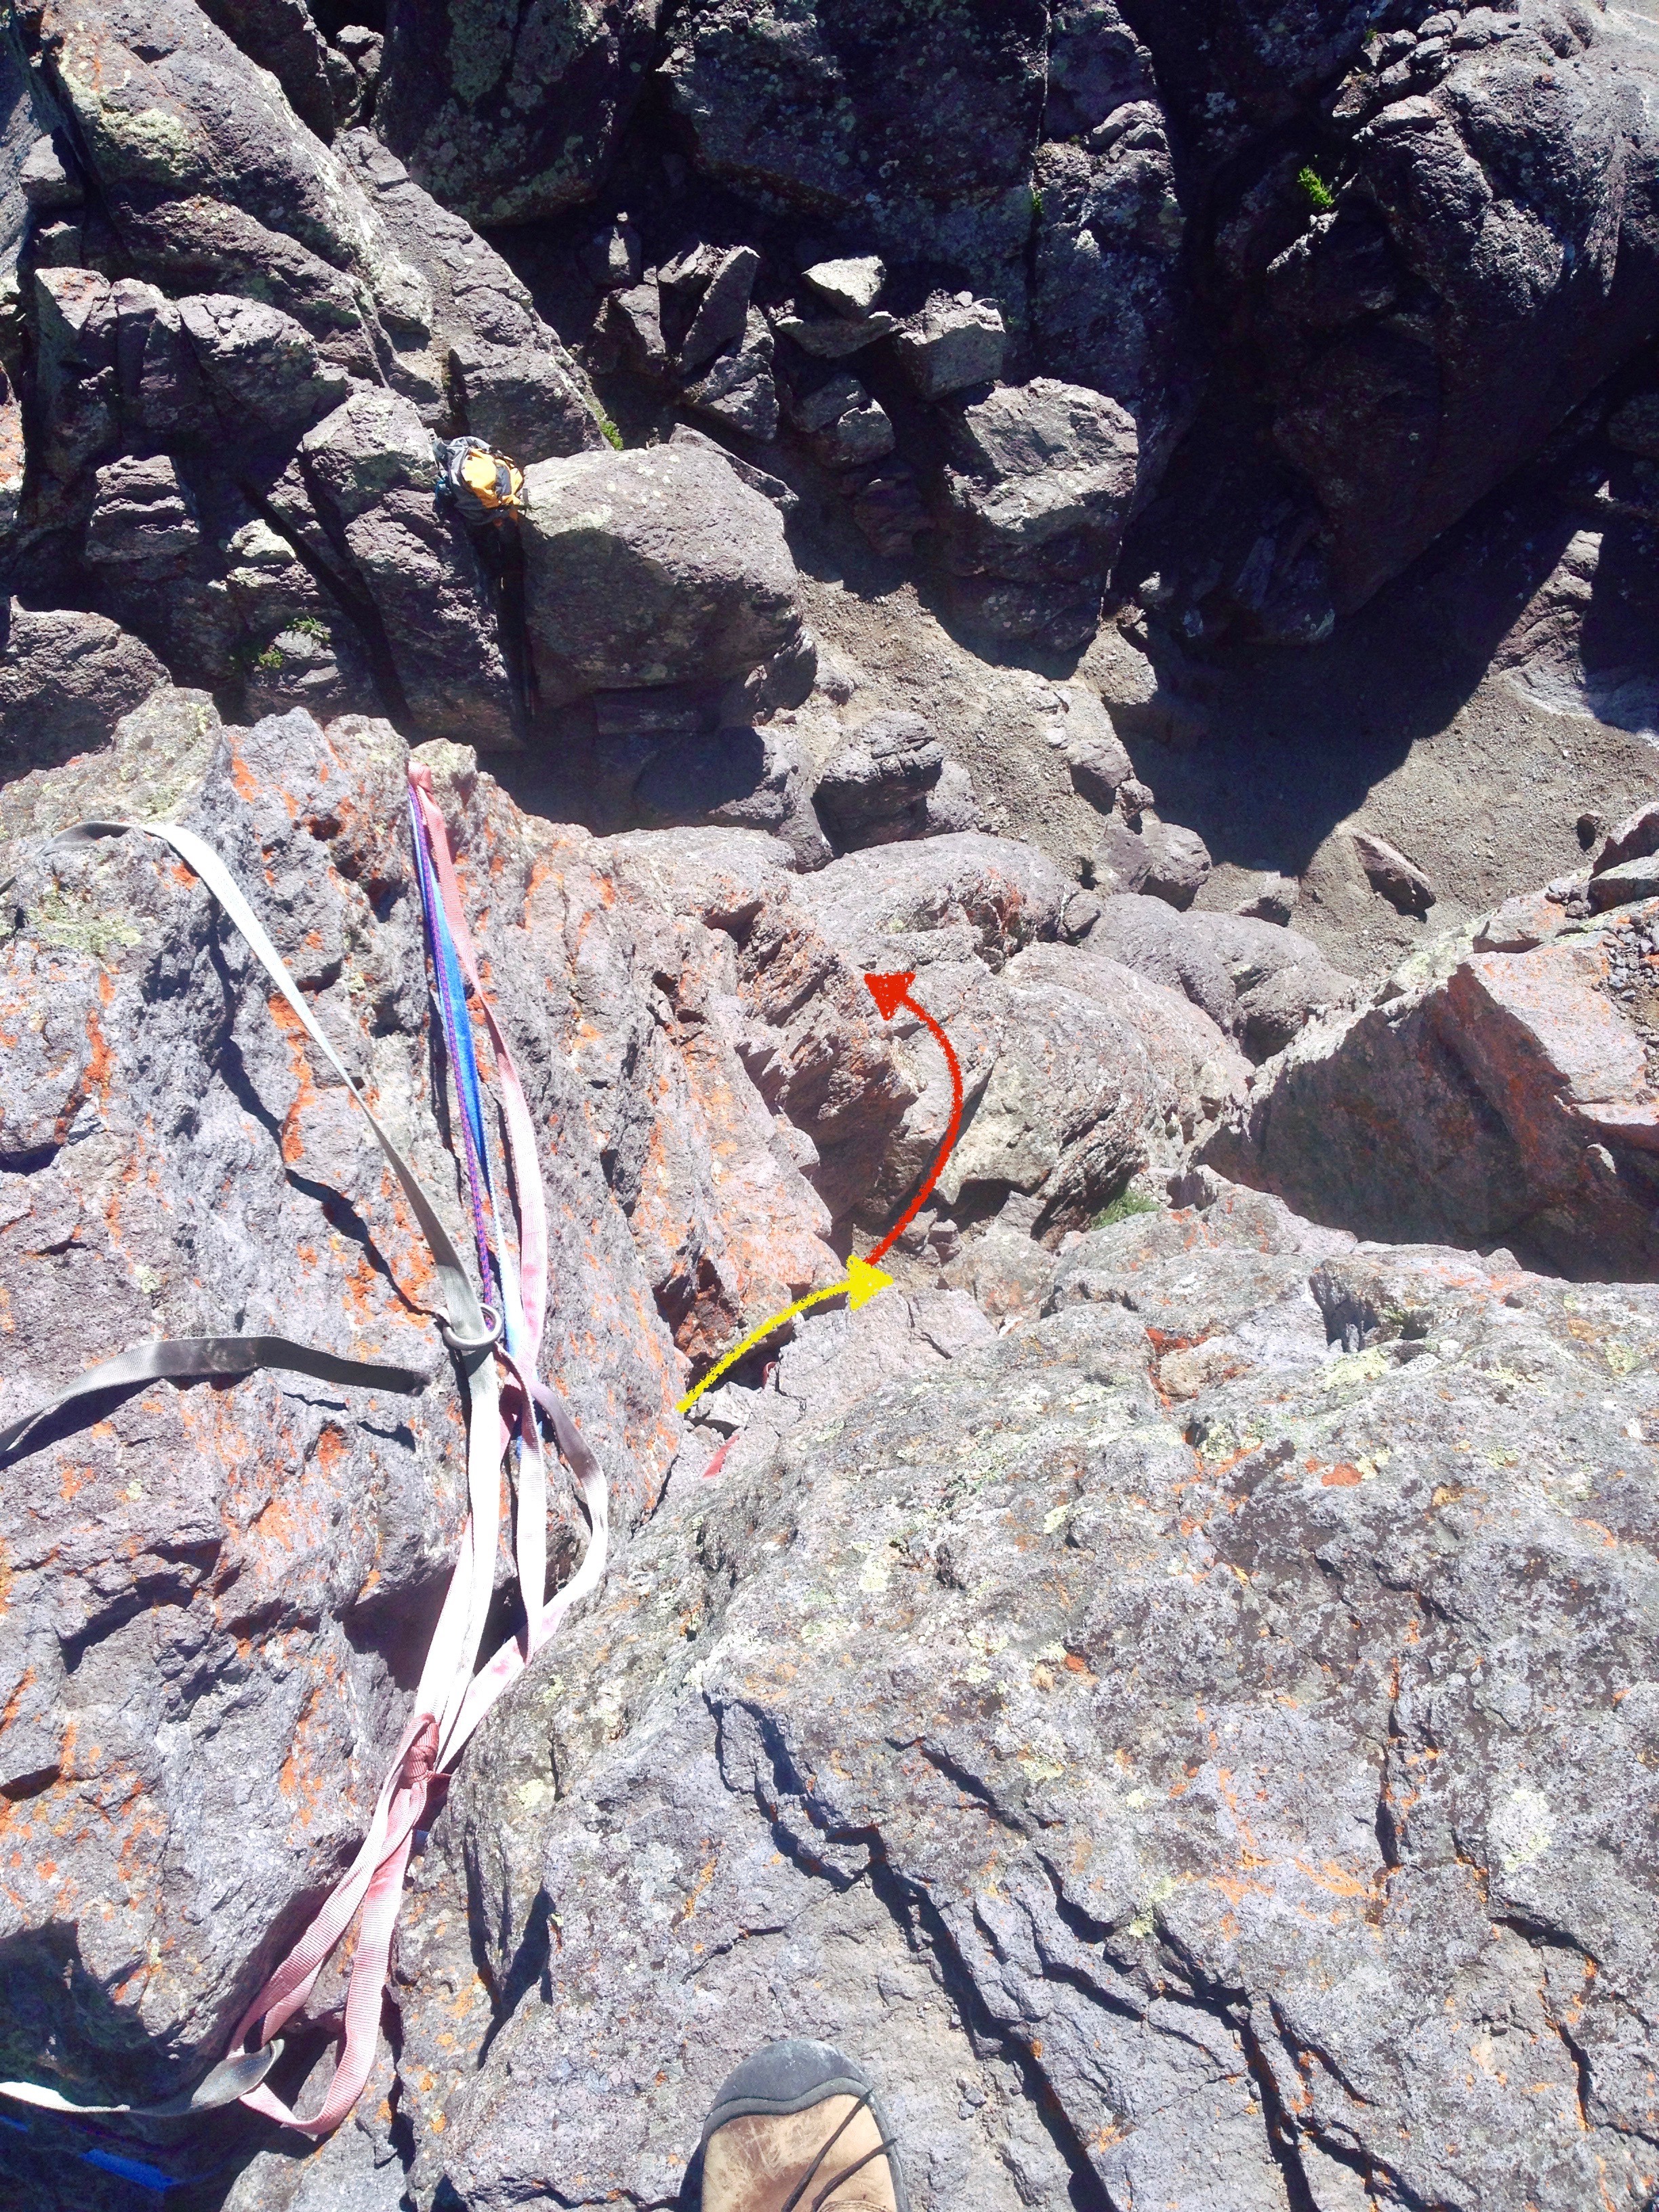
To descend, either downclimb or rappel the summit block and retrace your steps over to the bottom of the black gully. If climbing Potosi also, continue back to the base of Coffee Pot, and then down the ridge to the Teakettle/Potosi saddle. If Teakettle is your only goal, it's possible to save yourself the re-climb up to Coffee Pot and descend the basin below you. This has been described by many as incredibly loose and one of the worst descents in the San Juans. Alternatively, you can re-climb to Coffee Pot, follow the ridge, and descend from the Teakettle/Potosi saddle. This option isn't exactly pleasant either, so choose your poison and prepare to drink deeply from it.
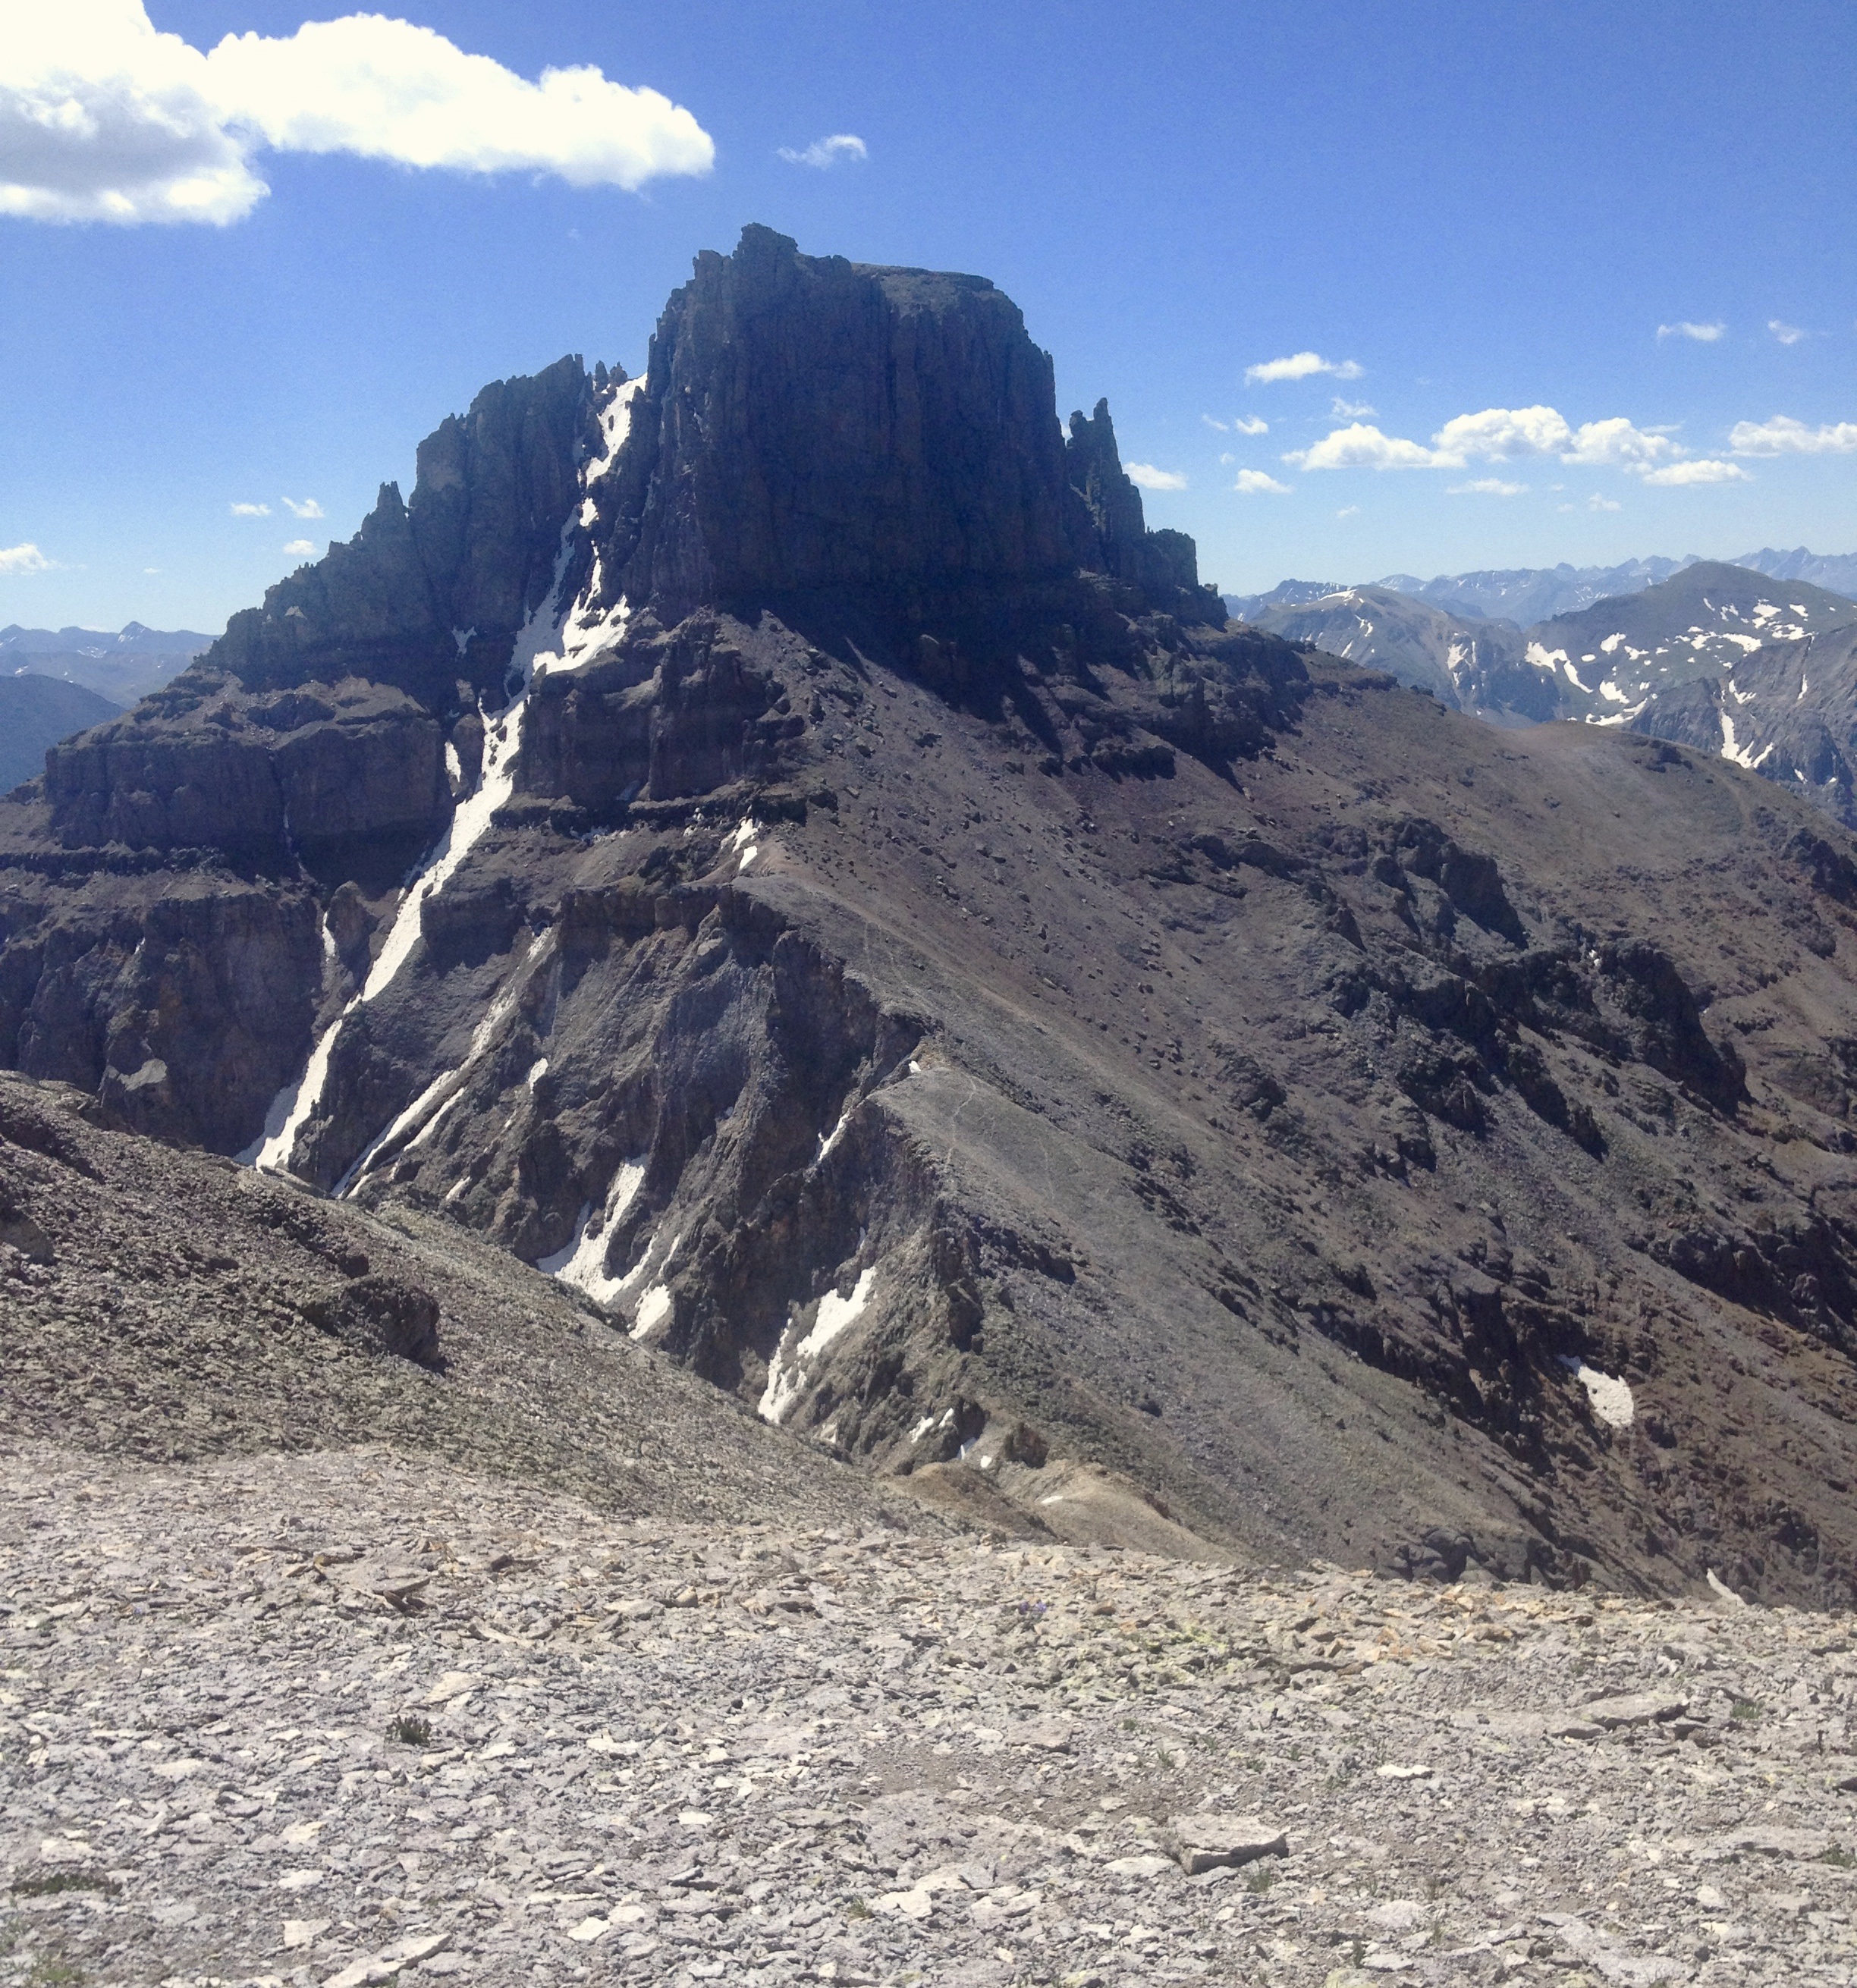
Click thumbnail to view full-size photo + captionRoute Description
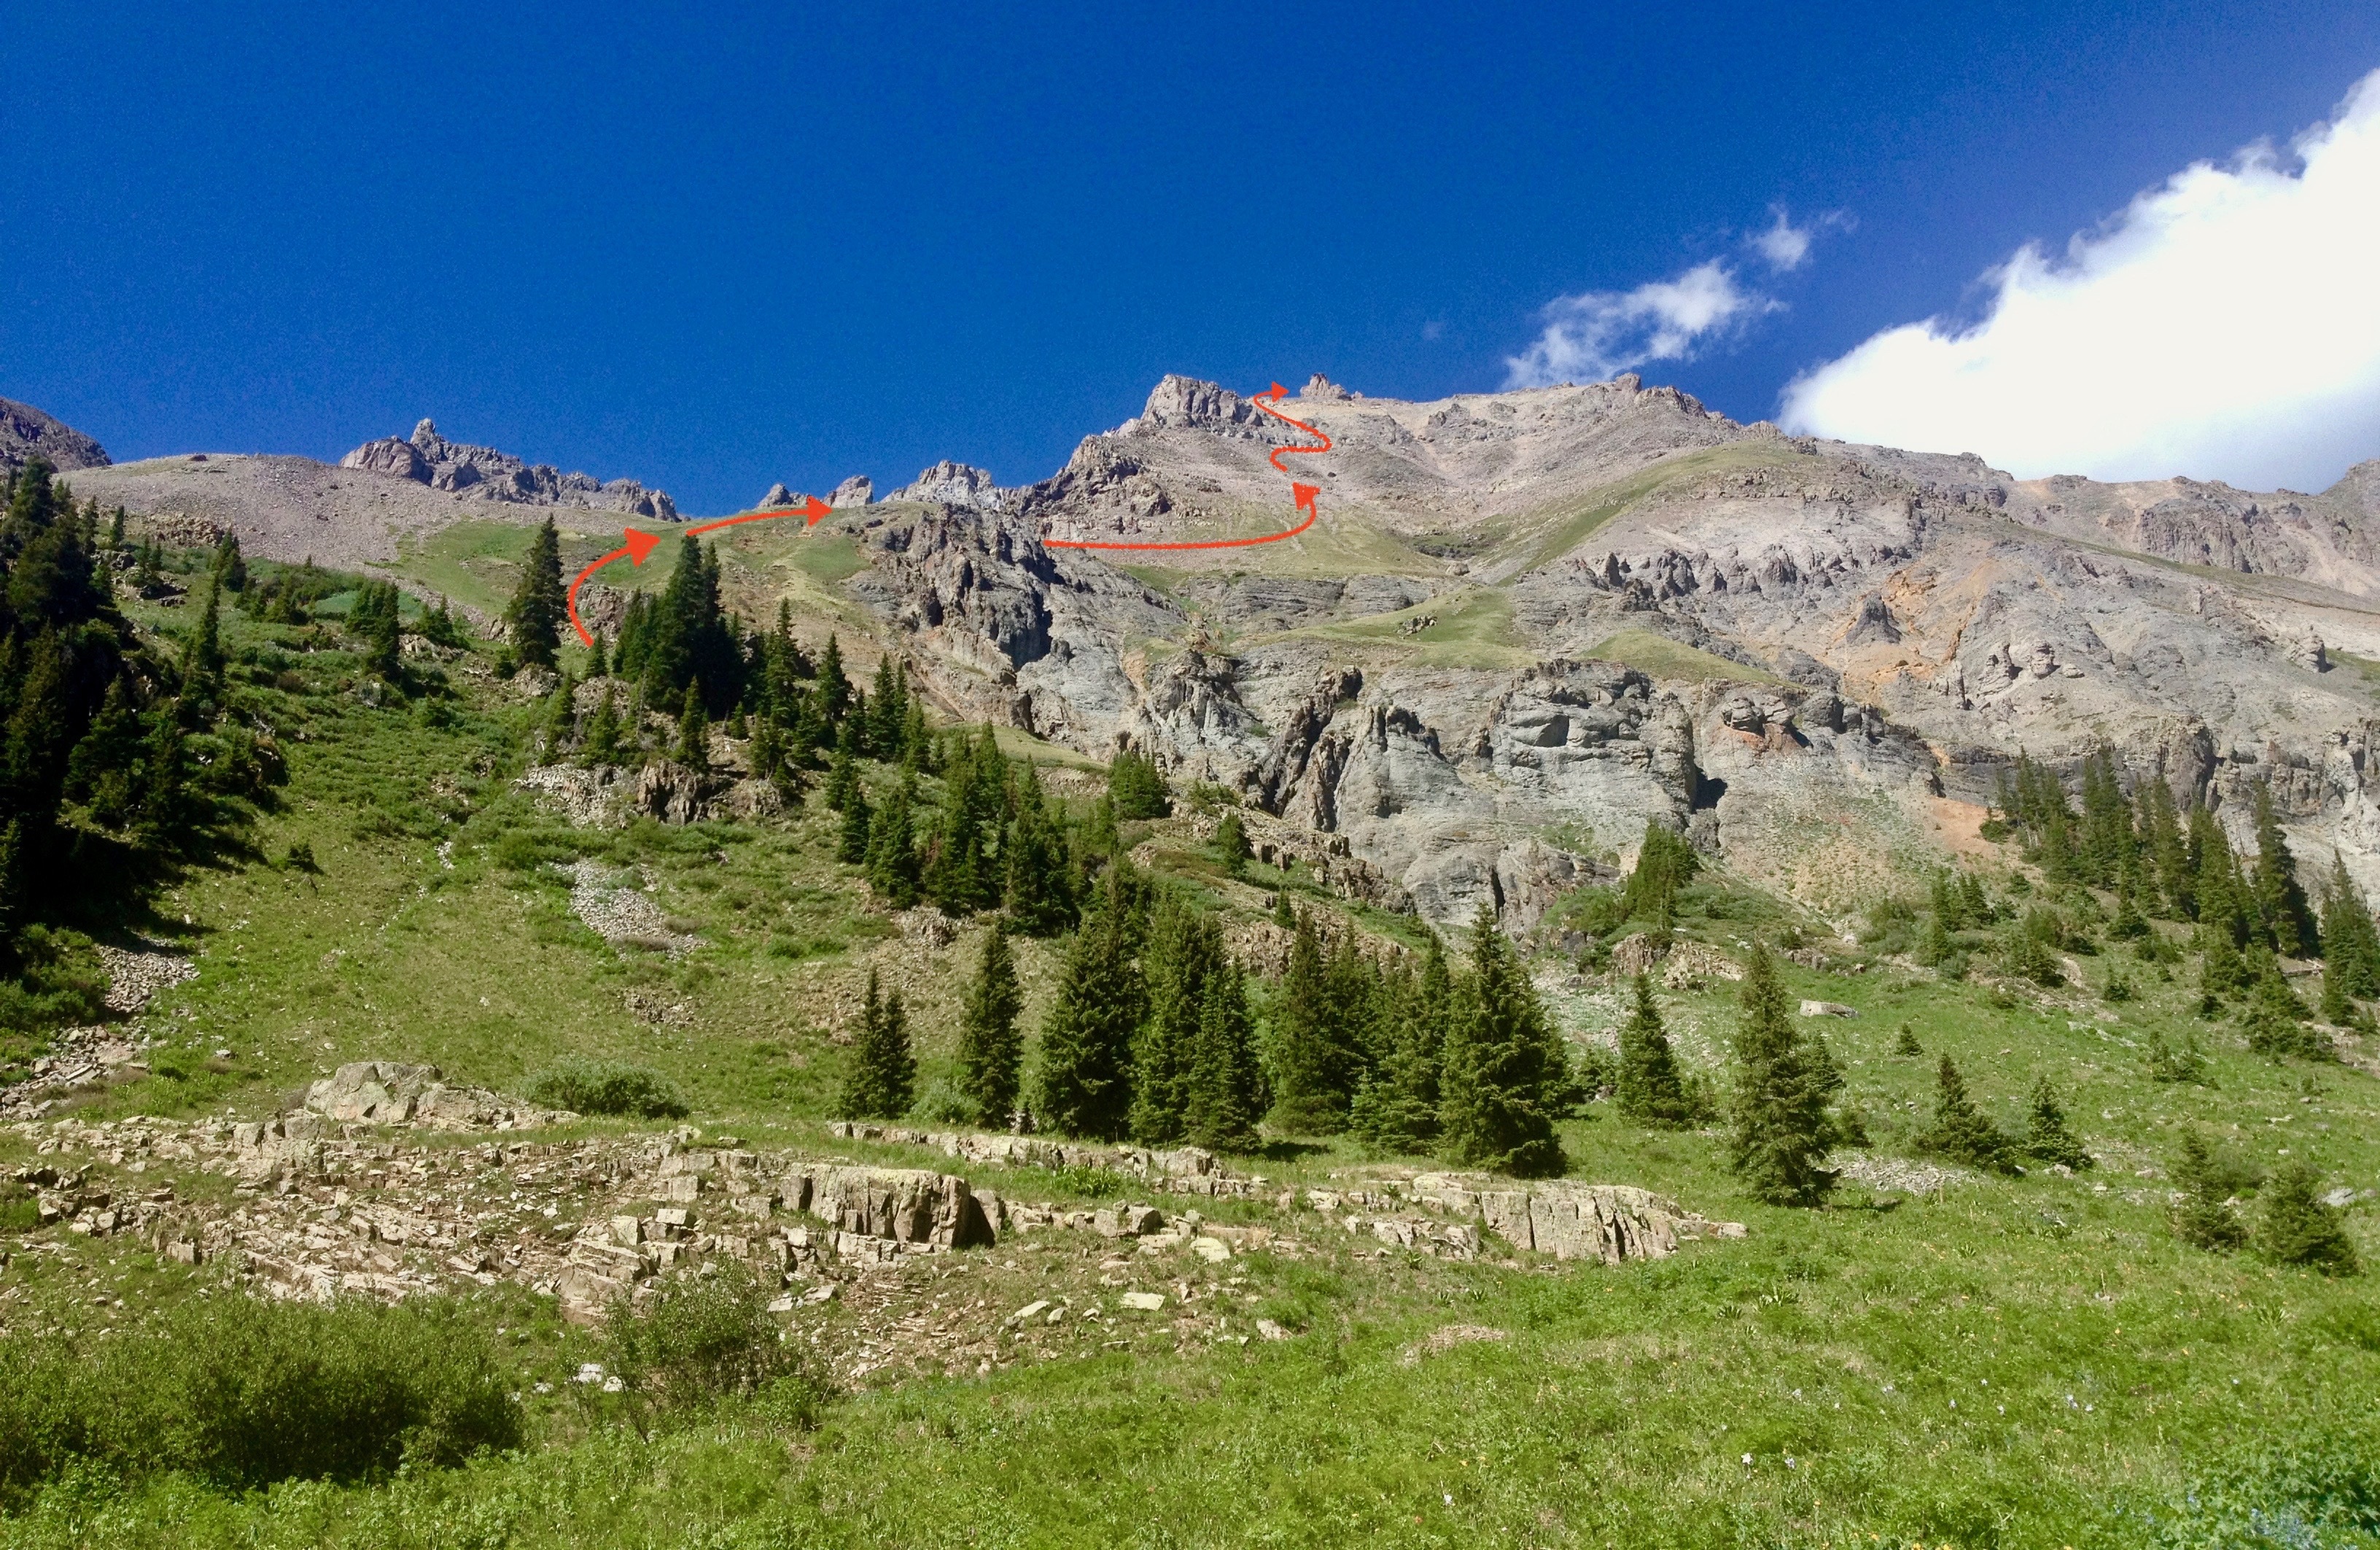
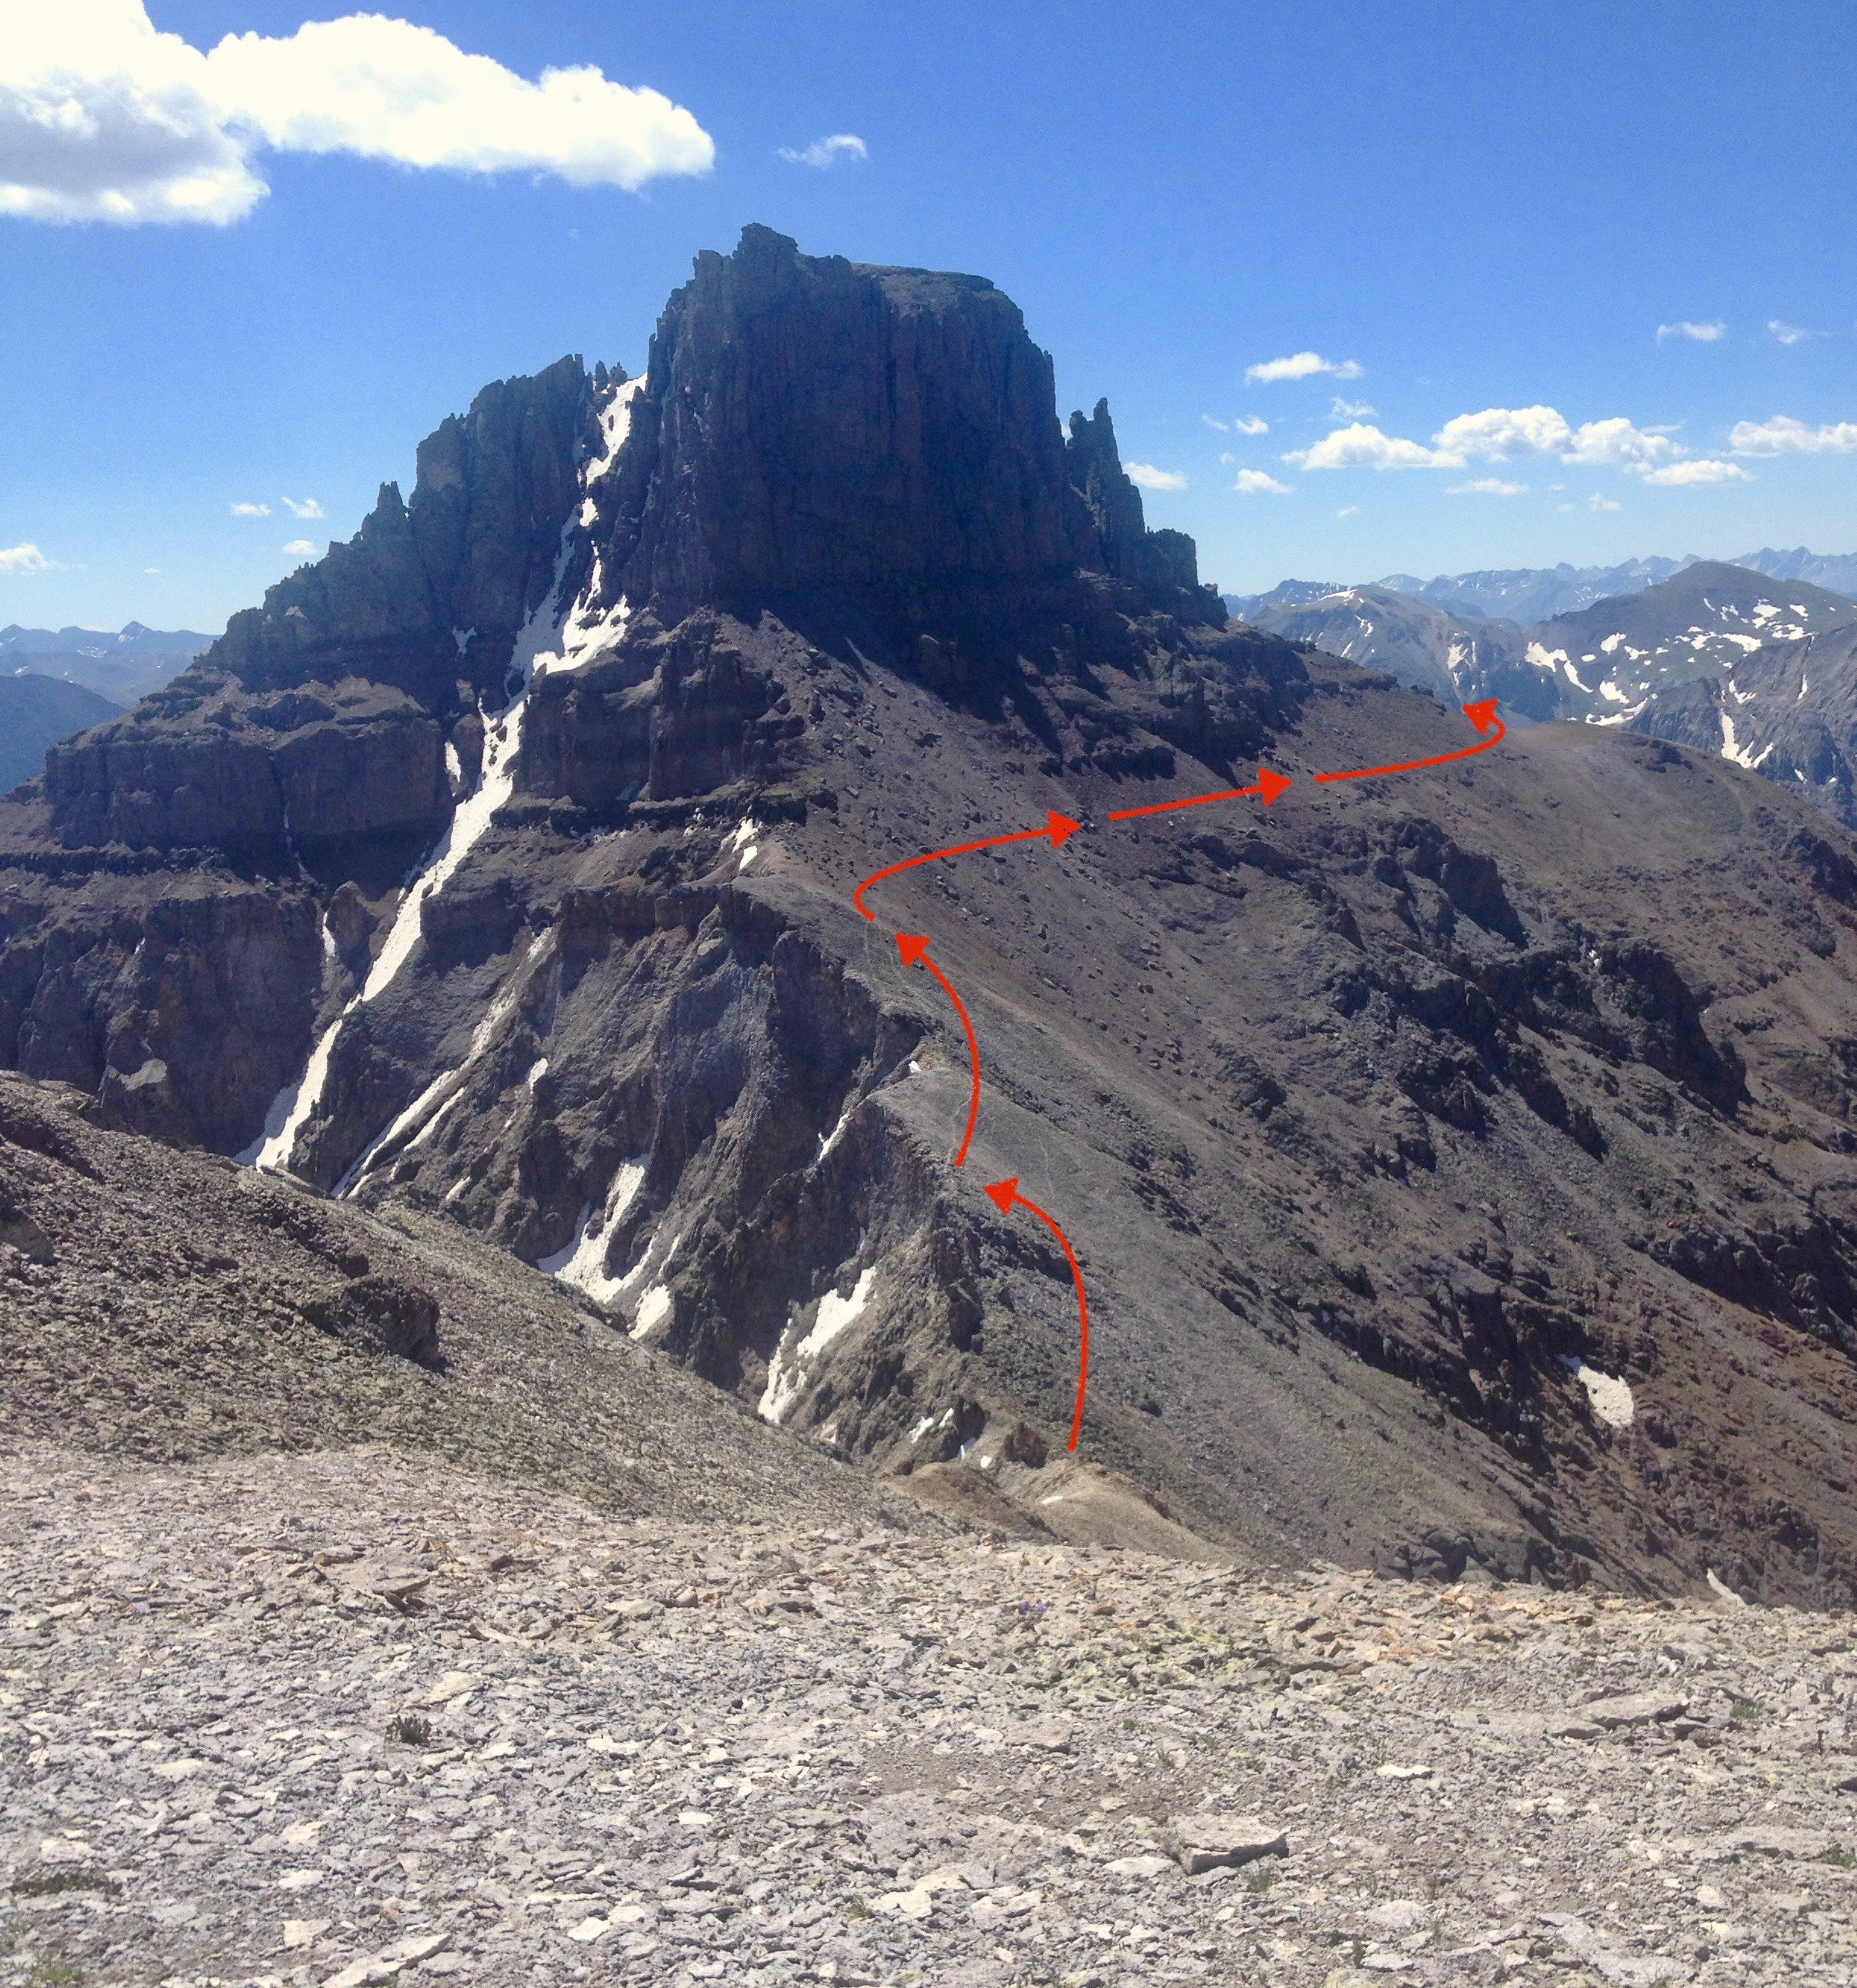
Year Climbed: 2018There is plenty of good information via Gerry & Jennifer Roach + Bob Martin & Mike Garratt on how to climb this peak. Their accounts both follow a similar, but convoluted sounding route that traverses the West & South faces of Potosi, finally climbing up a gully on the SE side of the peak. The target gully on the SE side of the peak is correct, but these accounts can be greatly simplified to avoid confusion. The short of it is to traverse across the west face of Potosi to a broad level area on the SW ridge below all the summit cliffs, then briefly climb this ridge up toward the summit cliffs before traversing across the S/SE face to the 3rd major gully that breaks through the summit cliffs. For a more detailed account, continue reading....
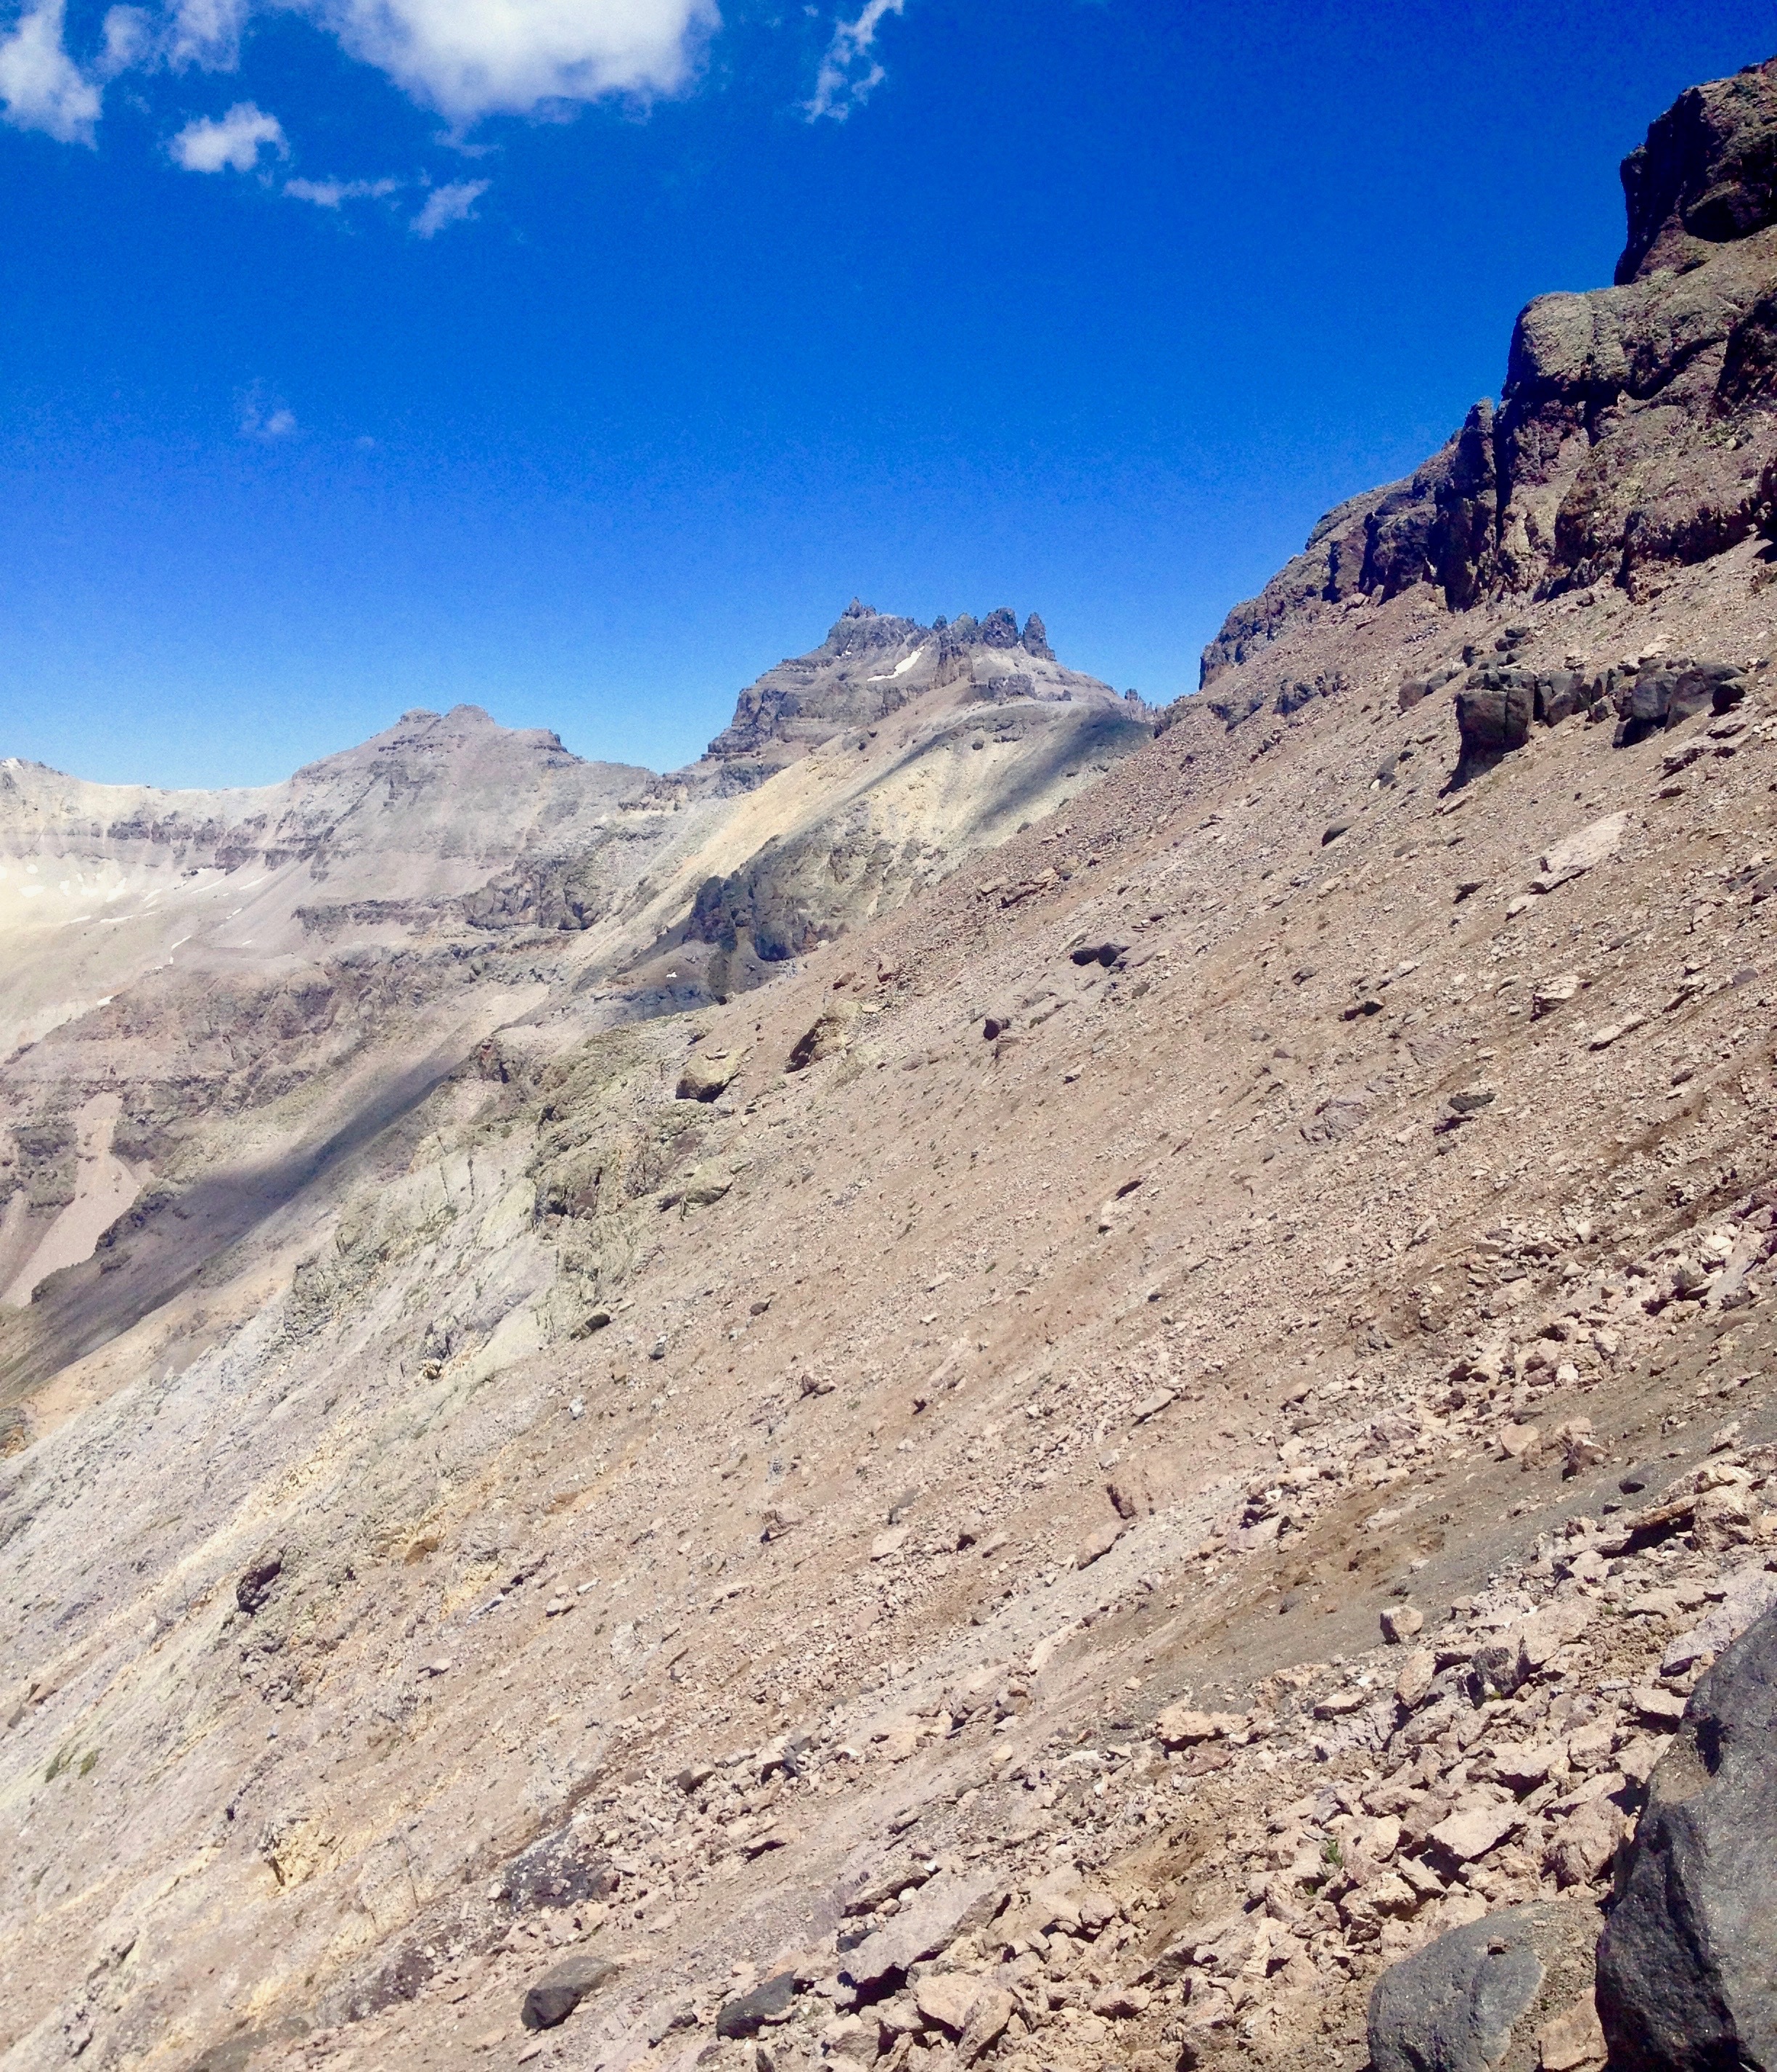
Assuming you're coming from the neighborhood of Coffee Pot, take a moment to survey the west face of Potosi. On the ridge extending toward you, if the snow has melted, you'll see a climber's trail taking off up the ridge that veers right—off of the ridge crest—well before the ridge intersects the cliffs. If you look closely, you'll see this trail lead across an area on the west face that is free of any major gullies or cliffs—gently gaining elevation at first before leveling its angle as it continues toward the SW ridge. Note a large, broad, level area on the SW ridge of Potosi that is comfortably below the summit block and the minor cliff bands immediately below it. You will want to aim for this spot, so take a moment to study the terrain and plot your course.
Carefully descend to the Coffee Pot/Potosi saddle. Along your way, there is a decent climber's trail that navigates this section—leading down & around several rough sections in the ridge. Use your best judgement to navigate this section and use caution. (Class 2+) Leaving the ridge crest, while at first reasonable and relatively fast-going, brings you into precariously loose & unstable terrain with an abundance of sharp rocks that are just waiting for an excuse to cut loose from their teetering position on the side of this slope. Tread carefully. You may be better off staying closer to the ridge crest, if possible.
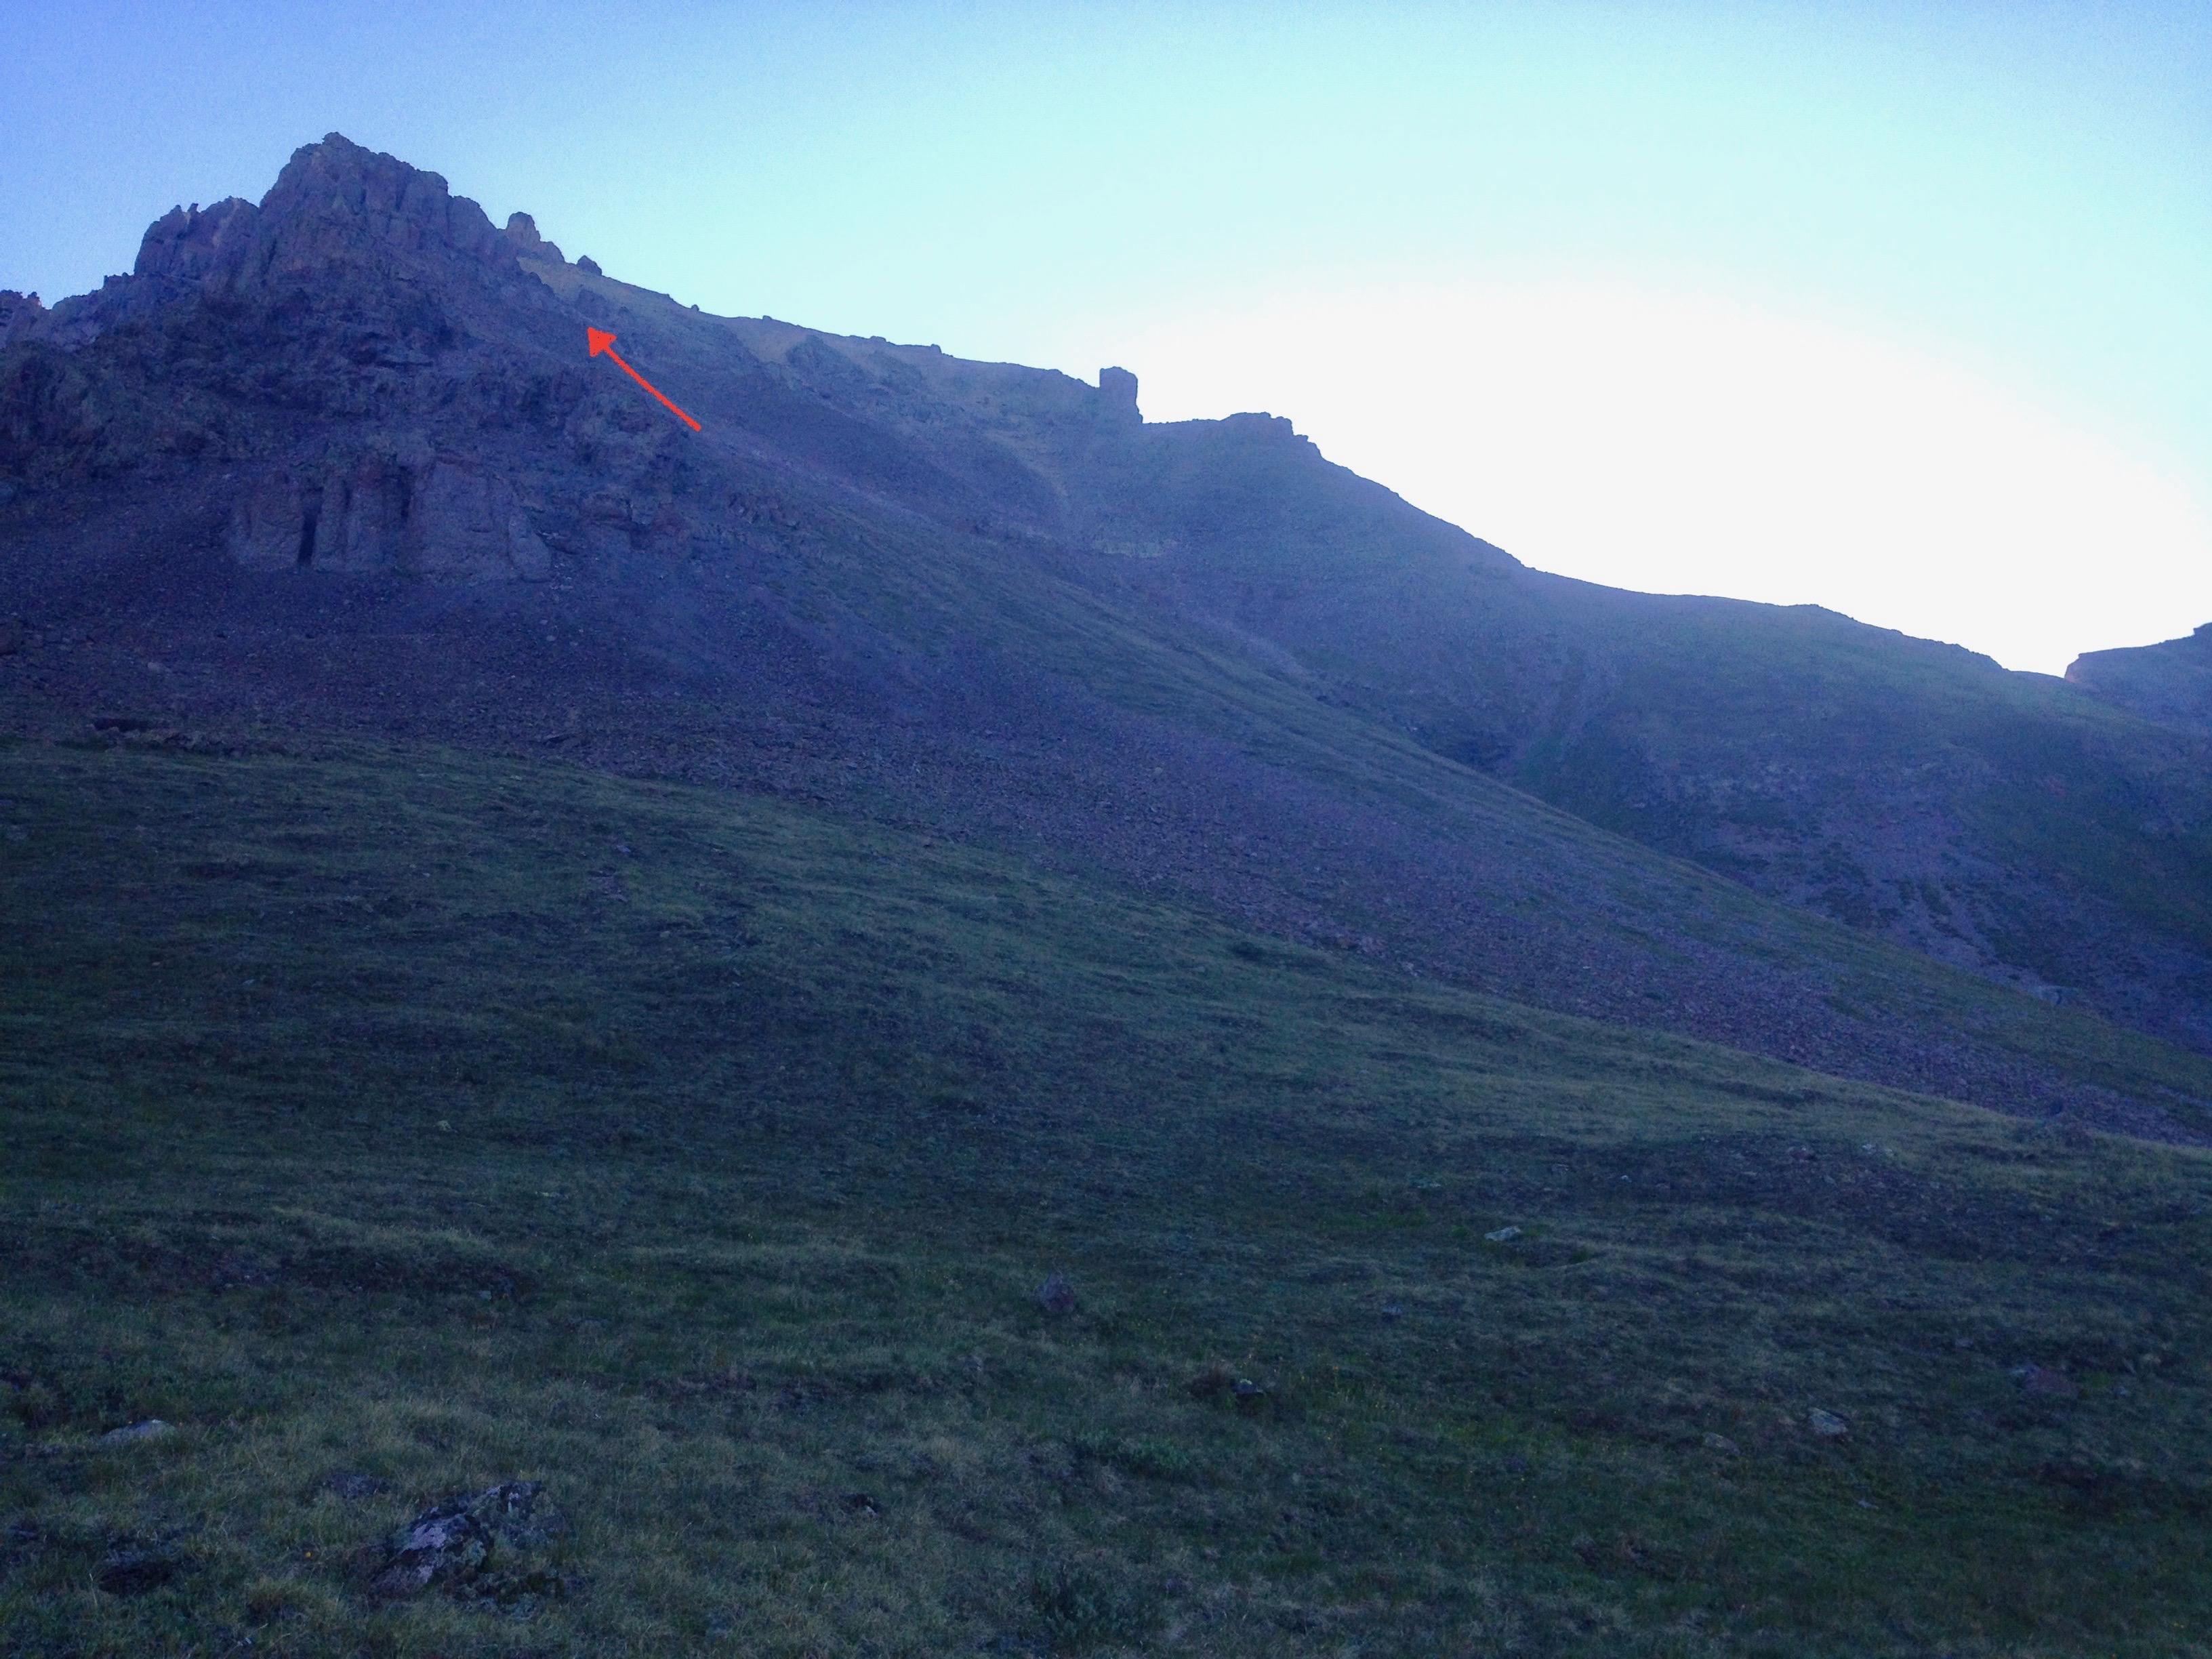
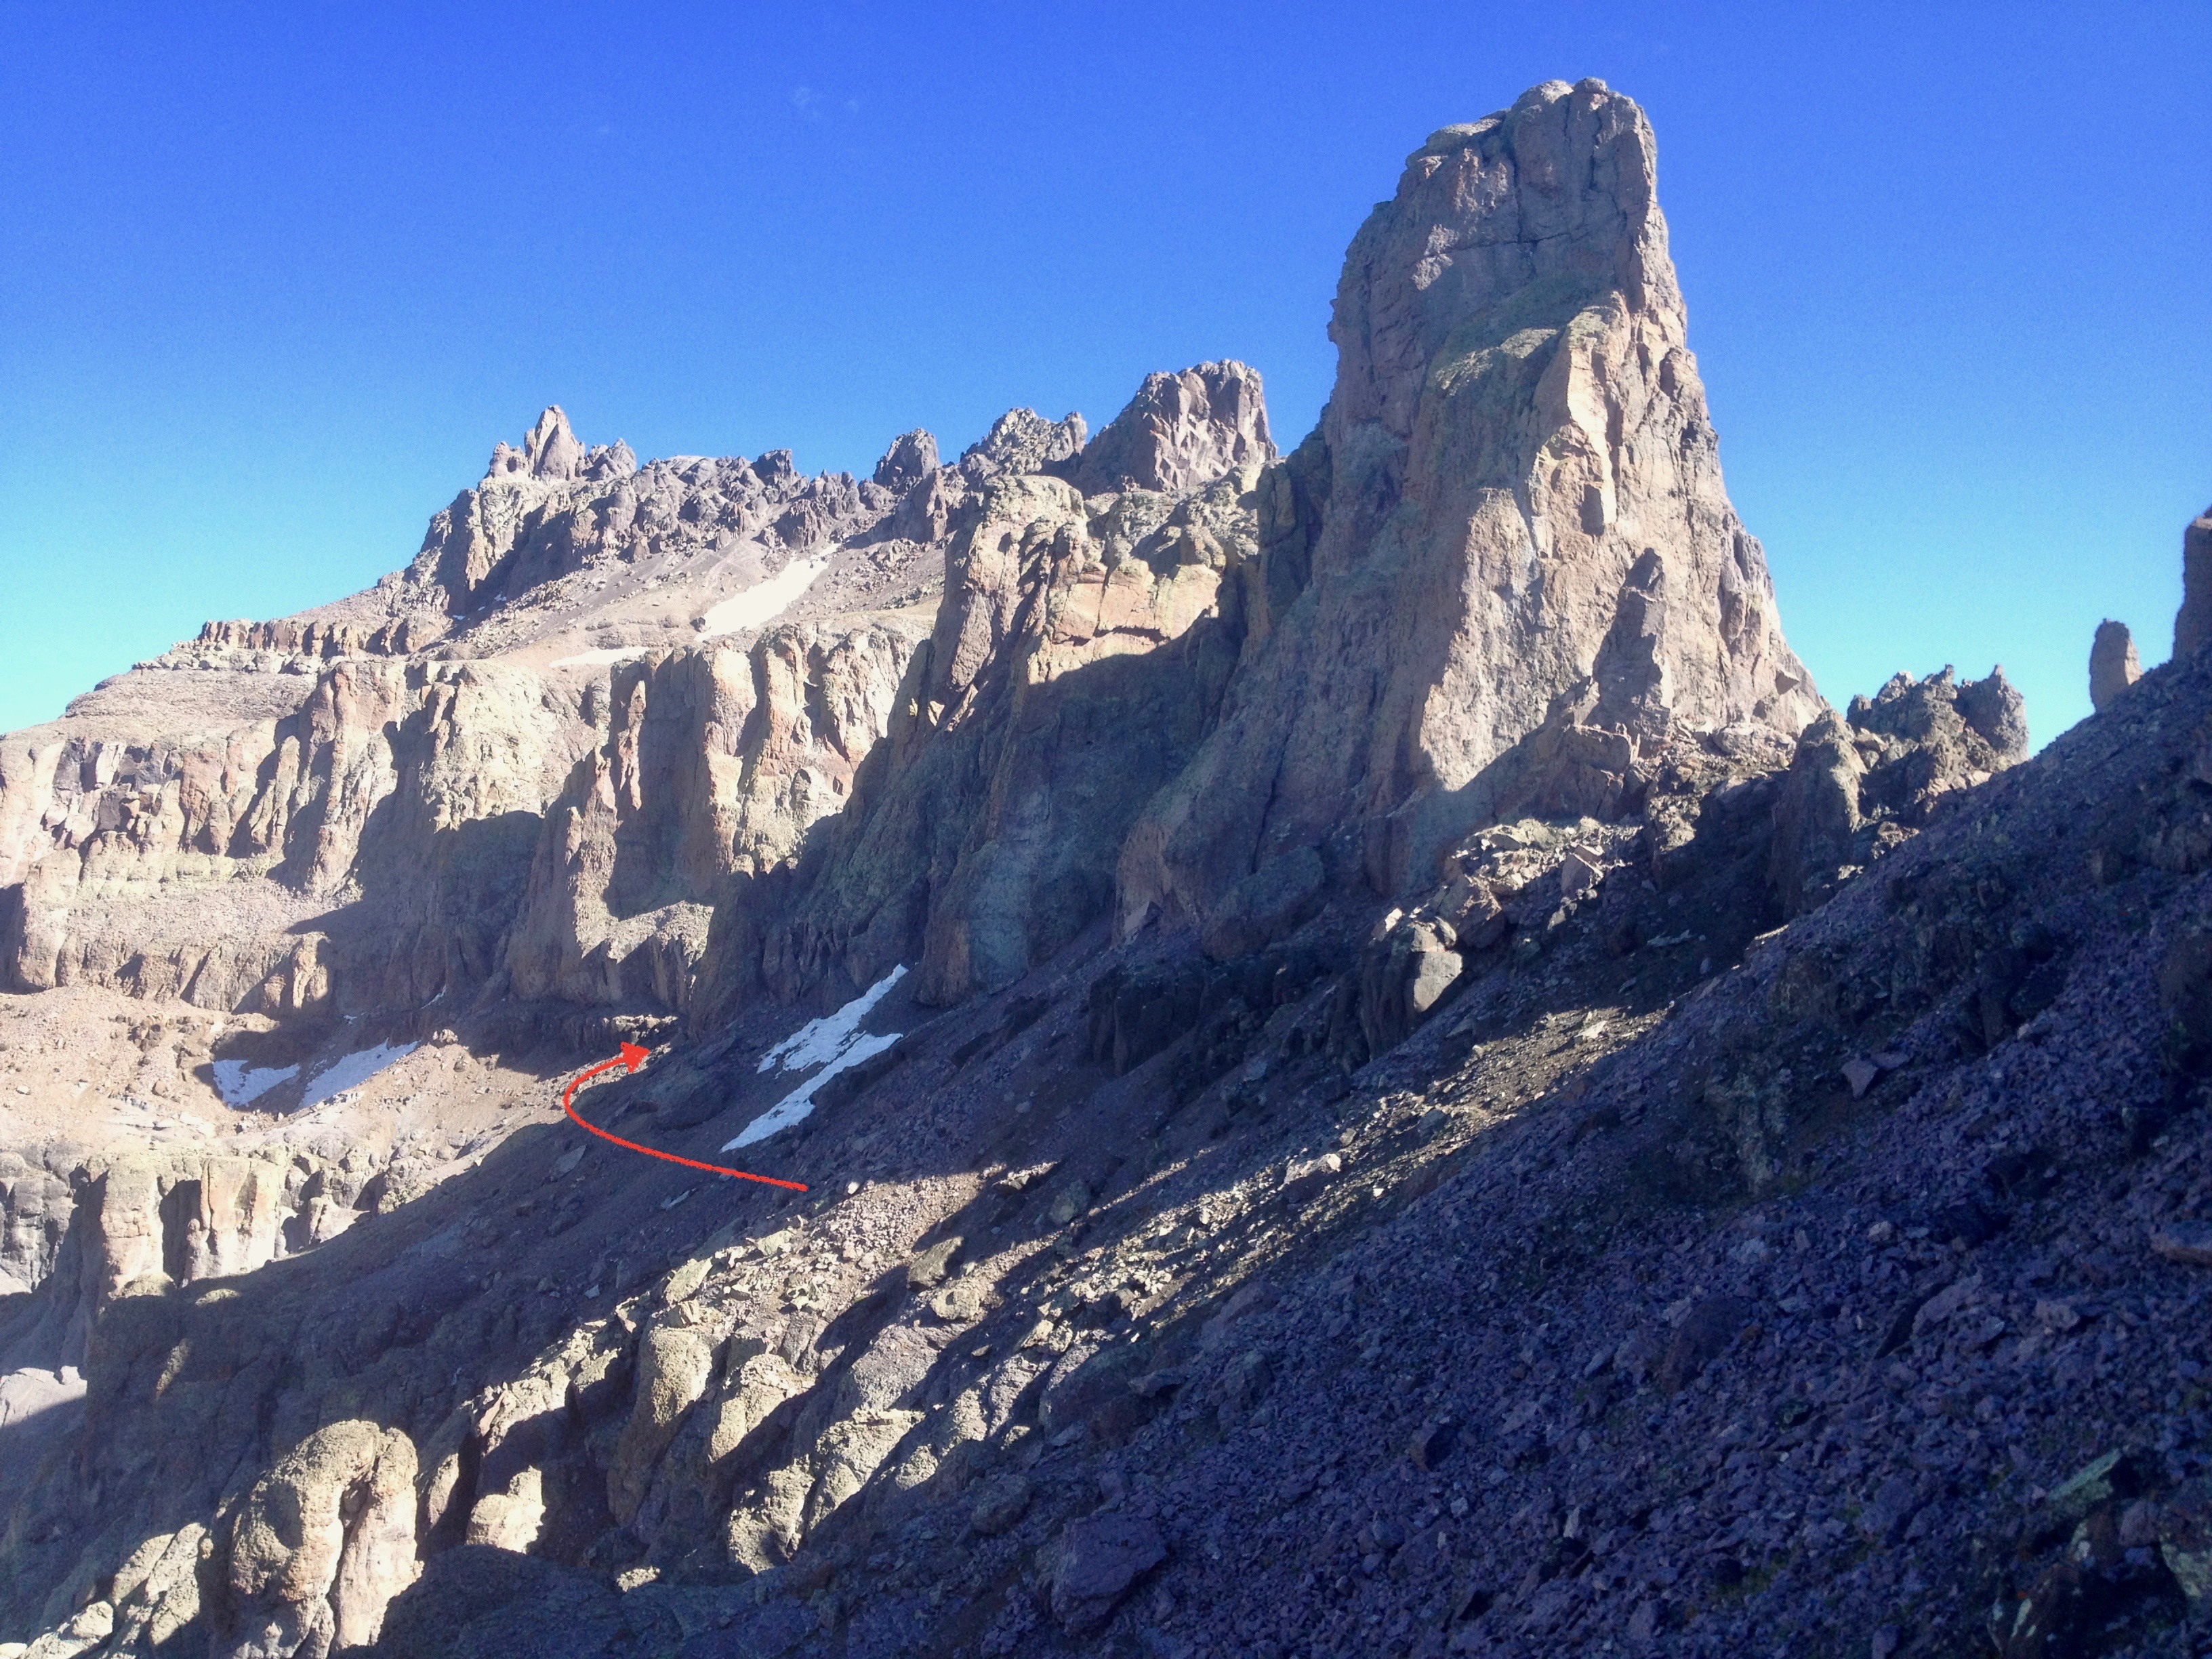
Once at the saddle, follow the climbers trail up the ridge crest for a few hundred feet. The terrain closer to the ridge crest is again the most stable. Follow it where feasible until you either see the trail veering off, or until you see an obvious break between the spires and gullies of Potosi's lower south face and the upper cliffs that traverses comfortably over on a sloping bench to the level spot on the SW ridge. Follow the use trail and series of small cairns to this flat spot on the SW ridge. Nothing on this slope should exceed class 2 or class 2+. Avoid any temptation to gain significant elevation.
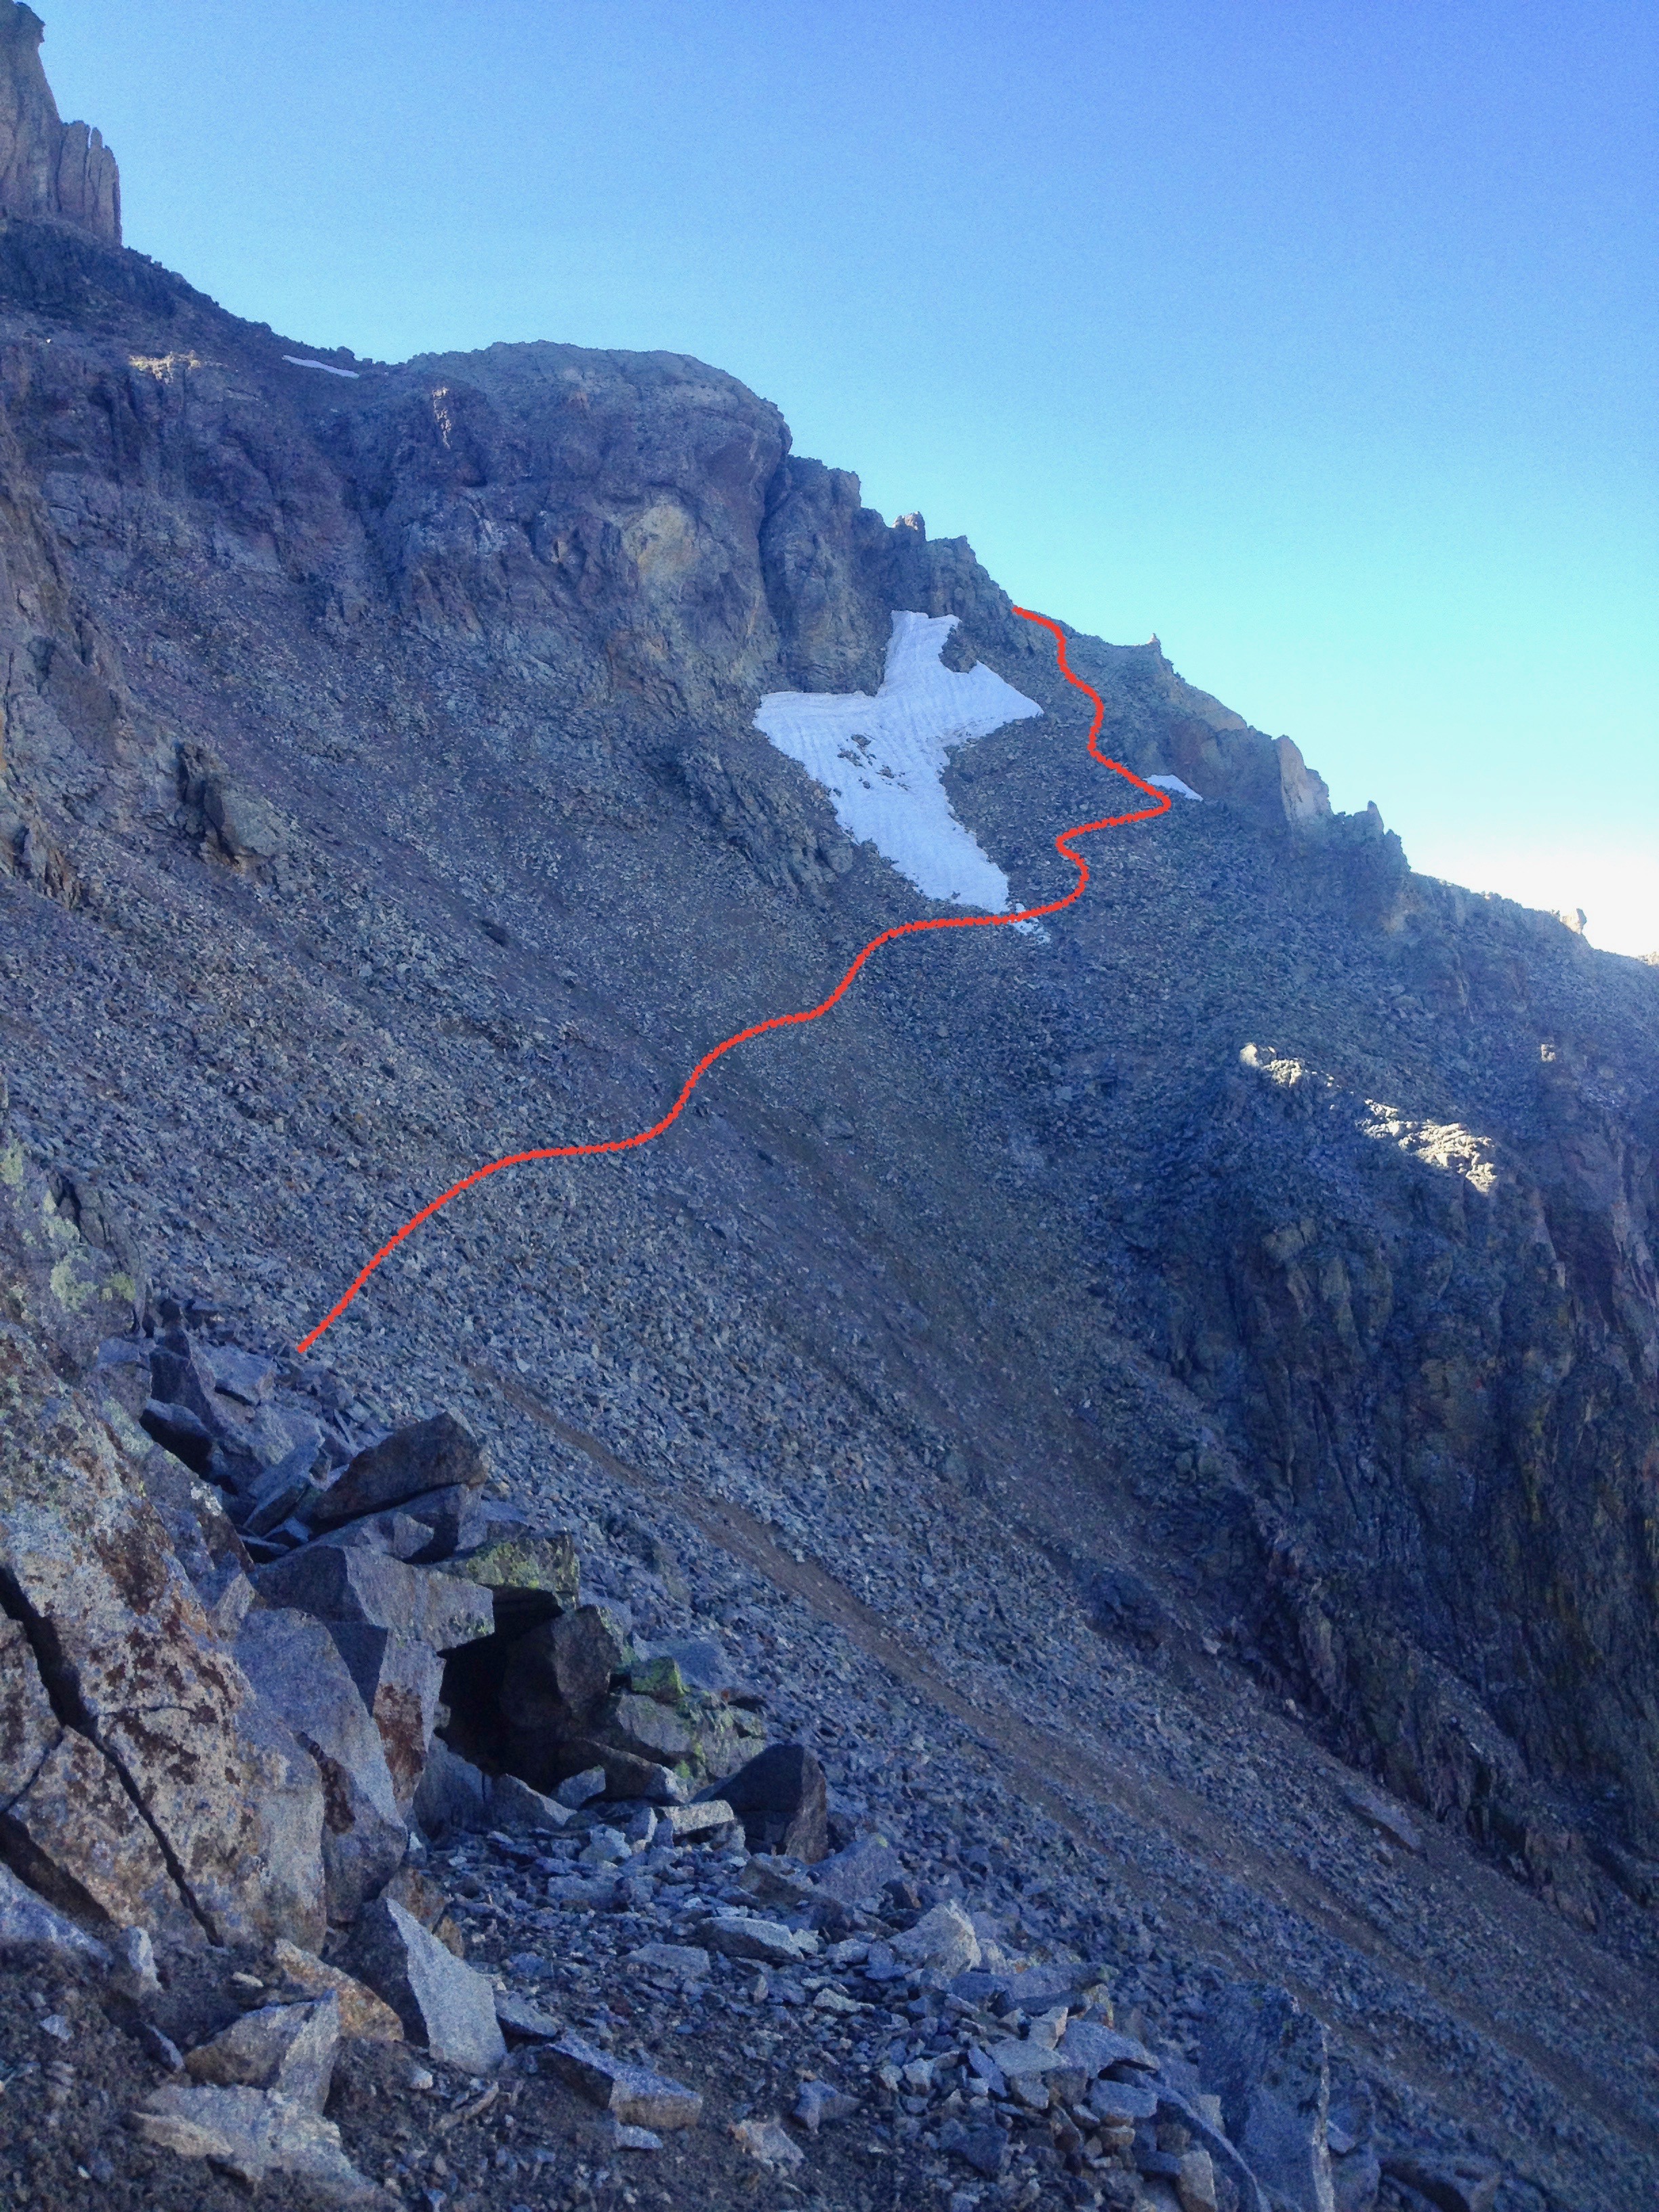
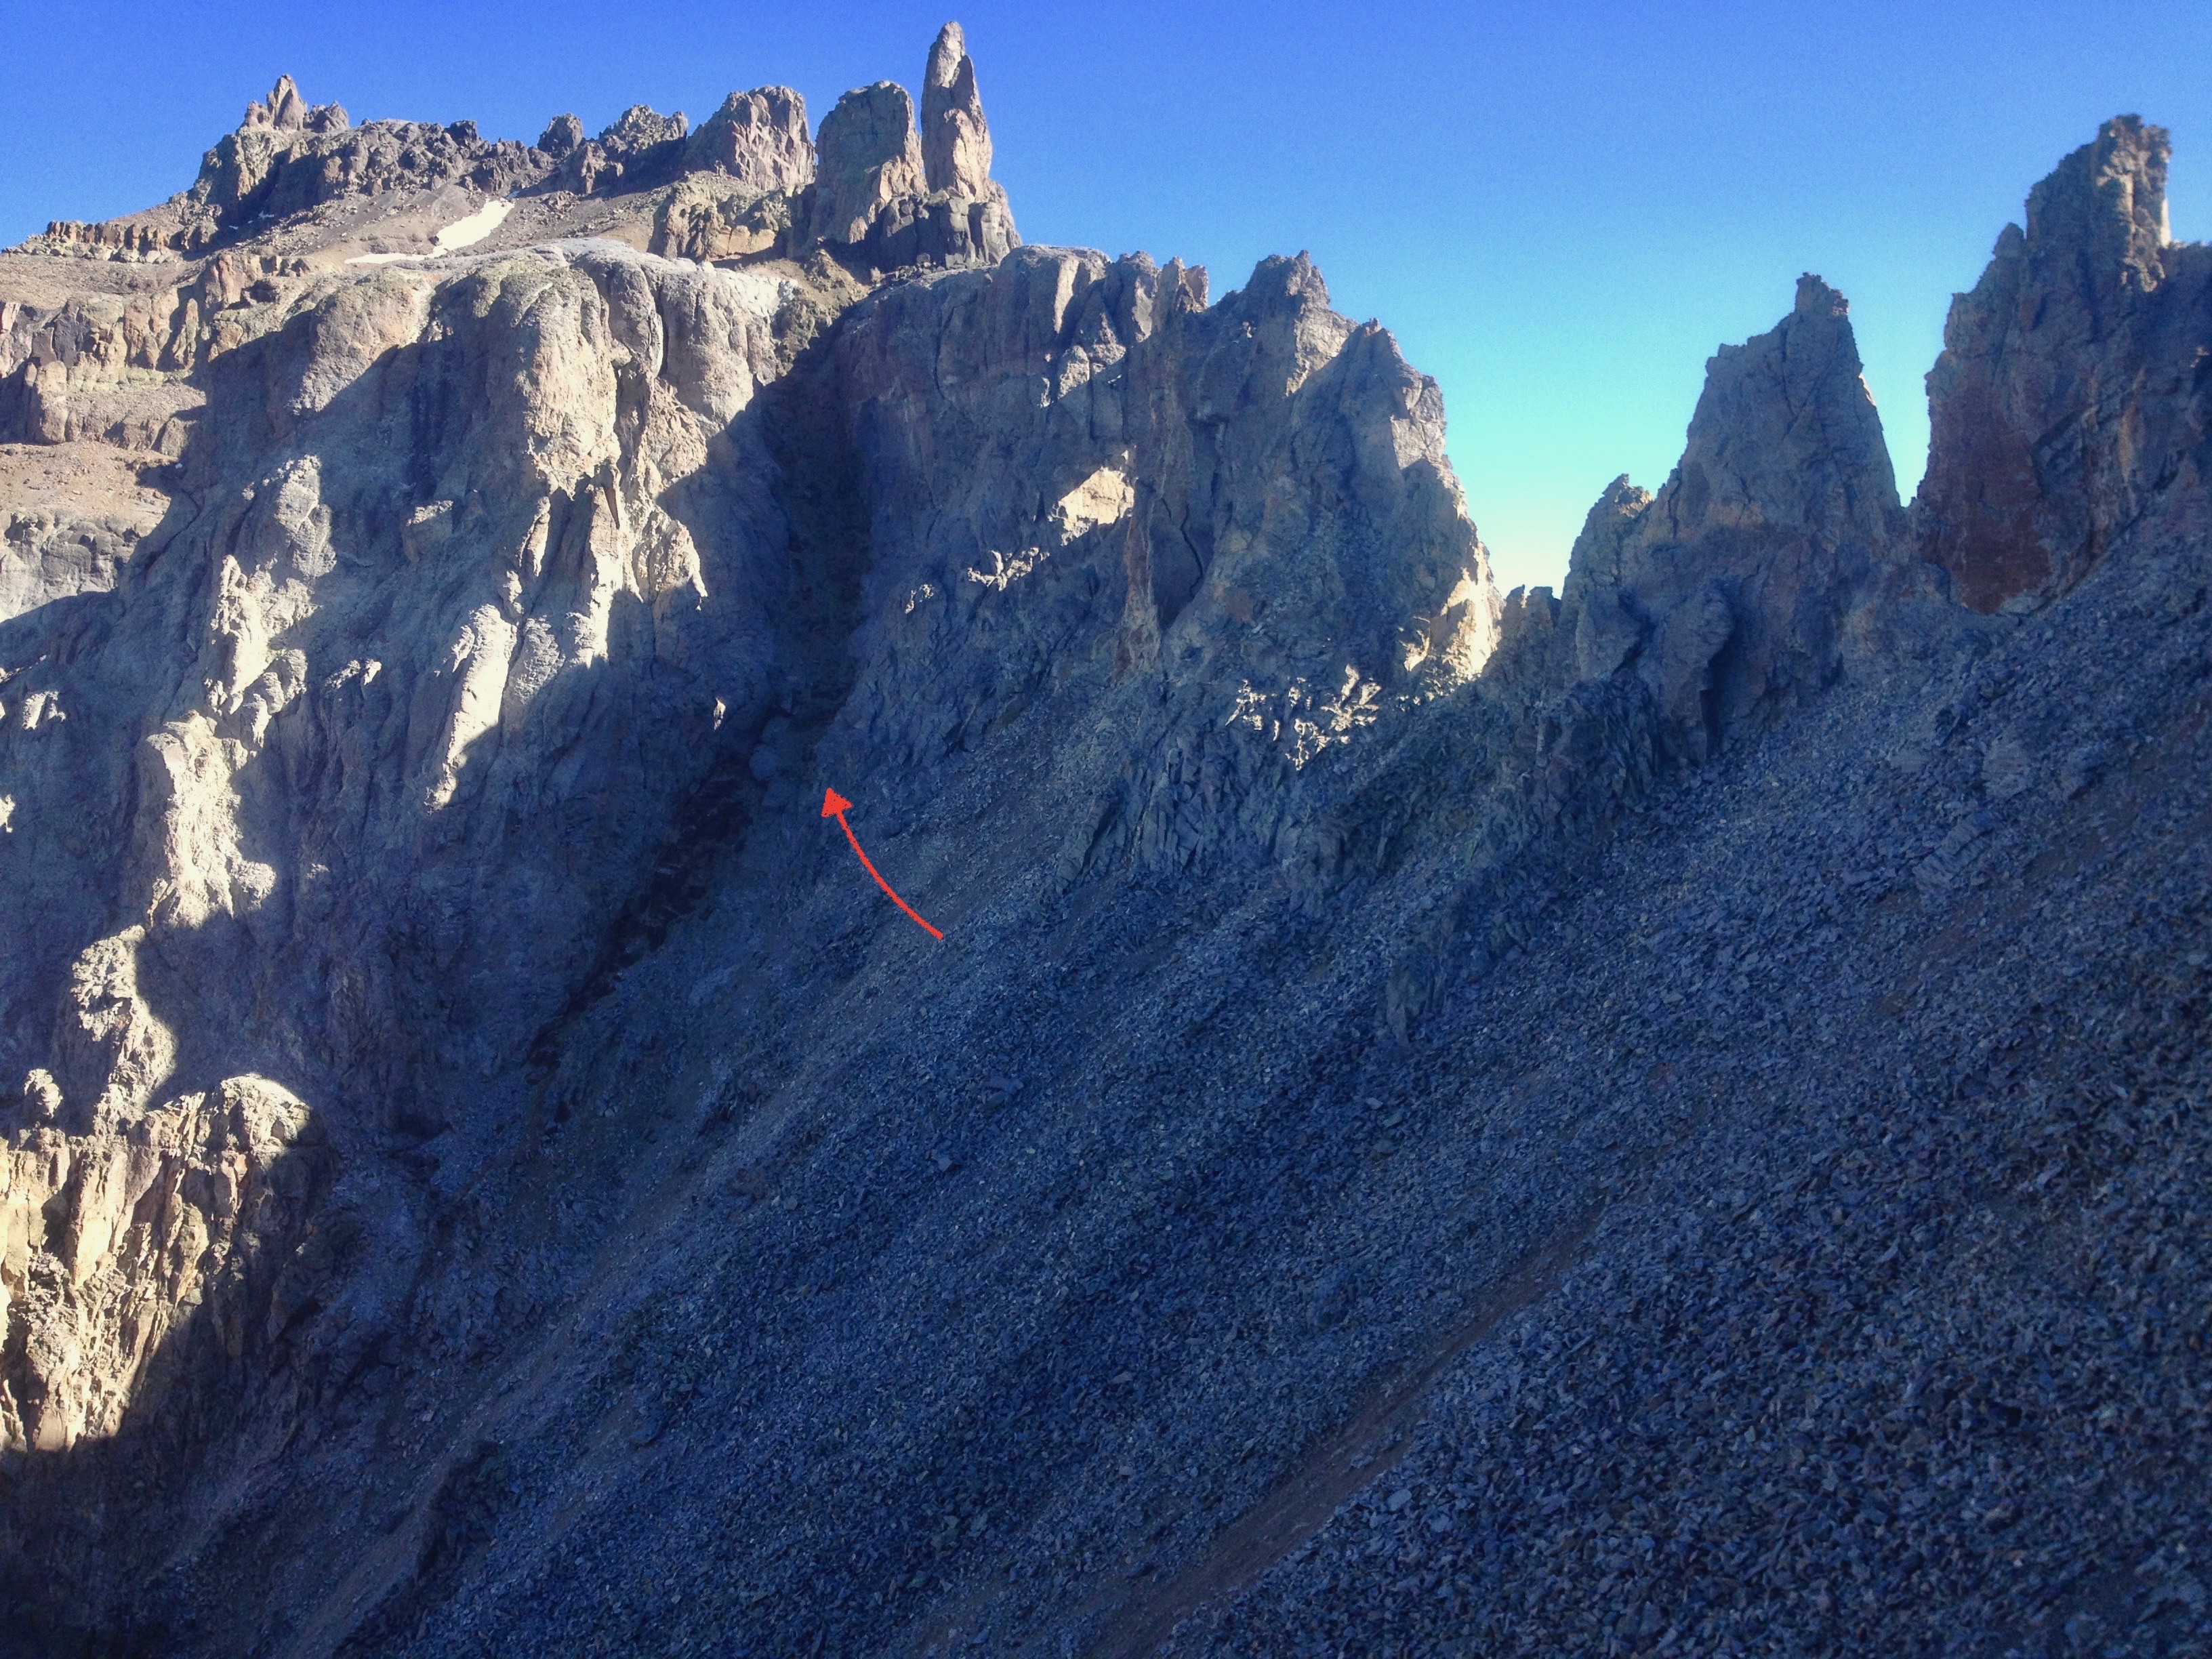
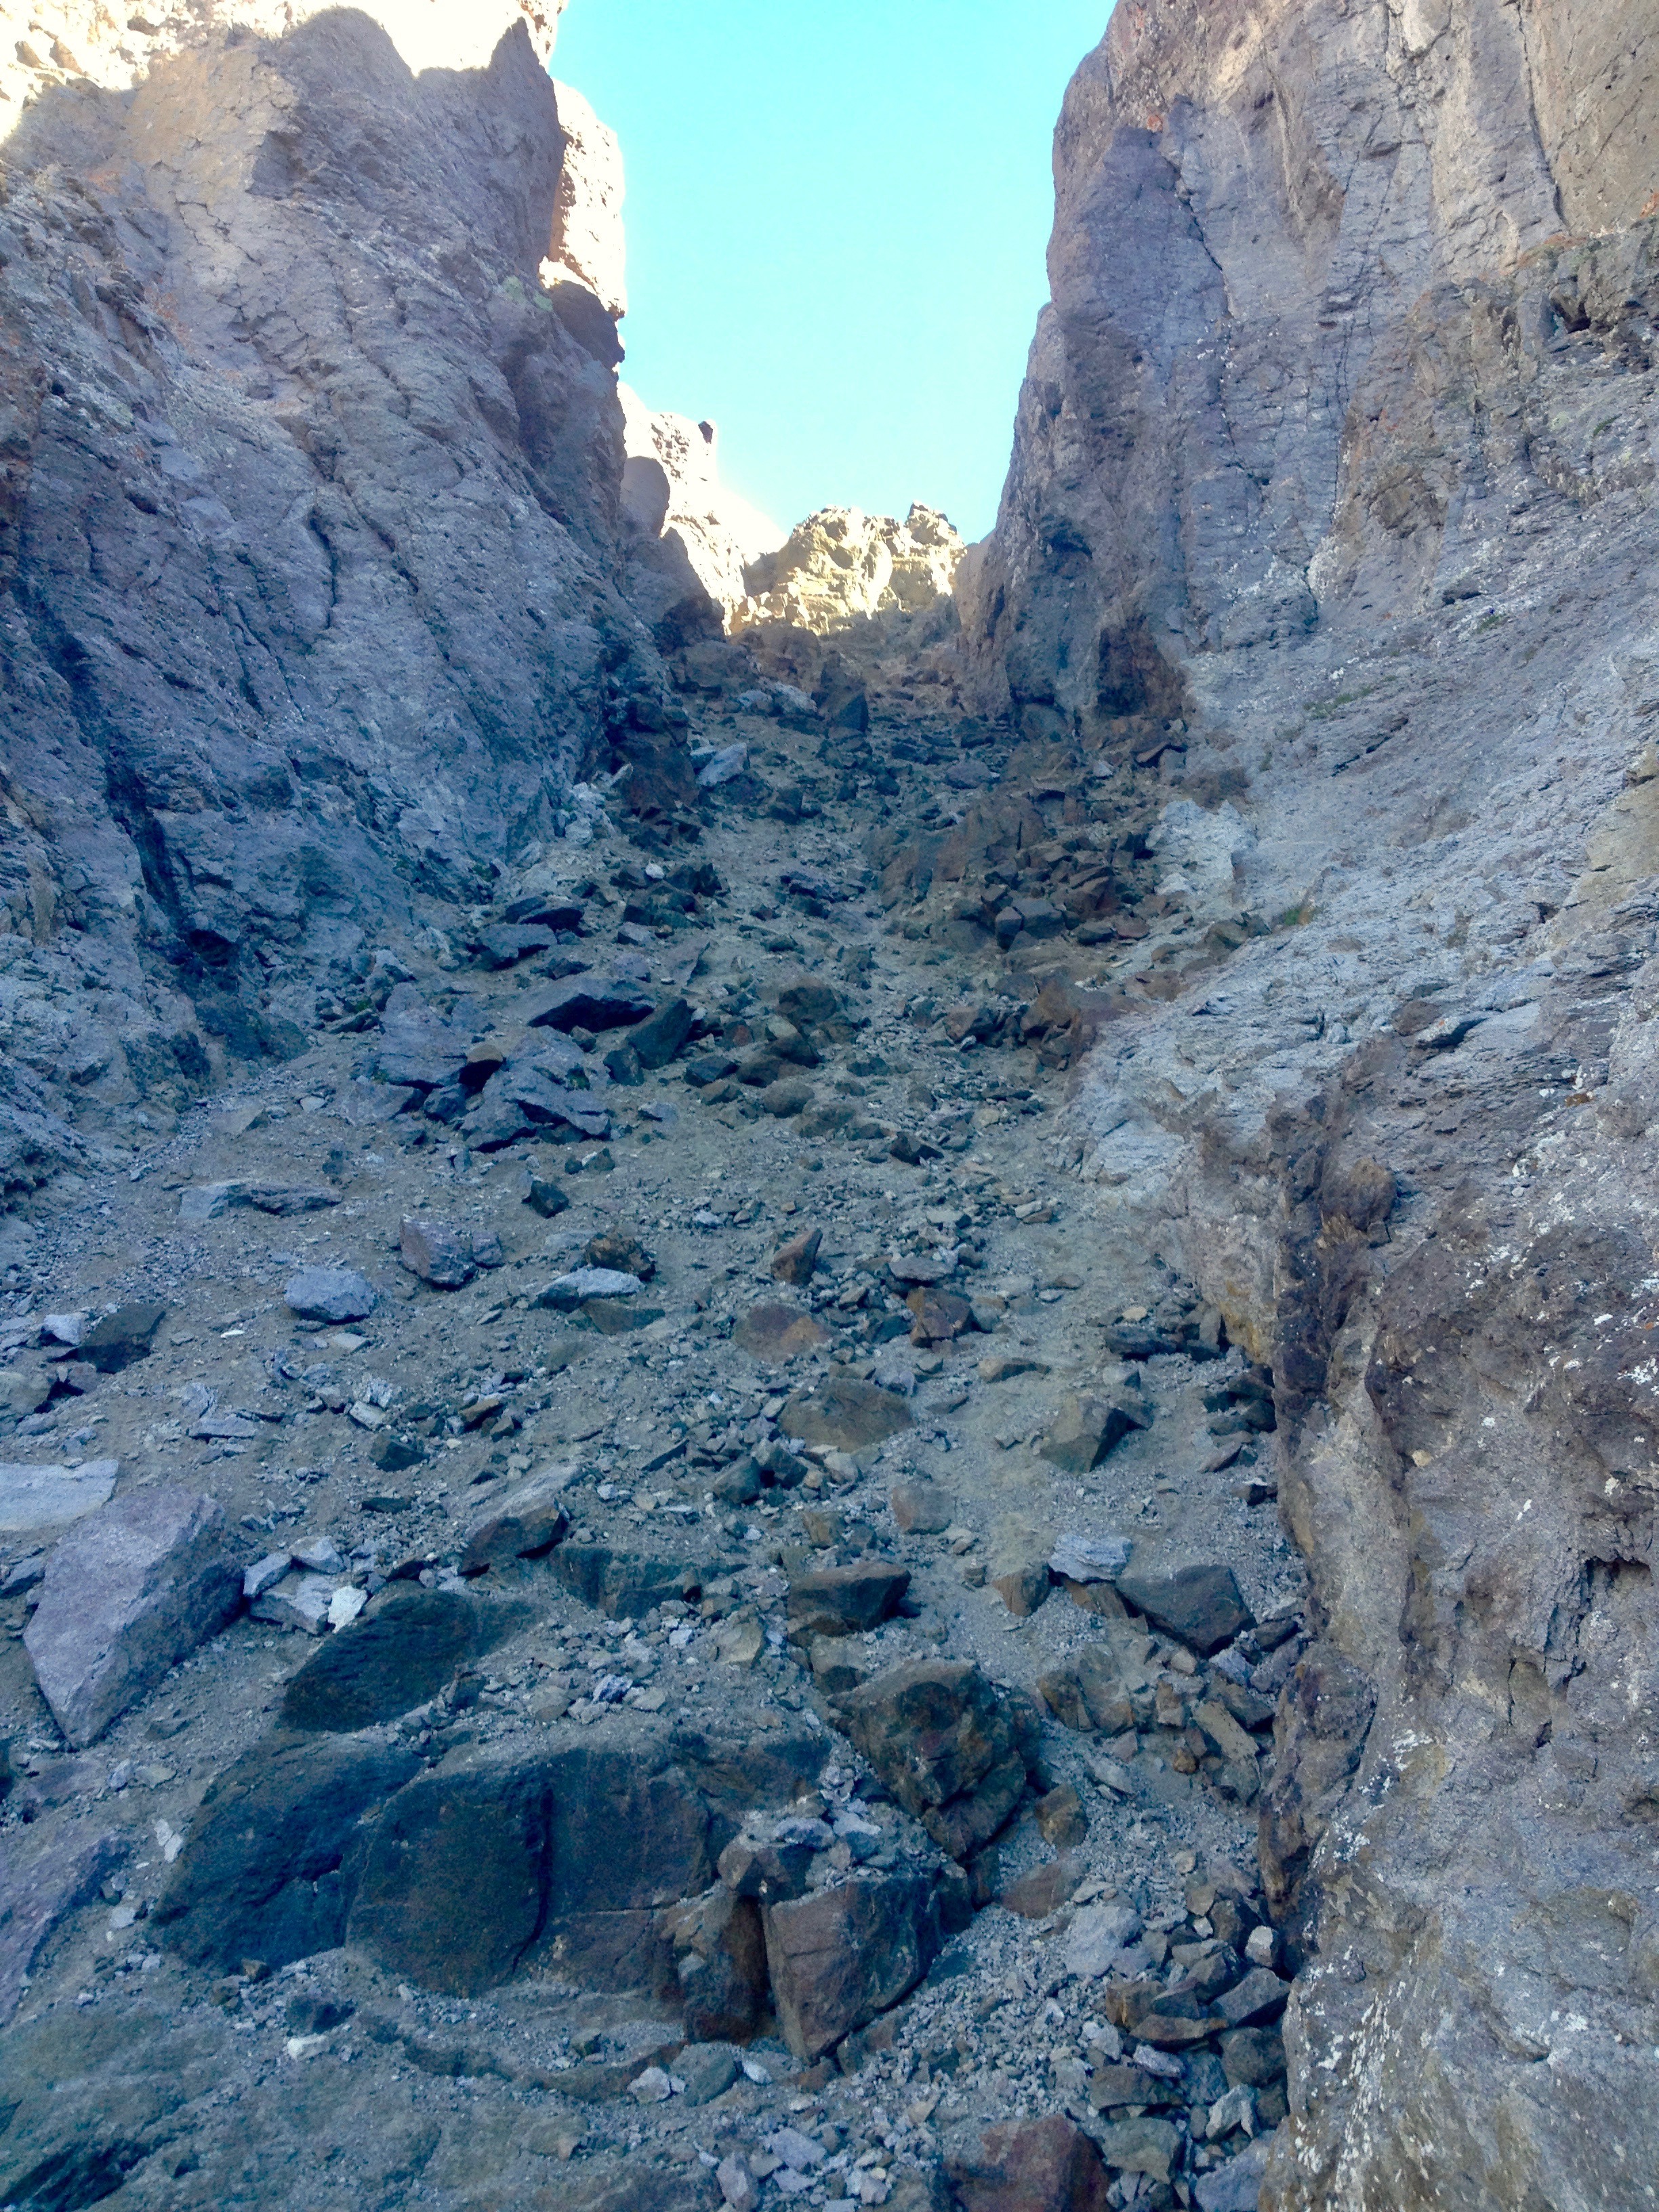
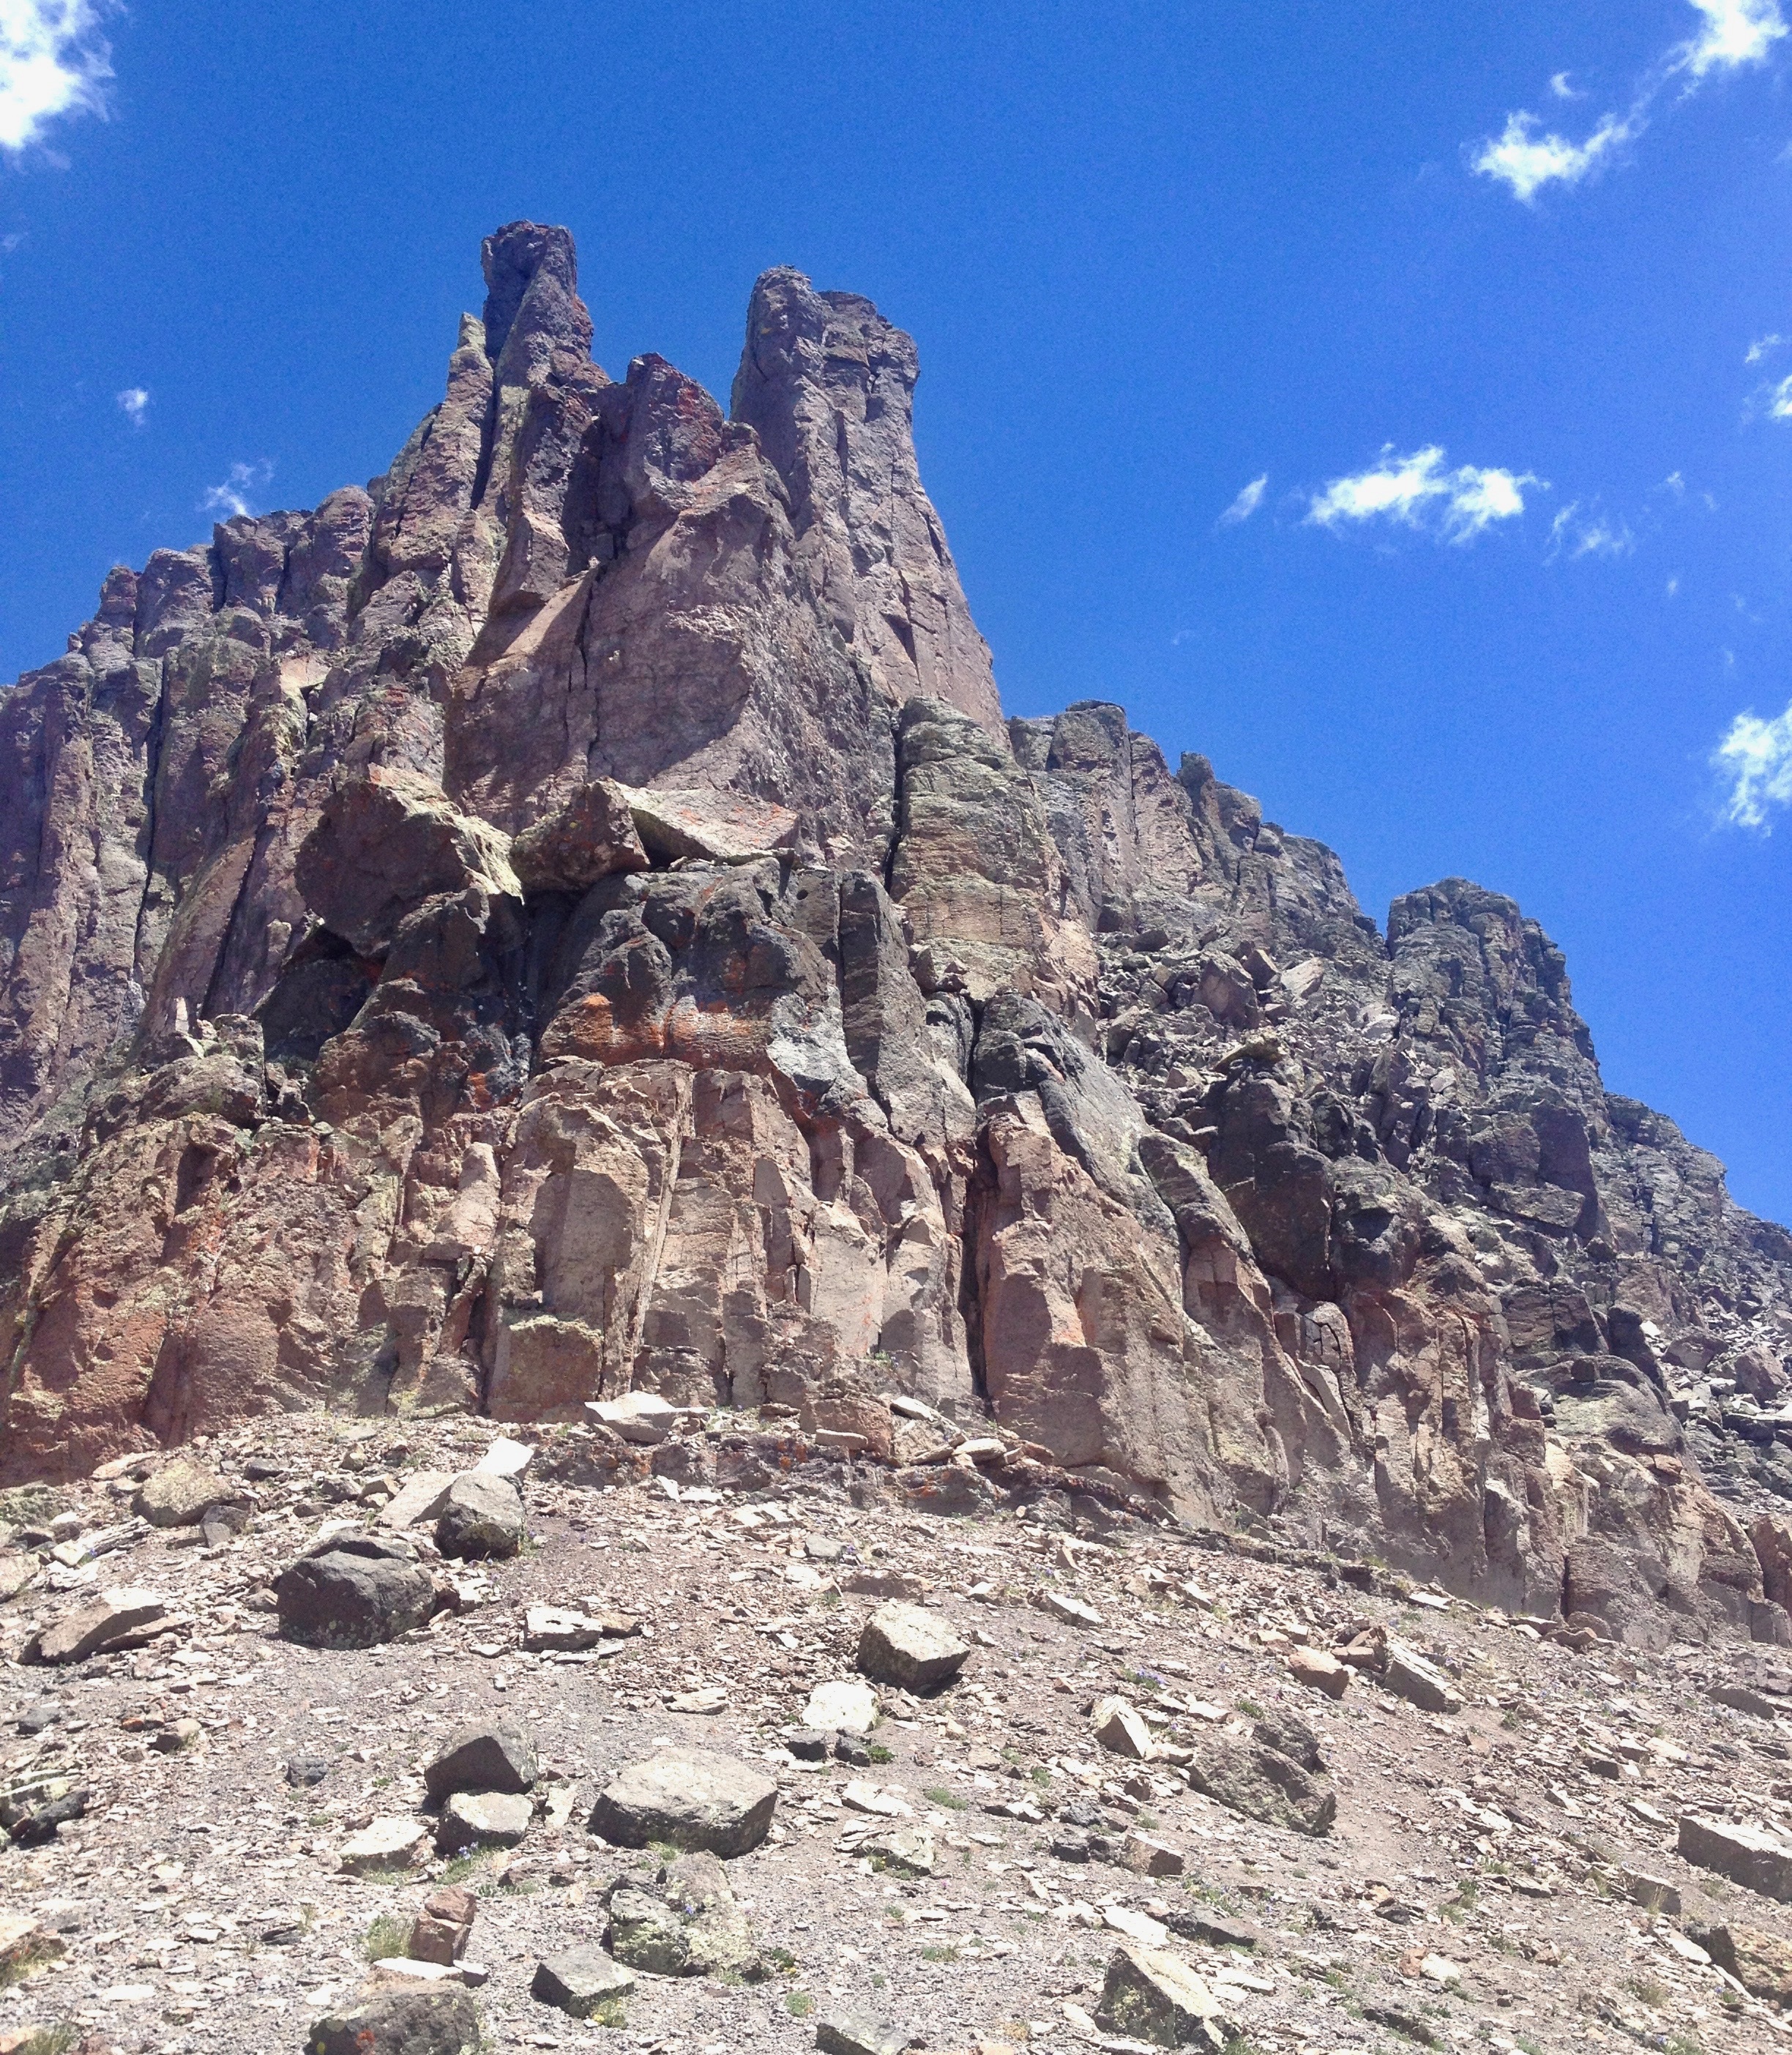
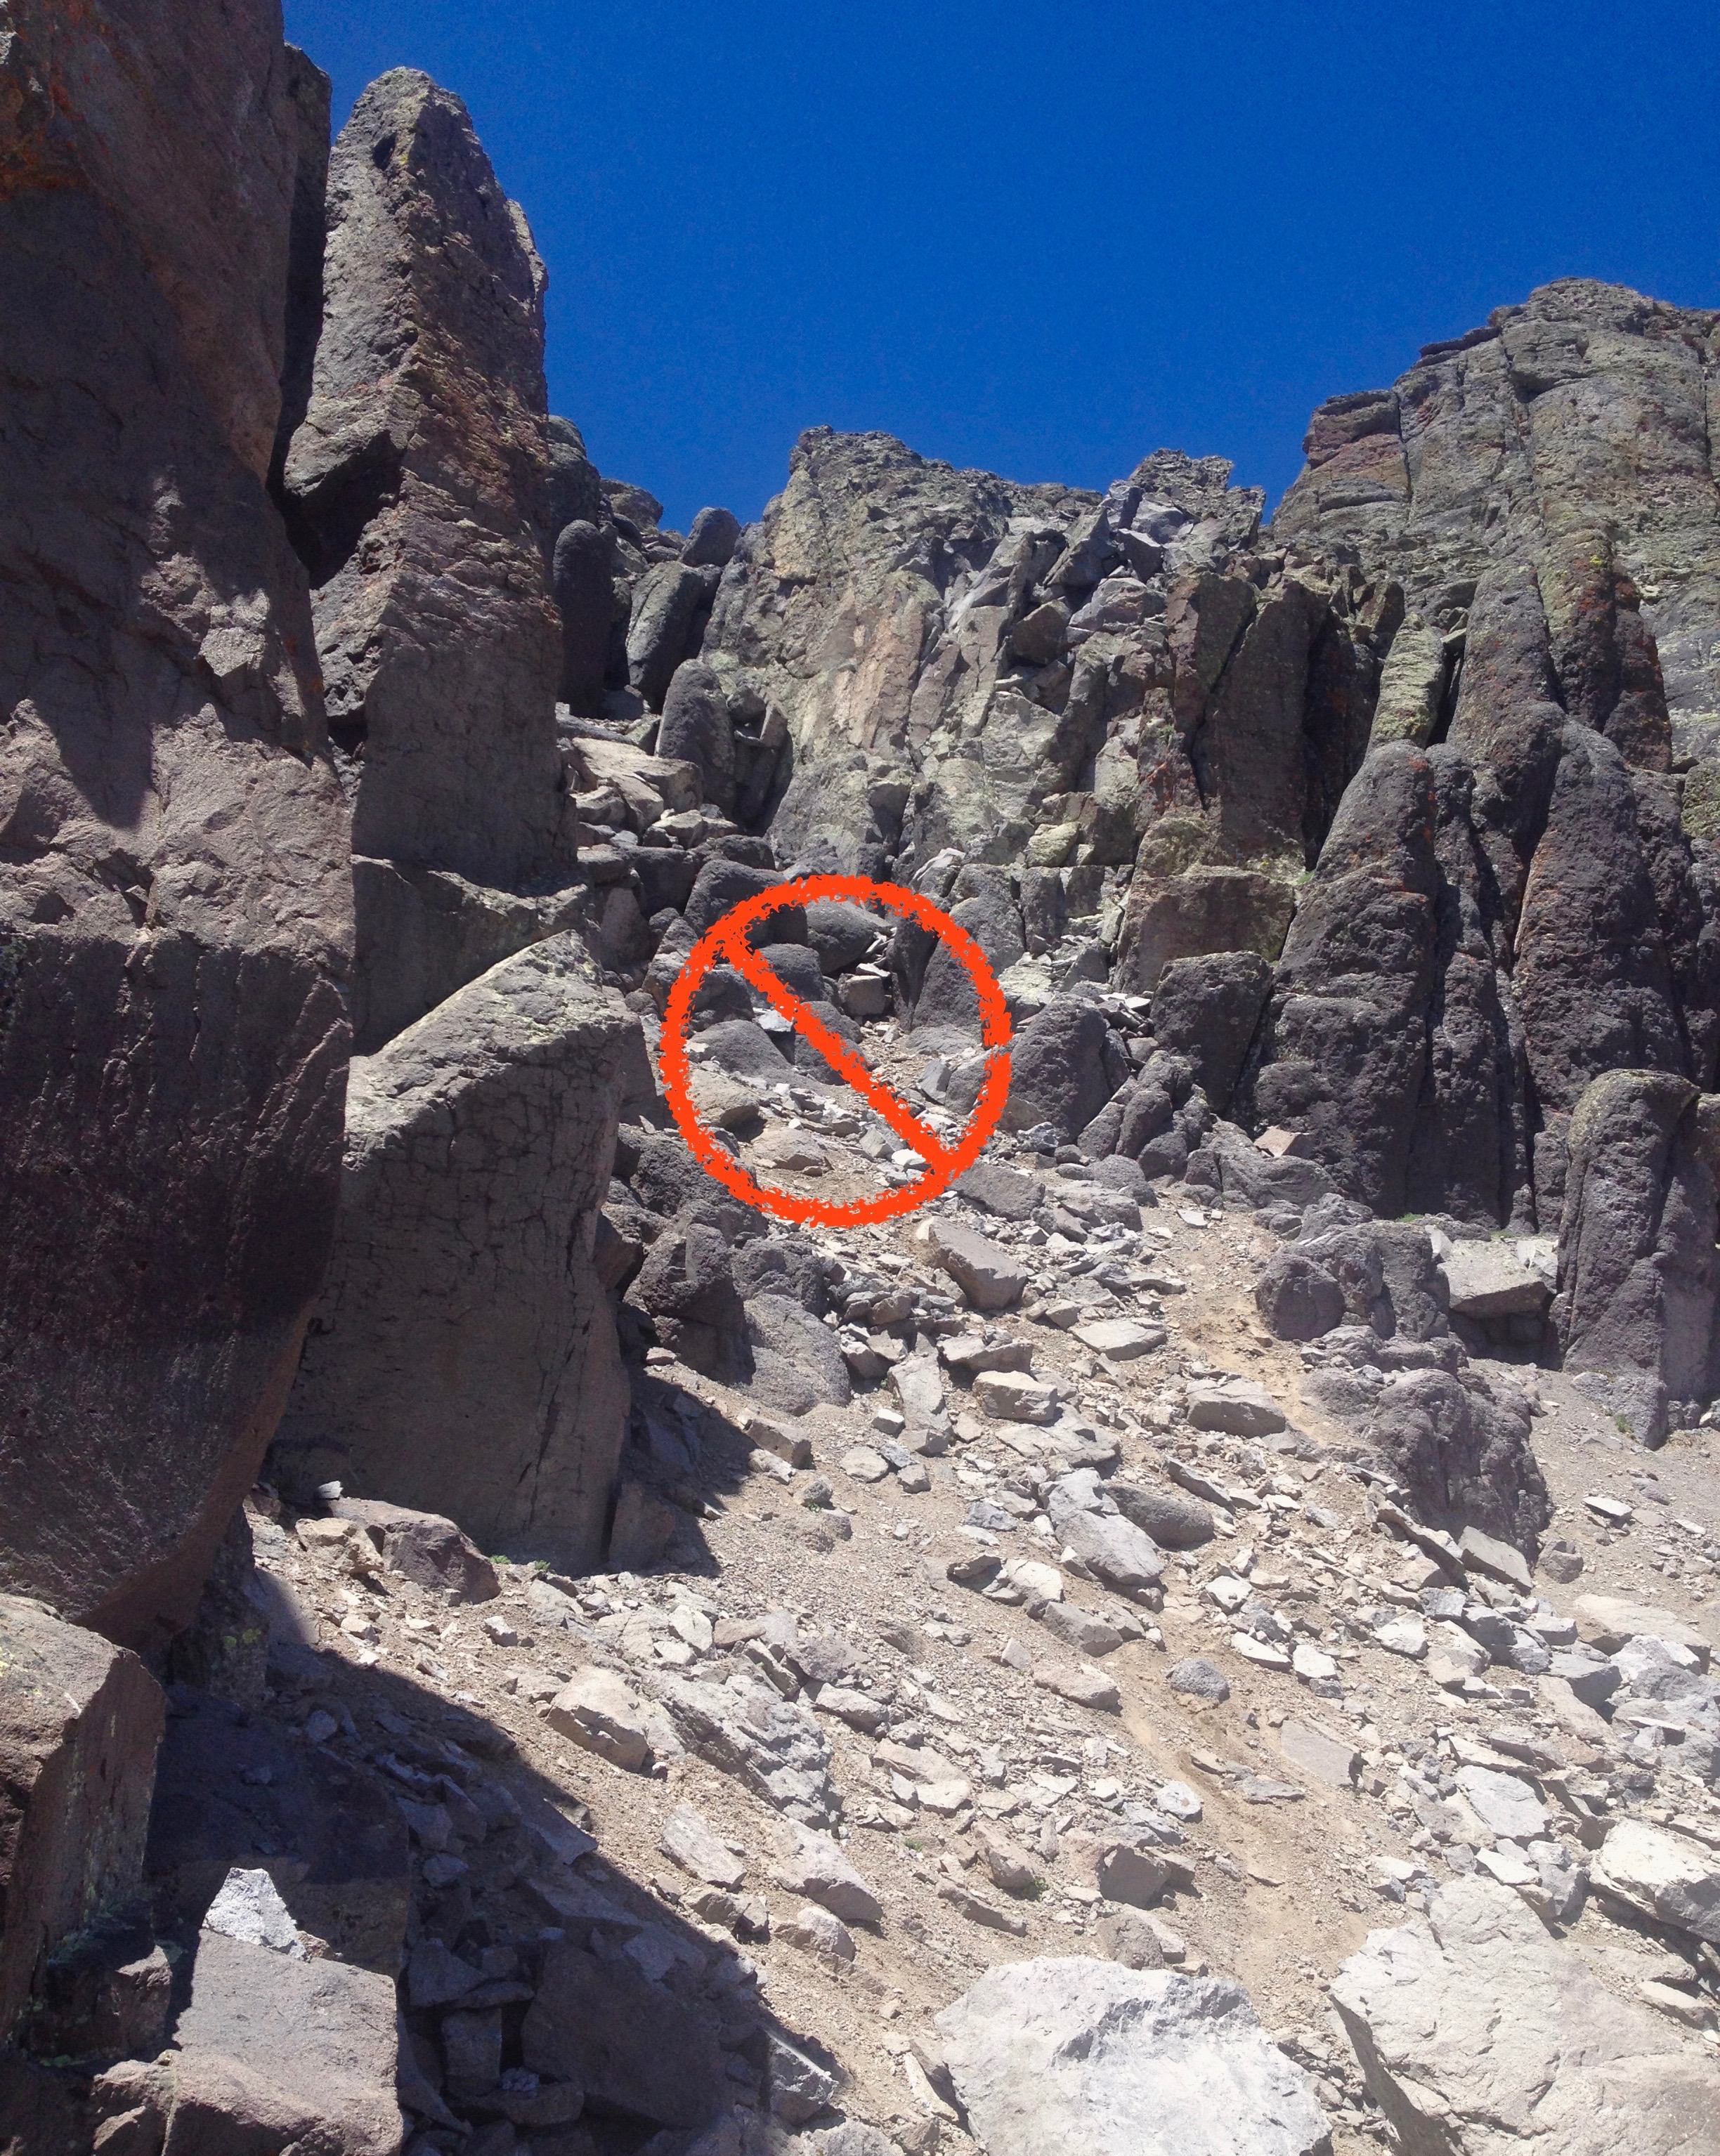
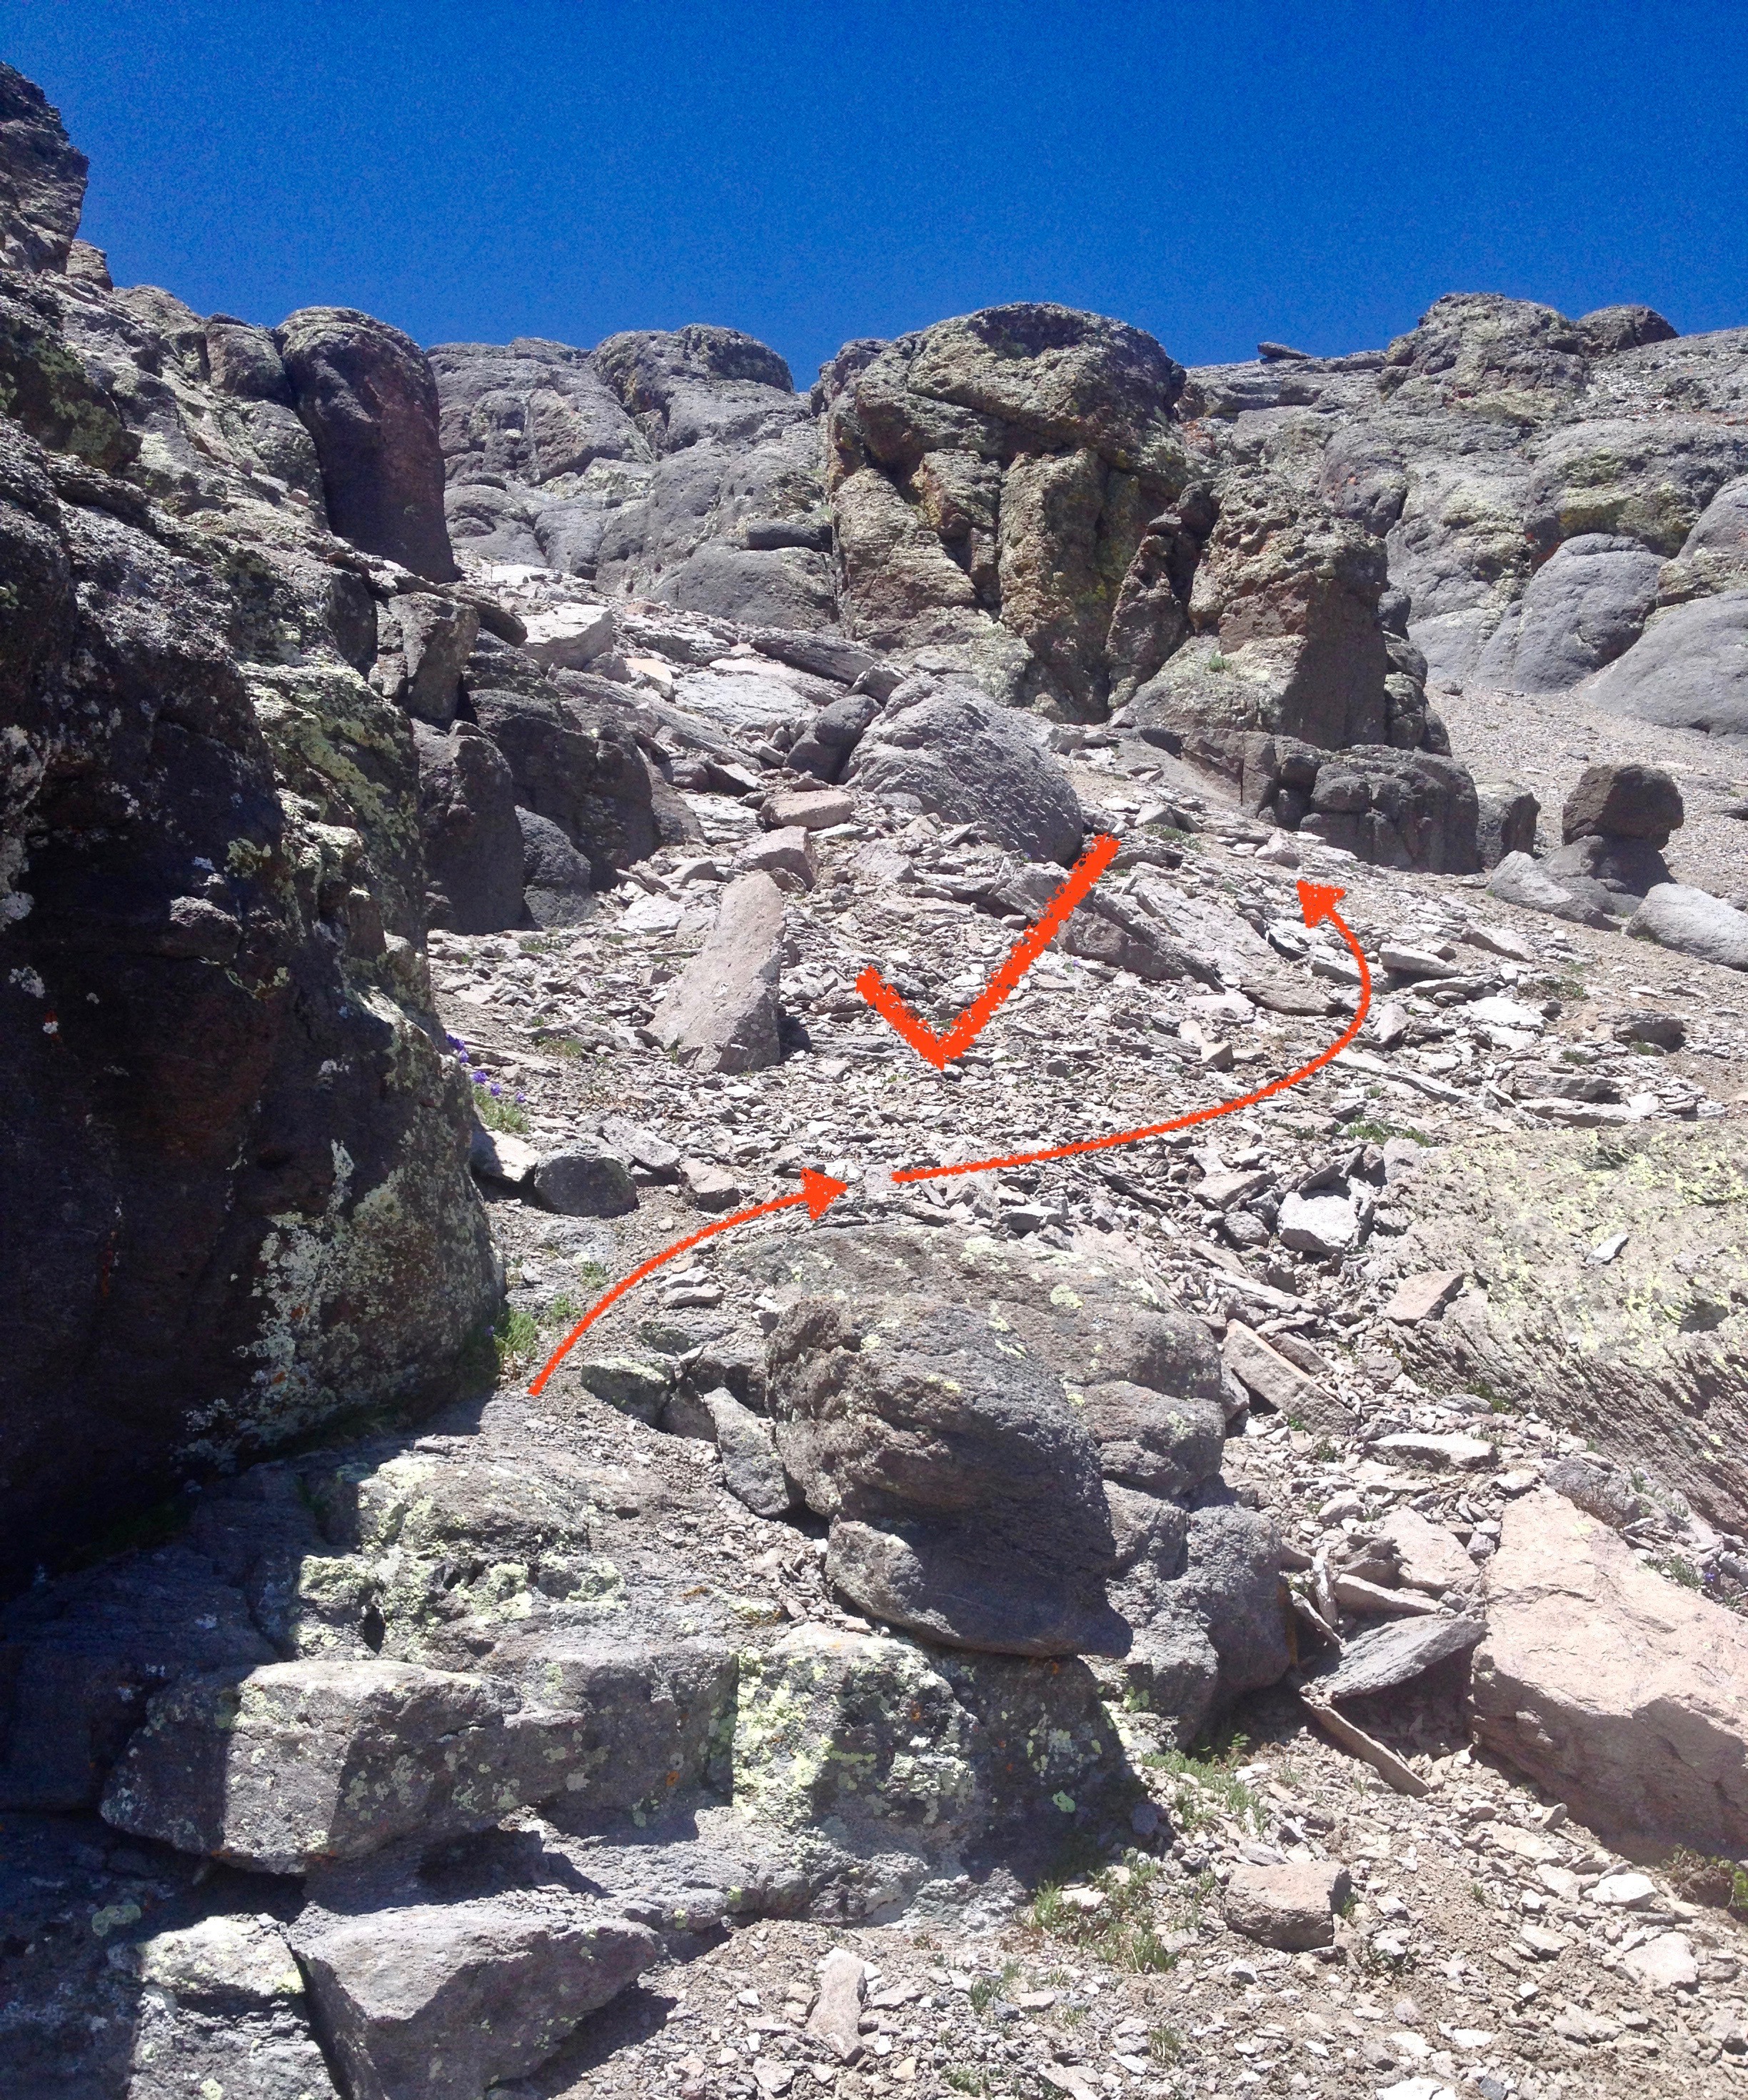
From the large flat area on the SW ridge, climb up the ridge crest for a short distance until easy class 2+ progress is no longer a reasonable possibility. Look for cairns and a use trail taking off across the S/SE face near the base of the cliffs. This trail will stay more or less near the base of the cliffs as it traverses east. Proceed to the first major gully that appears. If you're the adventurous sort, this gully may go. If you're a more conservative gambler, proceed onward. Pass a second major gully. Again, this may also go, but for the easiest route, continue to a third major gully. This one will be obviously wider, sandier, and more gravel-filled than the previous two. This is your route.
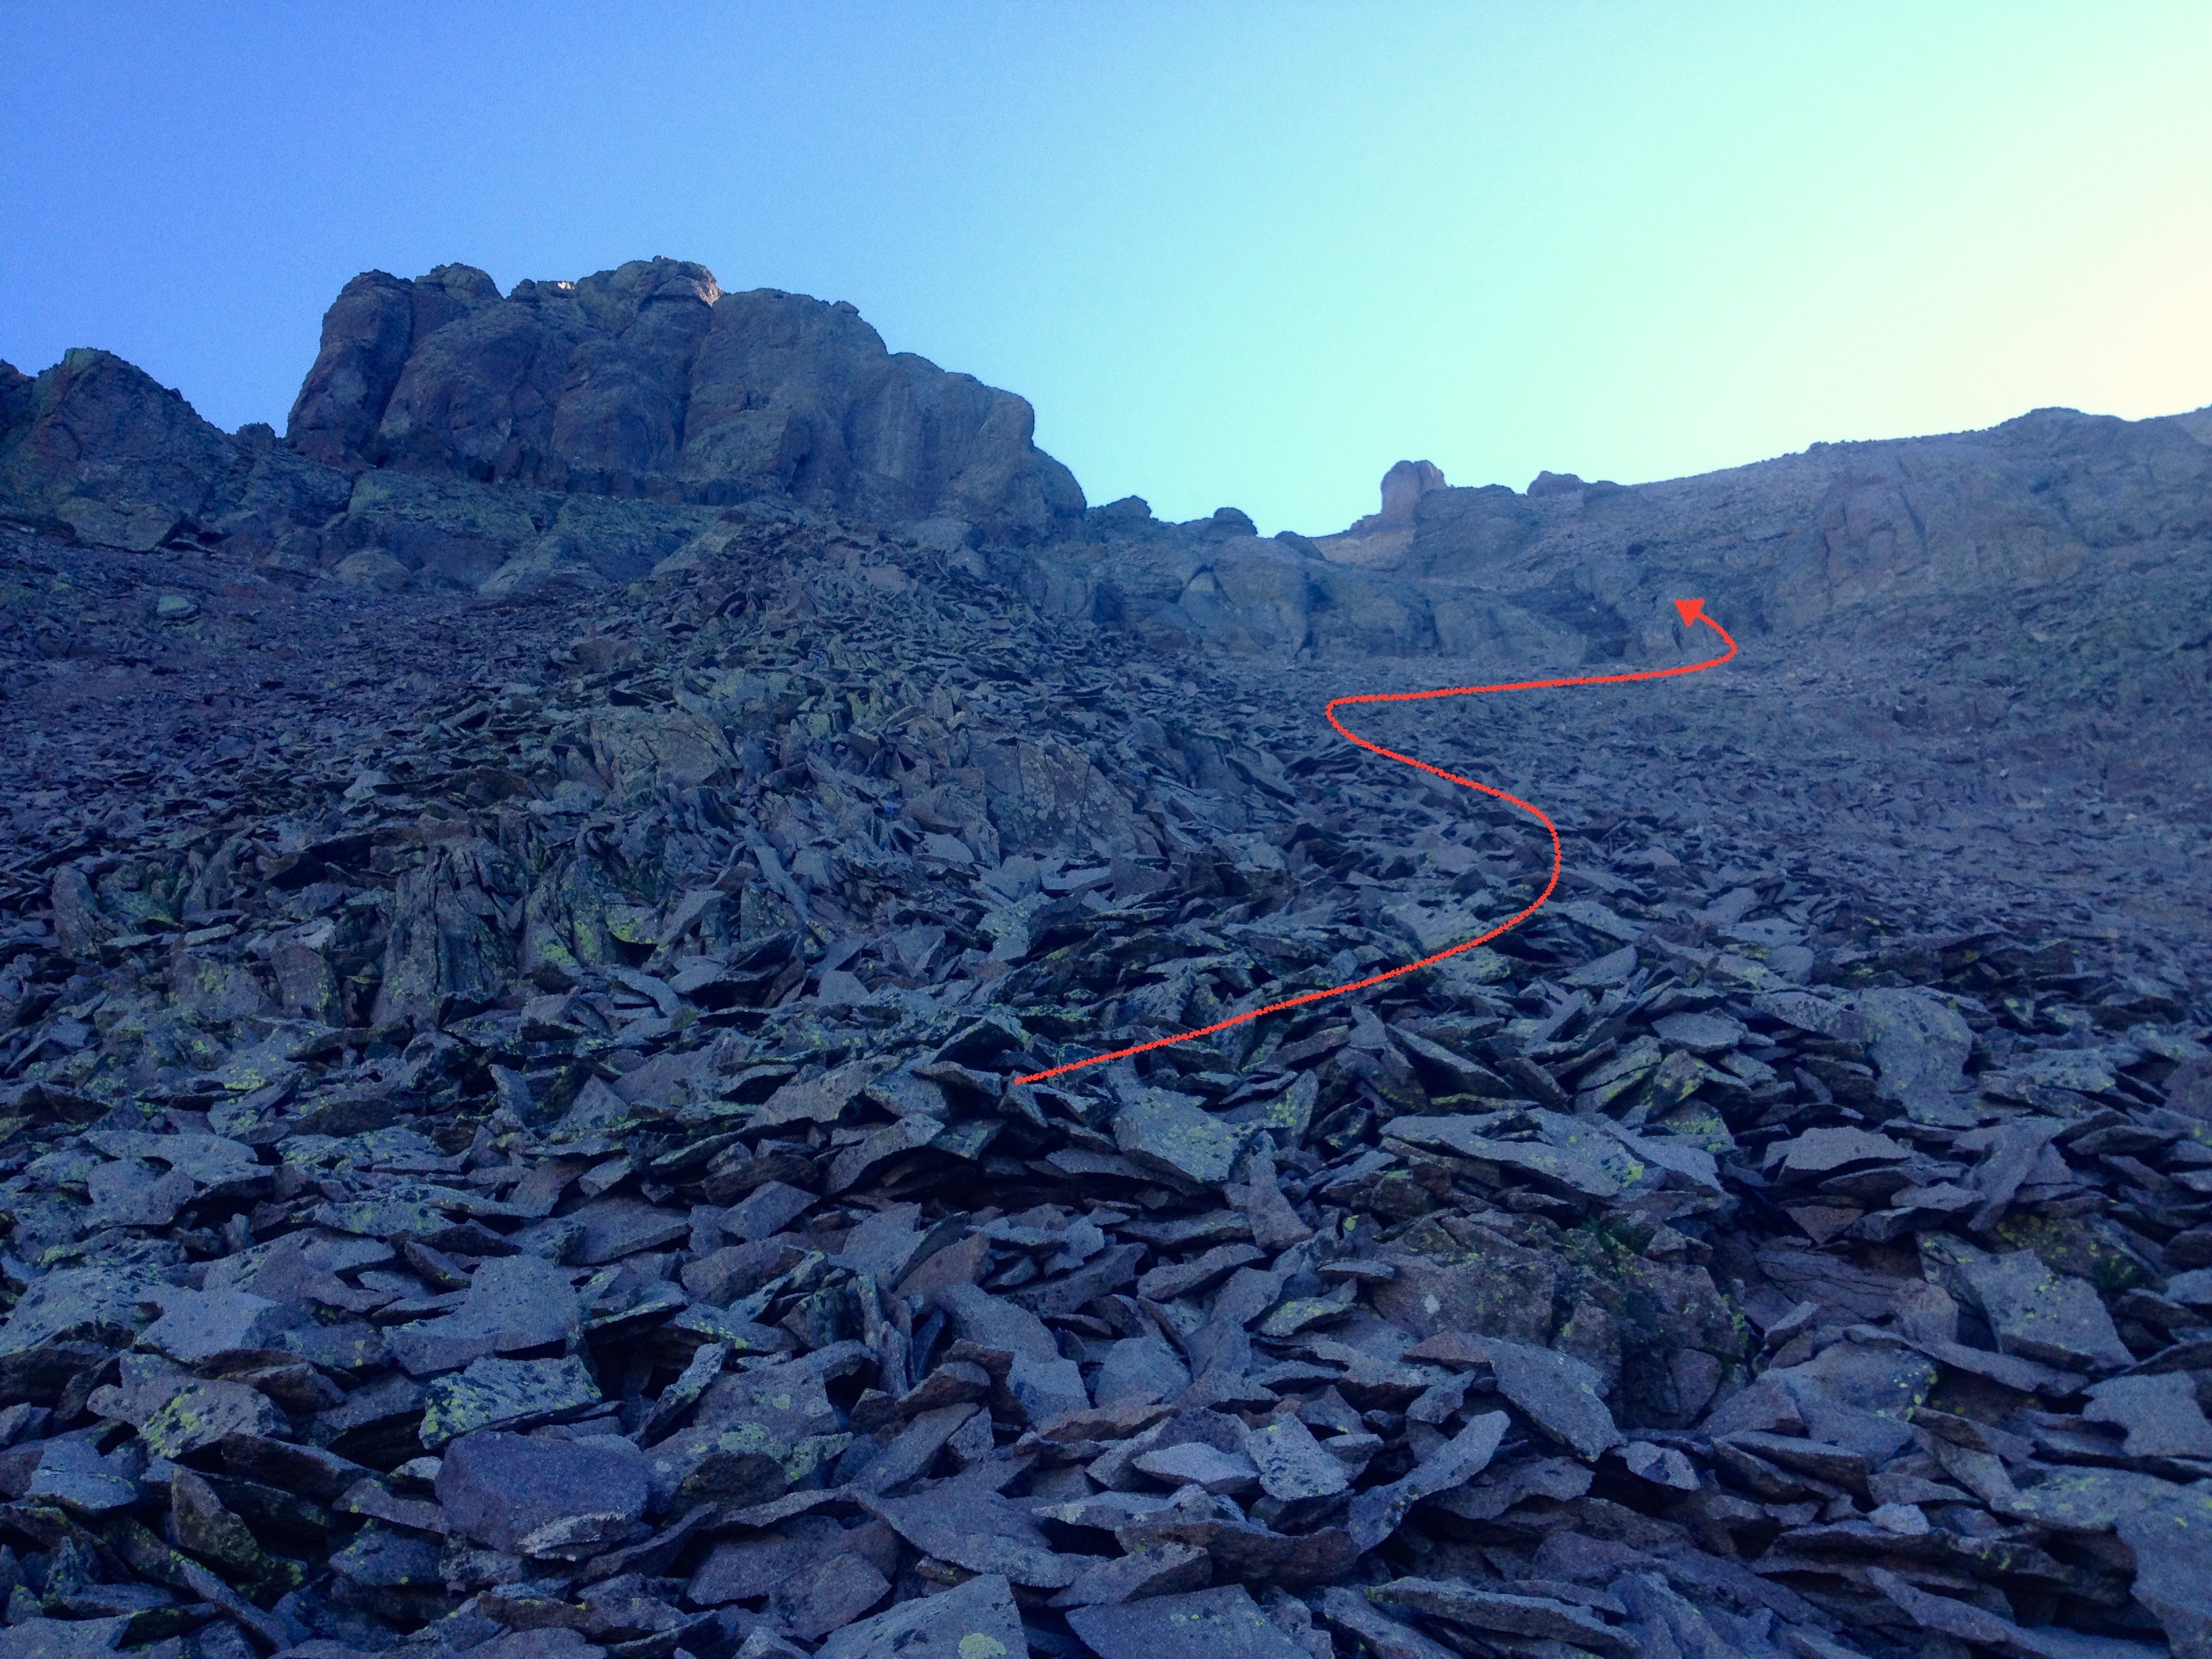
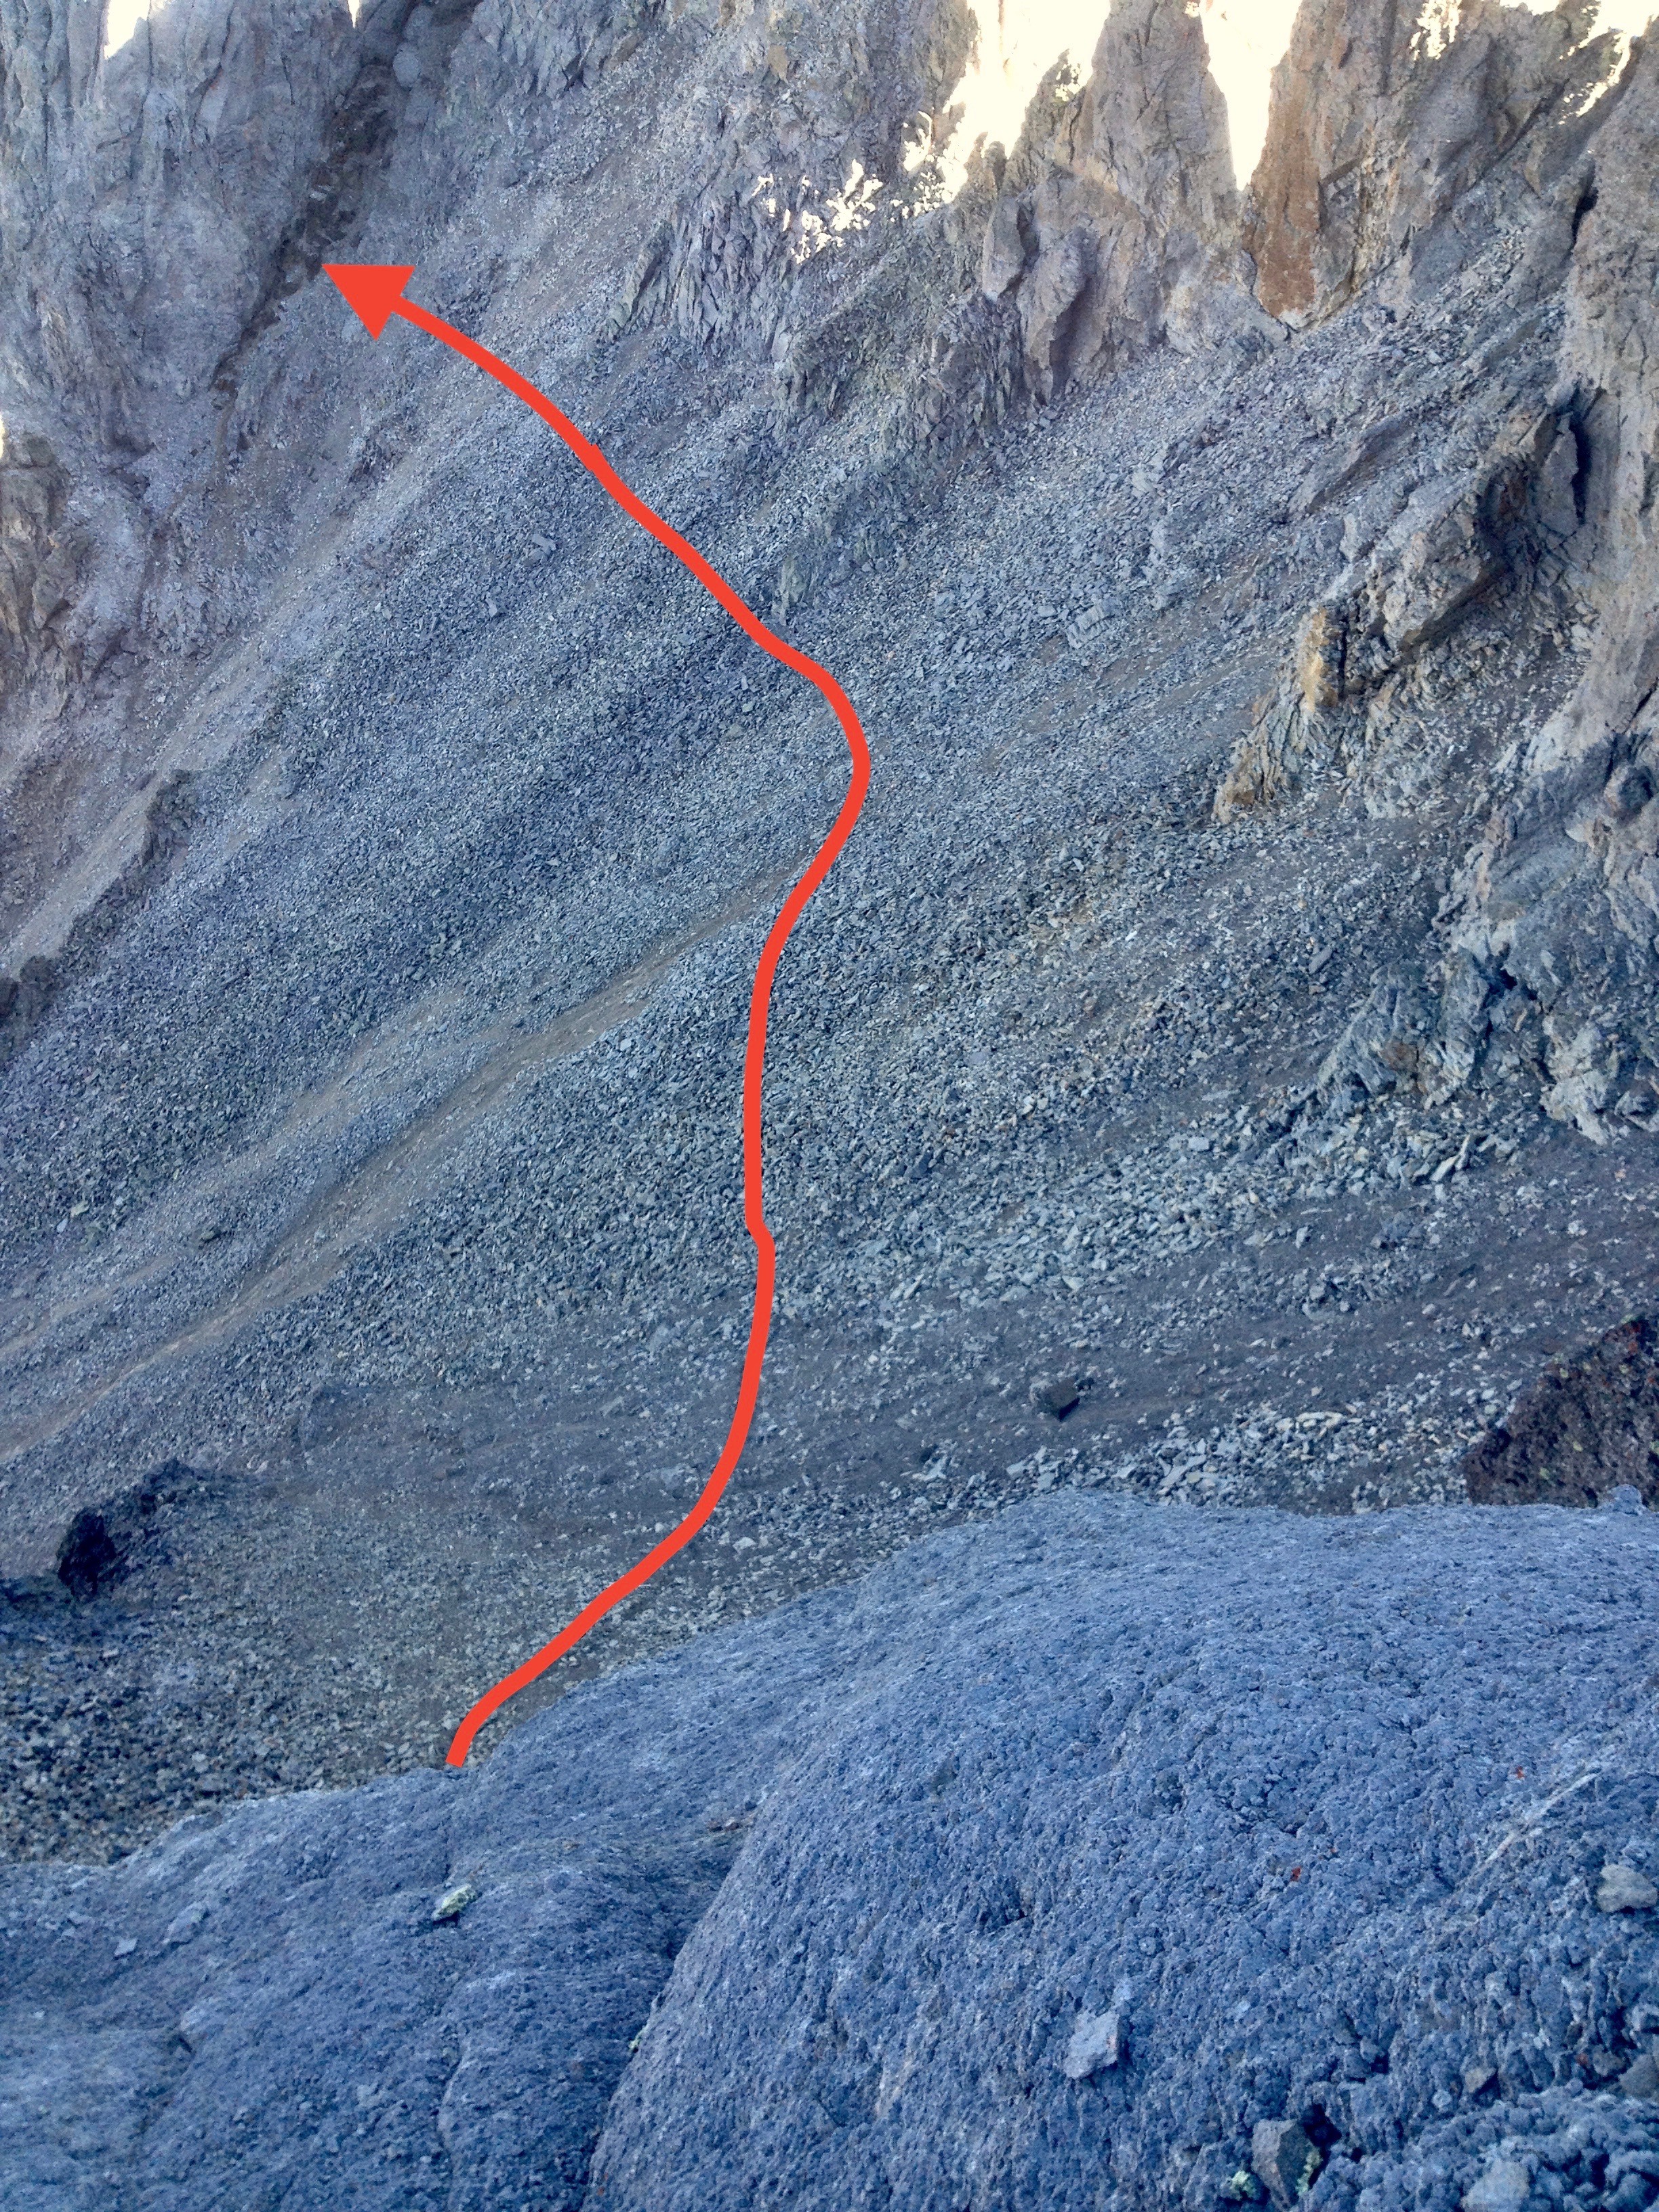
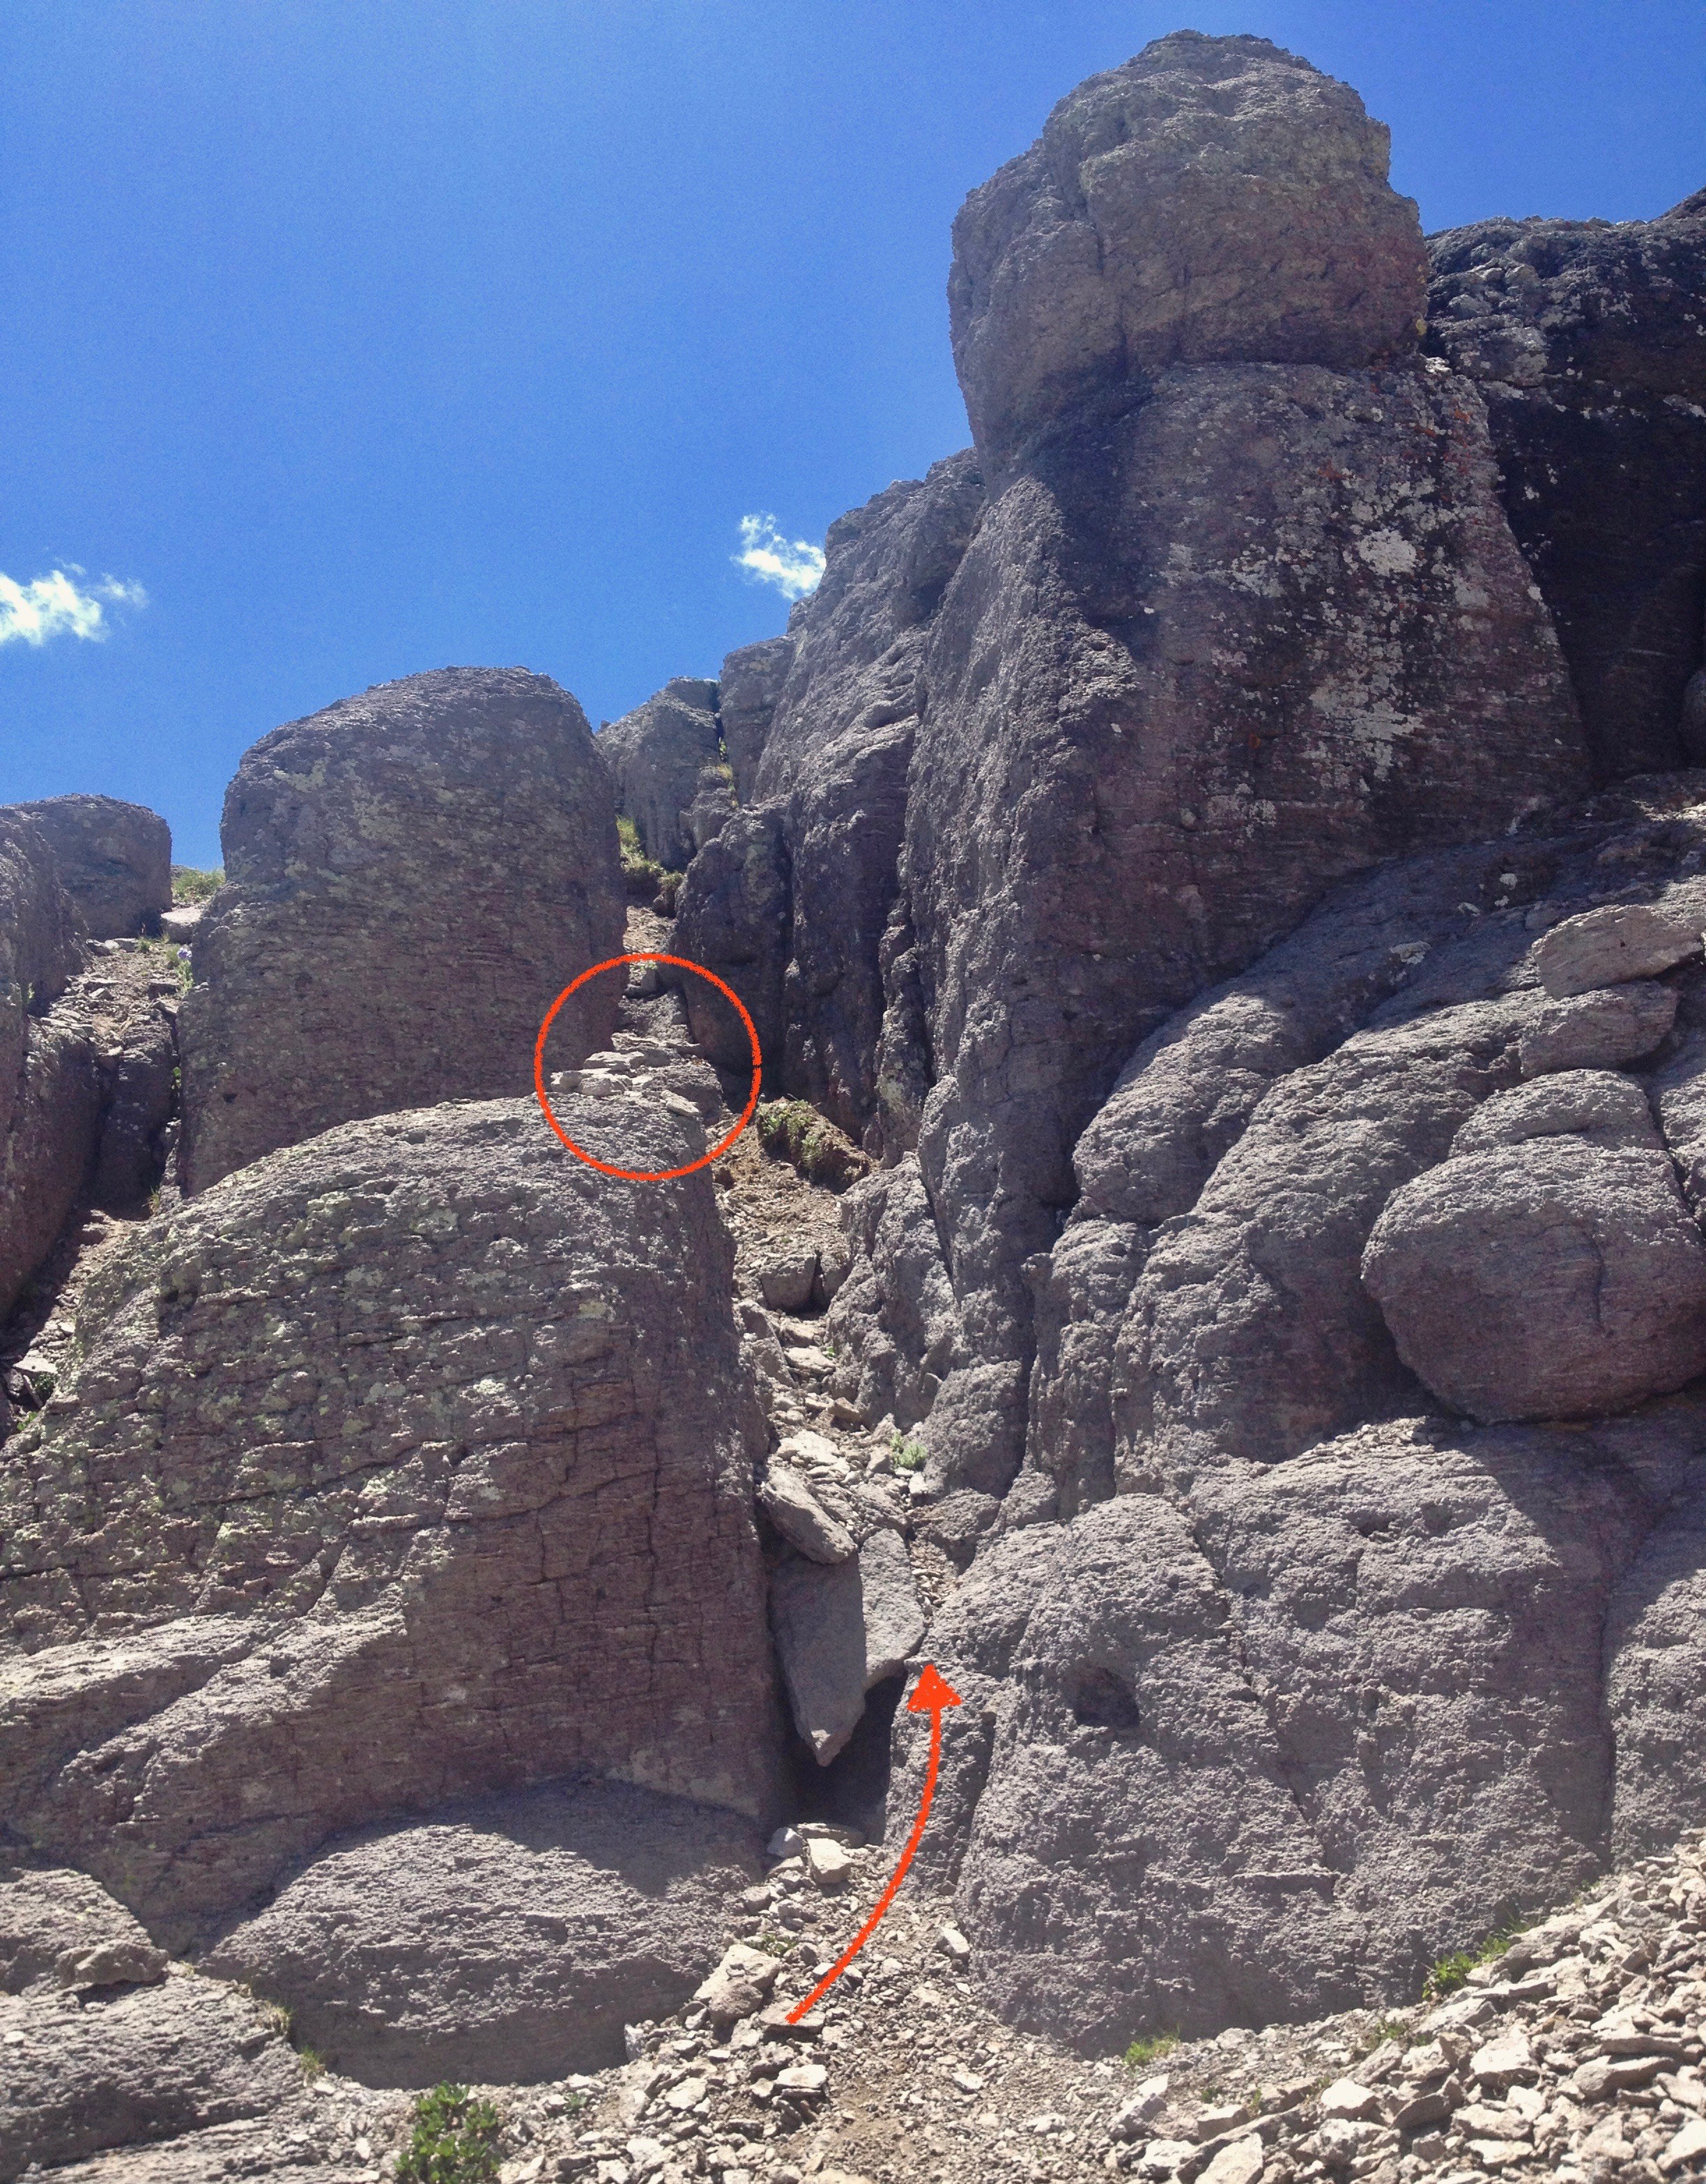
Follow this gully up for several hundred feet, but do not crest out at the top. Well before the top—perhaps 100 - 200 feet, look for a wide crack on your left hand side that breaks through the rock. We found this marked with a fairly substantial cairn in 2018. Follow the crack up to the broken terrain above.
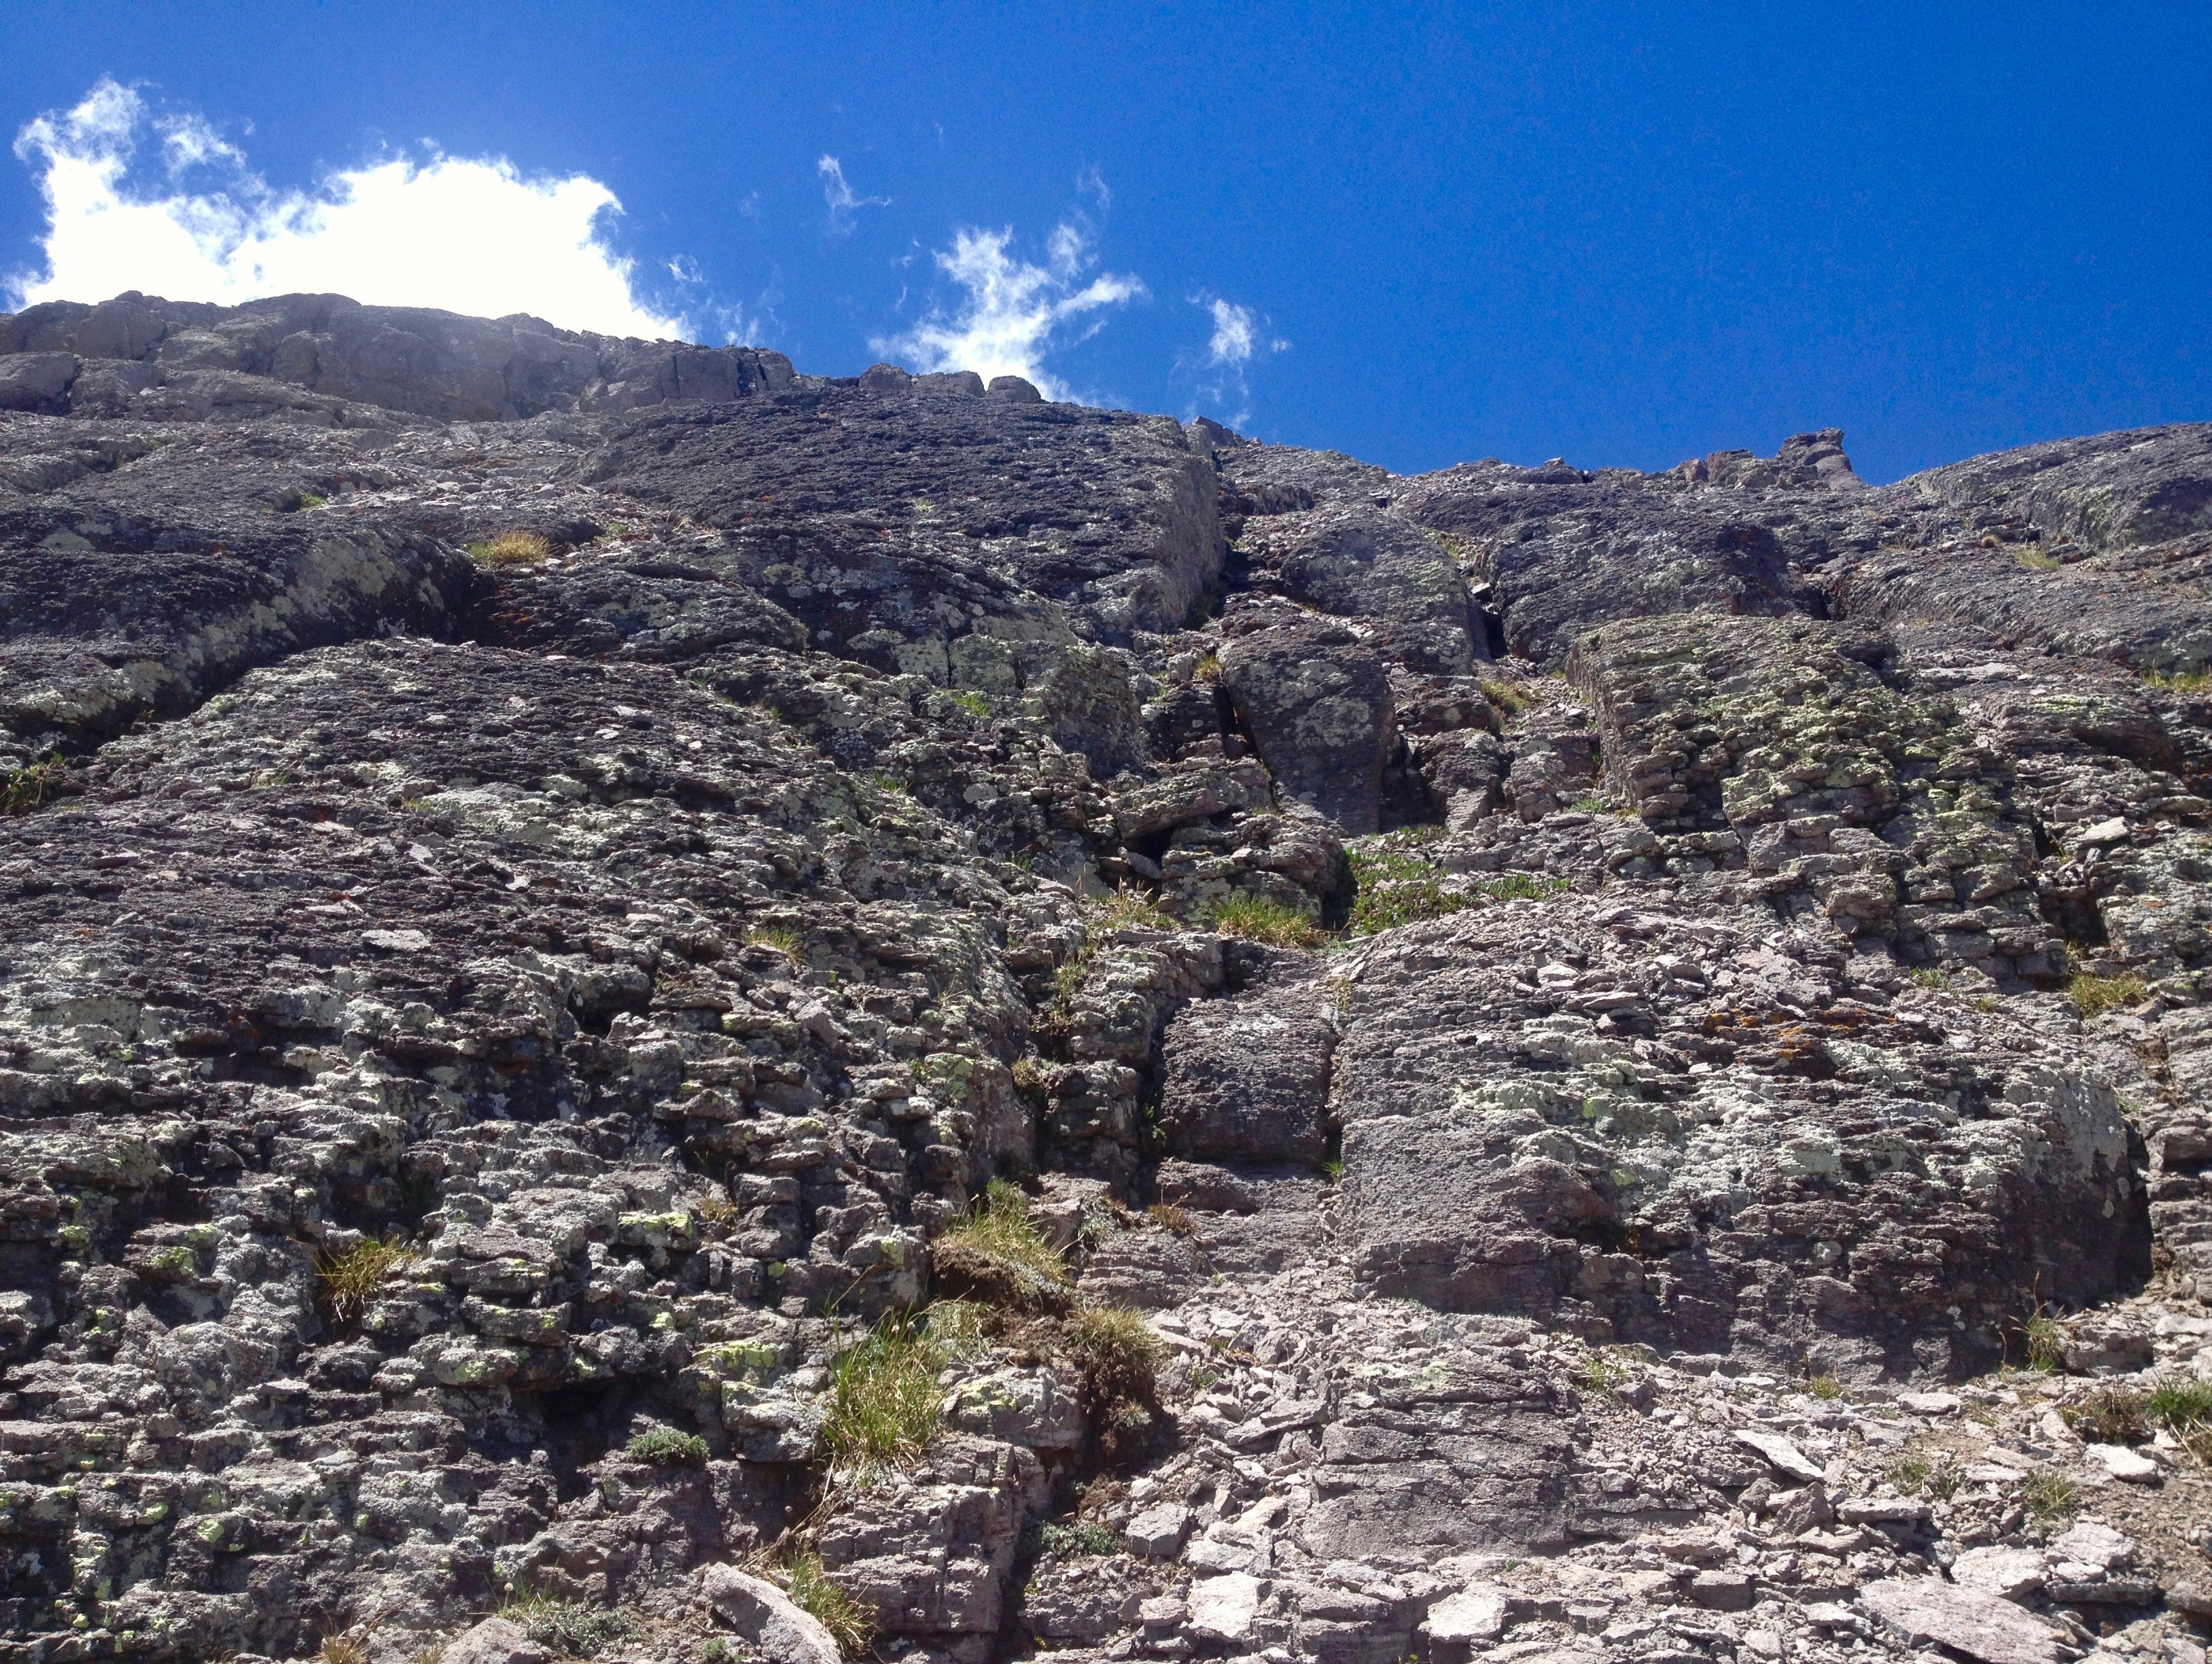
At this point, Potosi's summit is only a couple of hundred feet away. Climb carefully up this broken terrain using a series of small ledges and cracks that break through the decomposing rock. We found a zig-zagging pattern of ledges that was easier to identify coming down. If you miss it, there are ample options for climbing up various cracks, but beware of the loose gravel on top of these decomposing rocks as a fall here could be serious. Above this slope, scamper a short distance on more even terrain to the wide, flat summit of Potosi.
To descend, unpack your hang glider or wing suit, measure the wind, and jump. This will be the best way down.
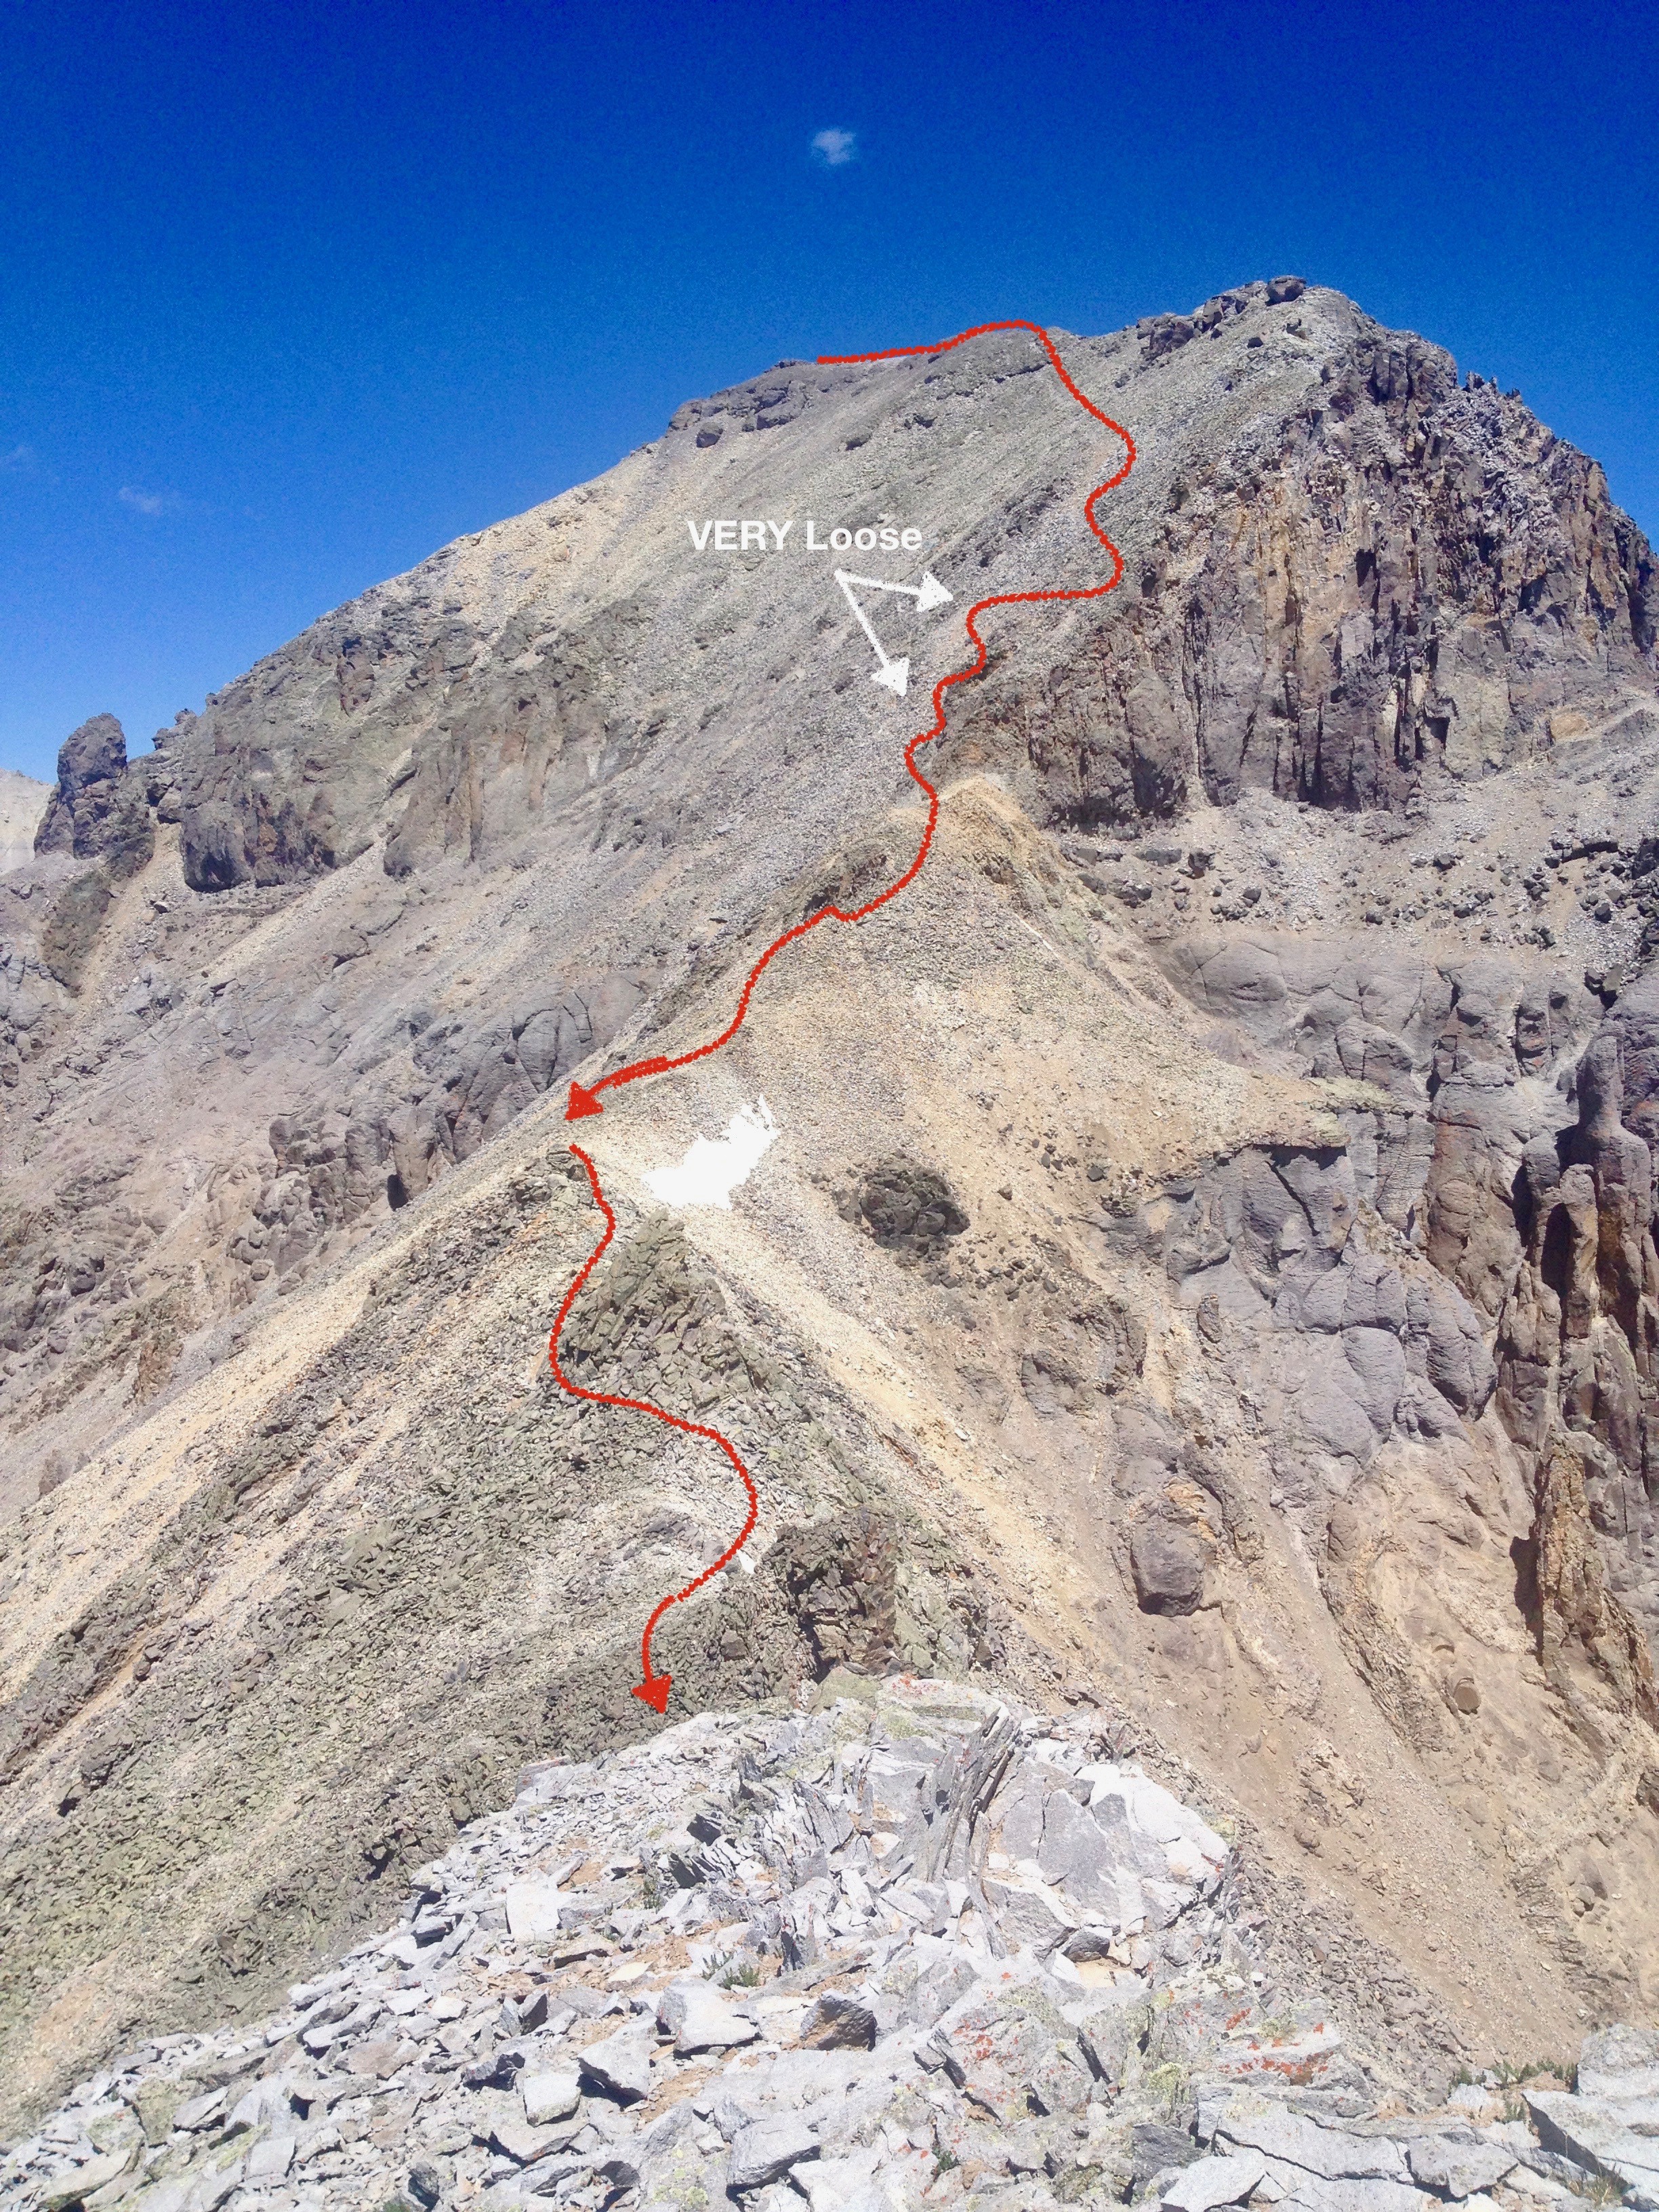
For those that did not pack an air-aided descent apparatus, retrace your route to the Potosi/Coffee Pot saddle and carefully consider your fate. There are no easy, straightforward routes down from here. Ours was as follows...
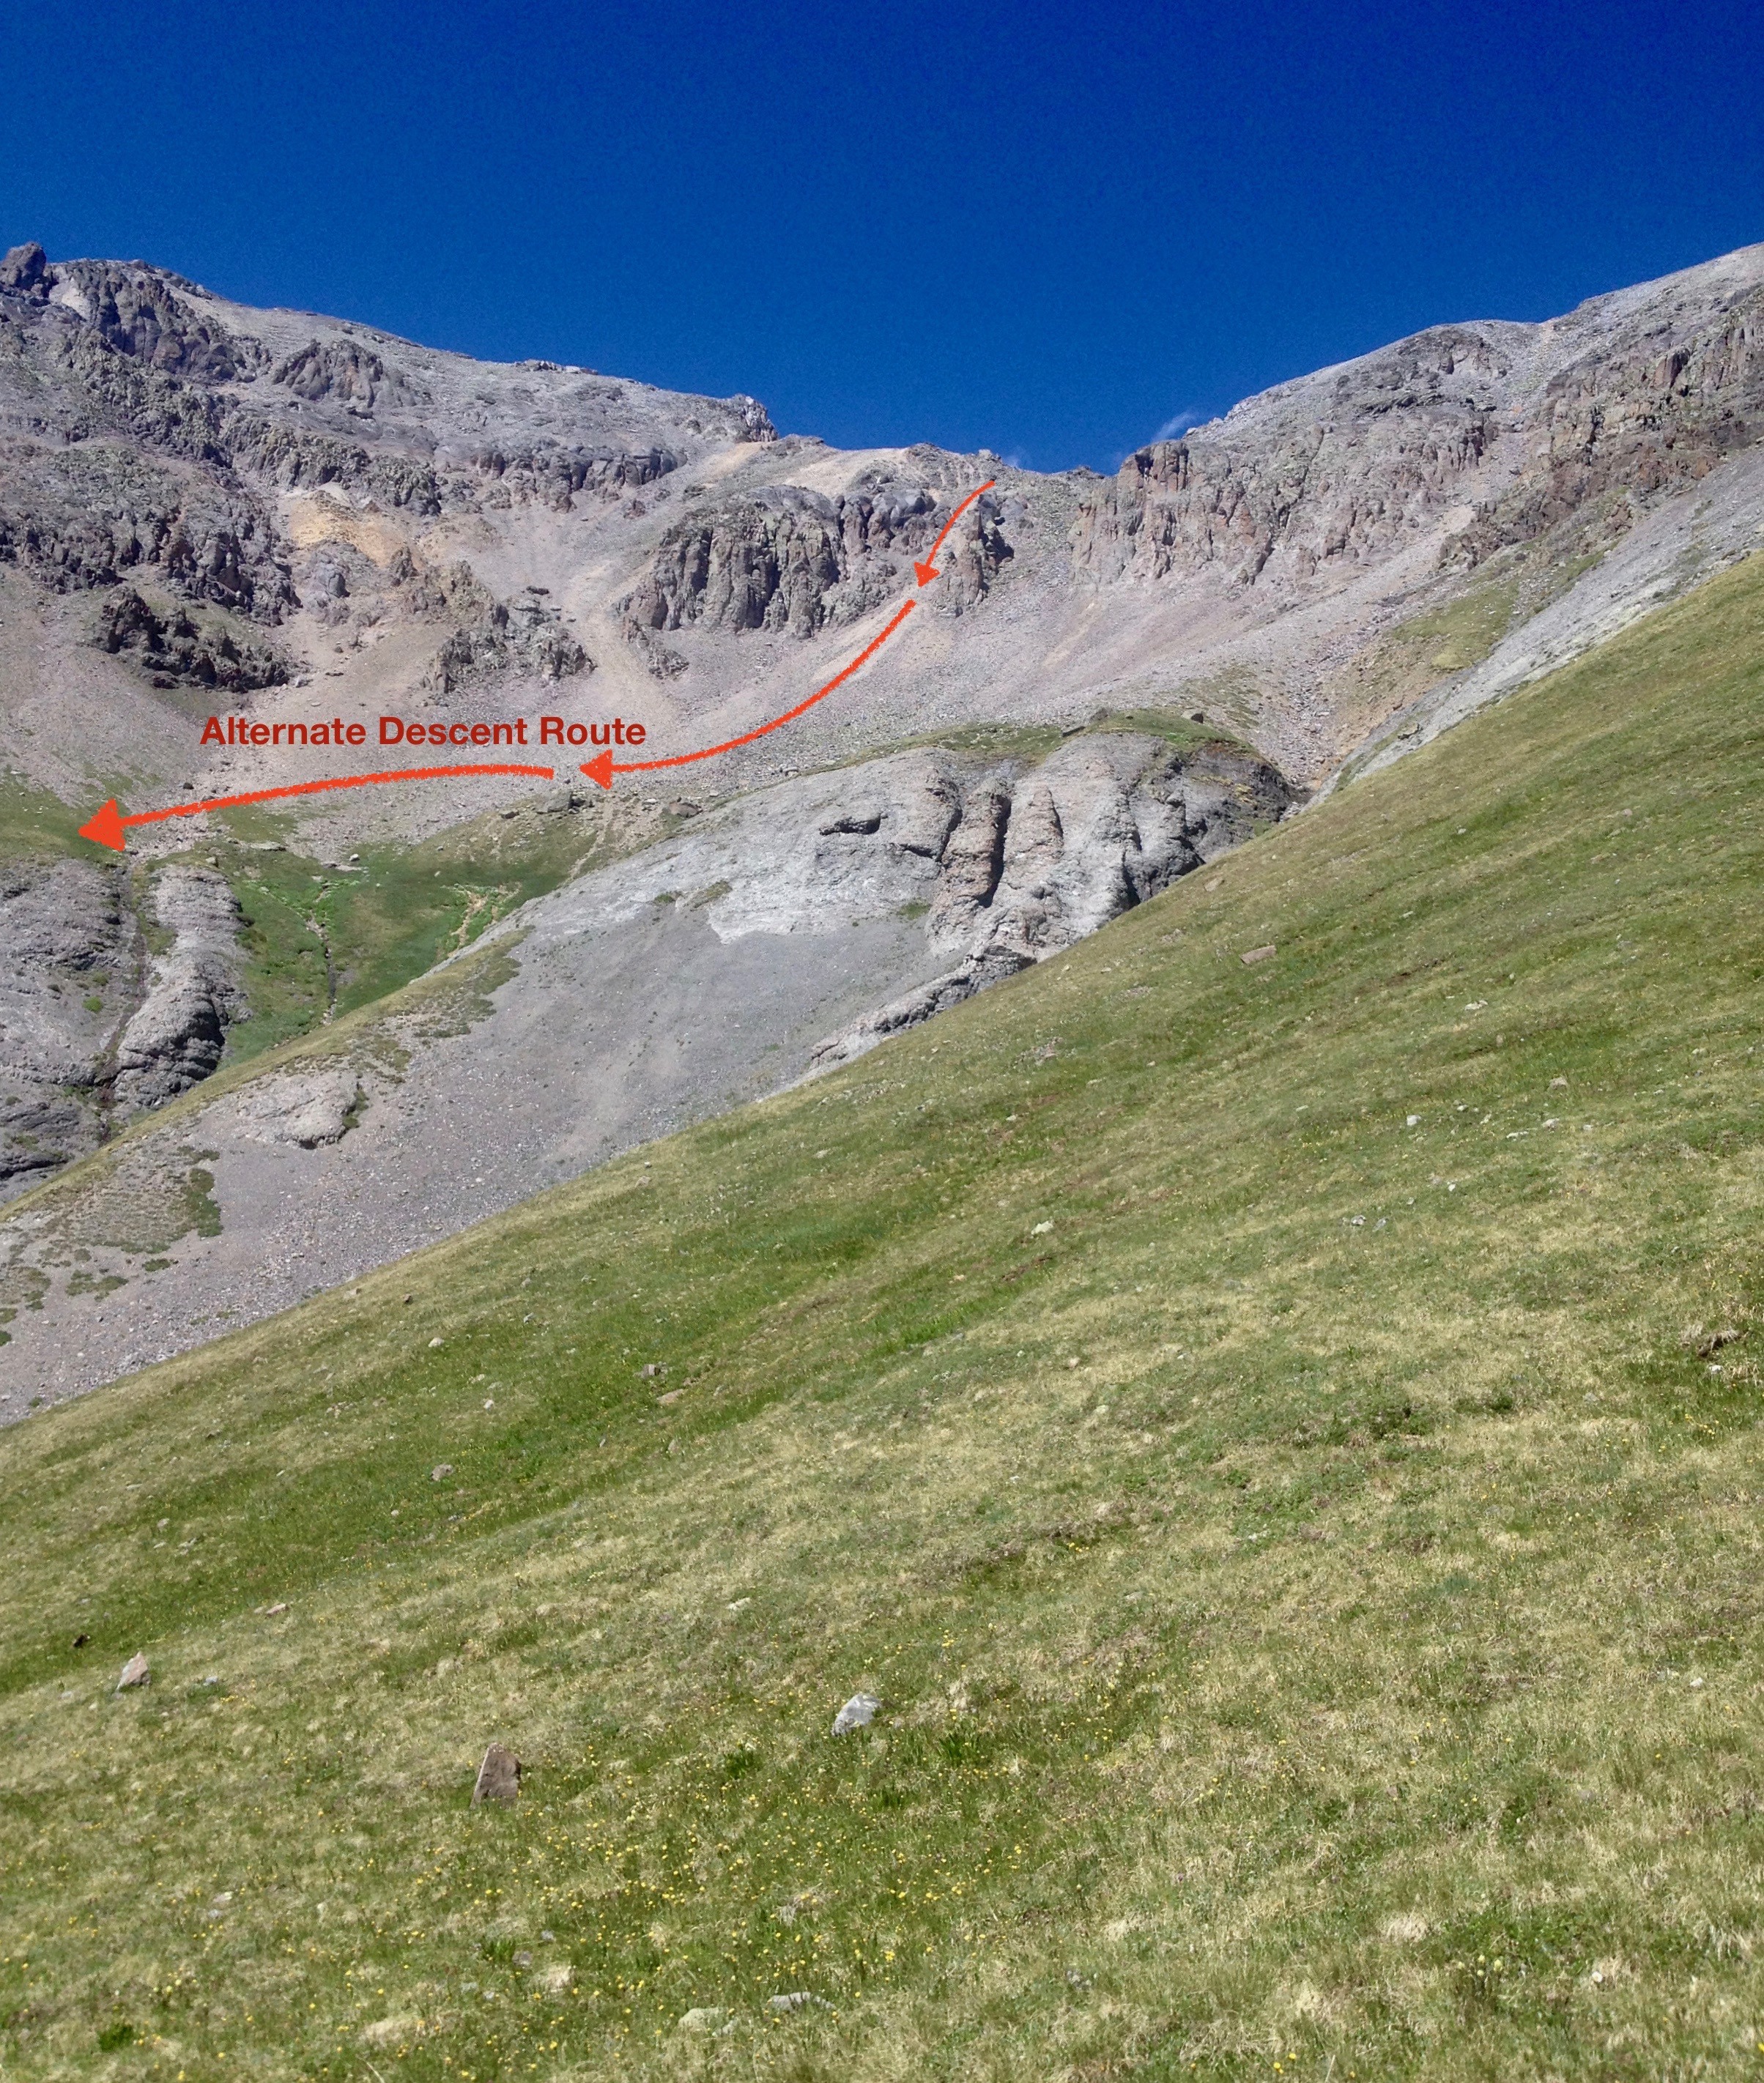
From the saddle, traverse gently right into a loose, rubble-filled gully. This gully splits into two branches separated by a rib/spire of rock. The right-most (Northern) side will most likely have softer scree to work with. The left (southern) branch looks to have larger, blockier choss to deal with. Pick your poison and drink deeply from it. Descend until you've cleared the cliffs. From here, you have two options:
- A contouring route to your right that rejoins the ascent route up Teakettle, or...
- A contouring route to your left that spills out (hopefully not literally) on the Yankee Boy Basin road a few hundred yards below where you started for the day.
If you chose #2, proceed as follows. (This description provided b Shaun Cooney from a 2018 descent.)
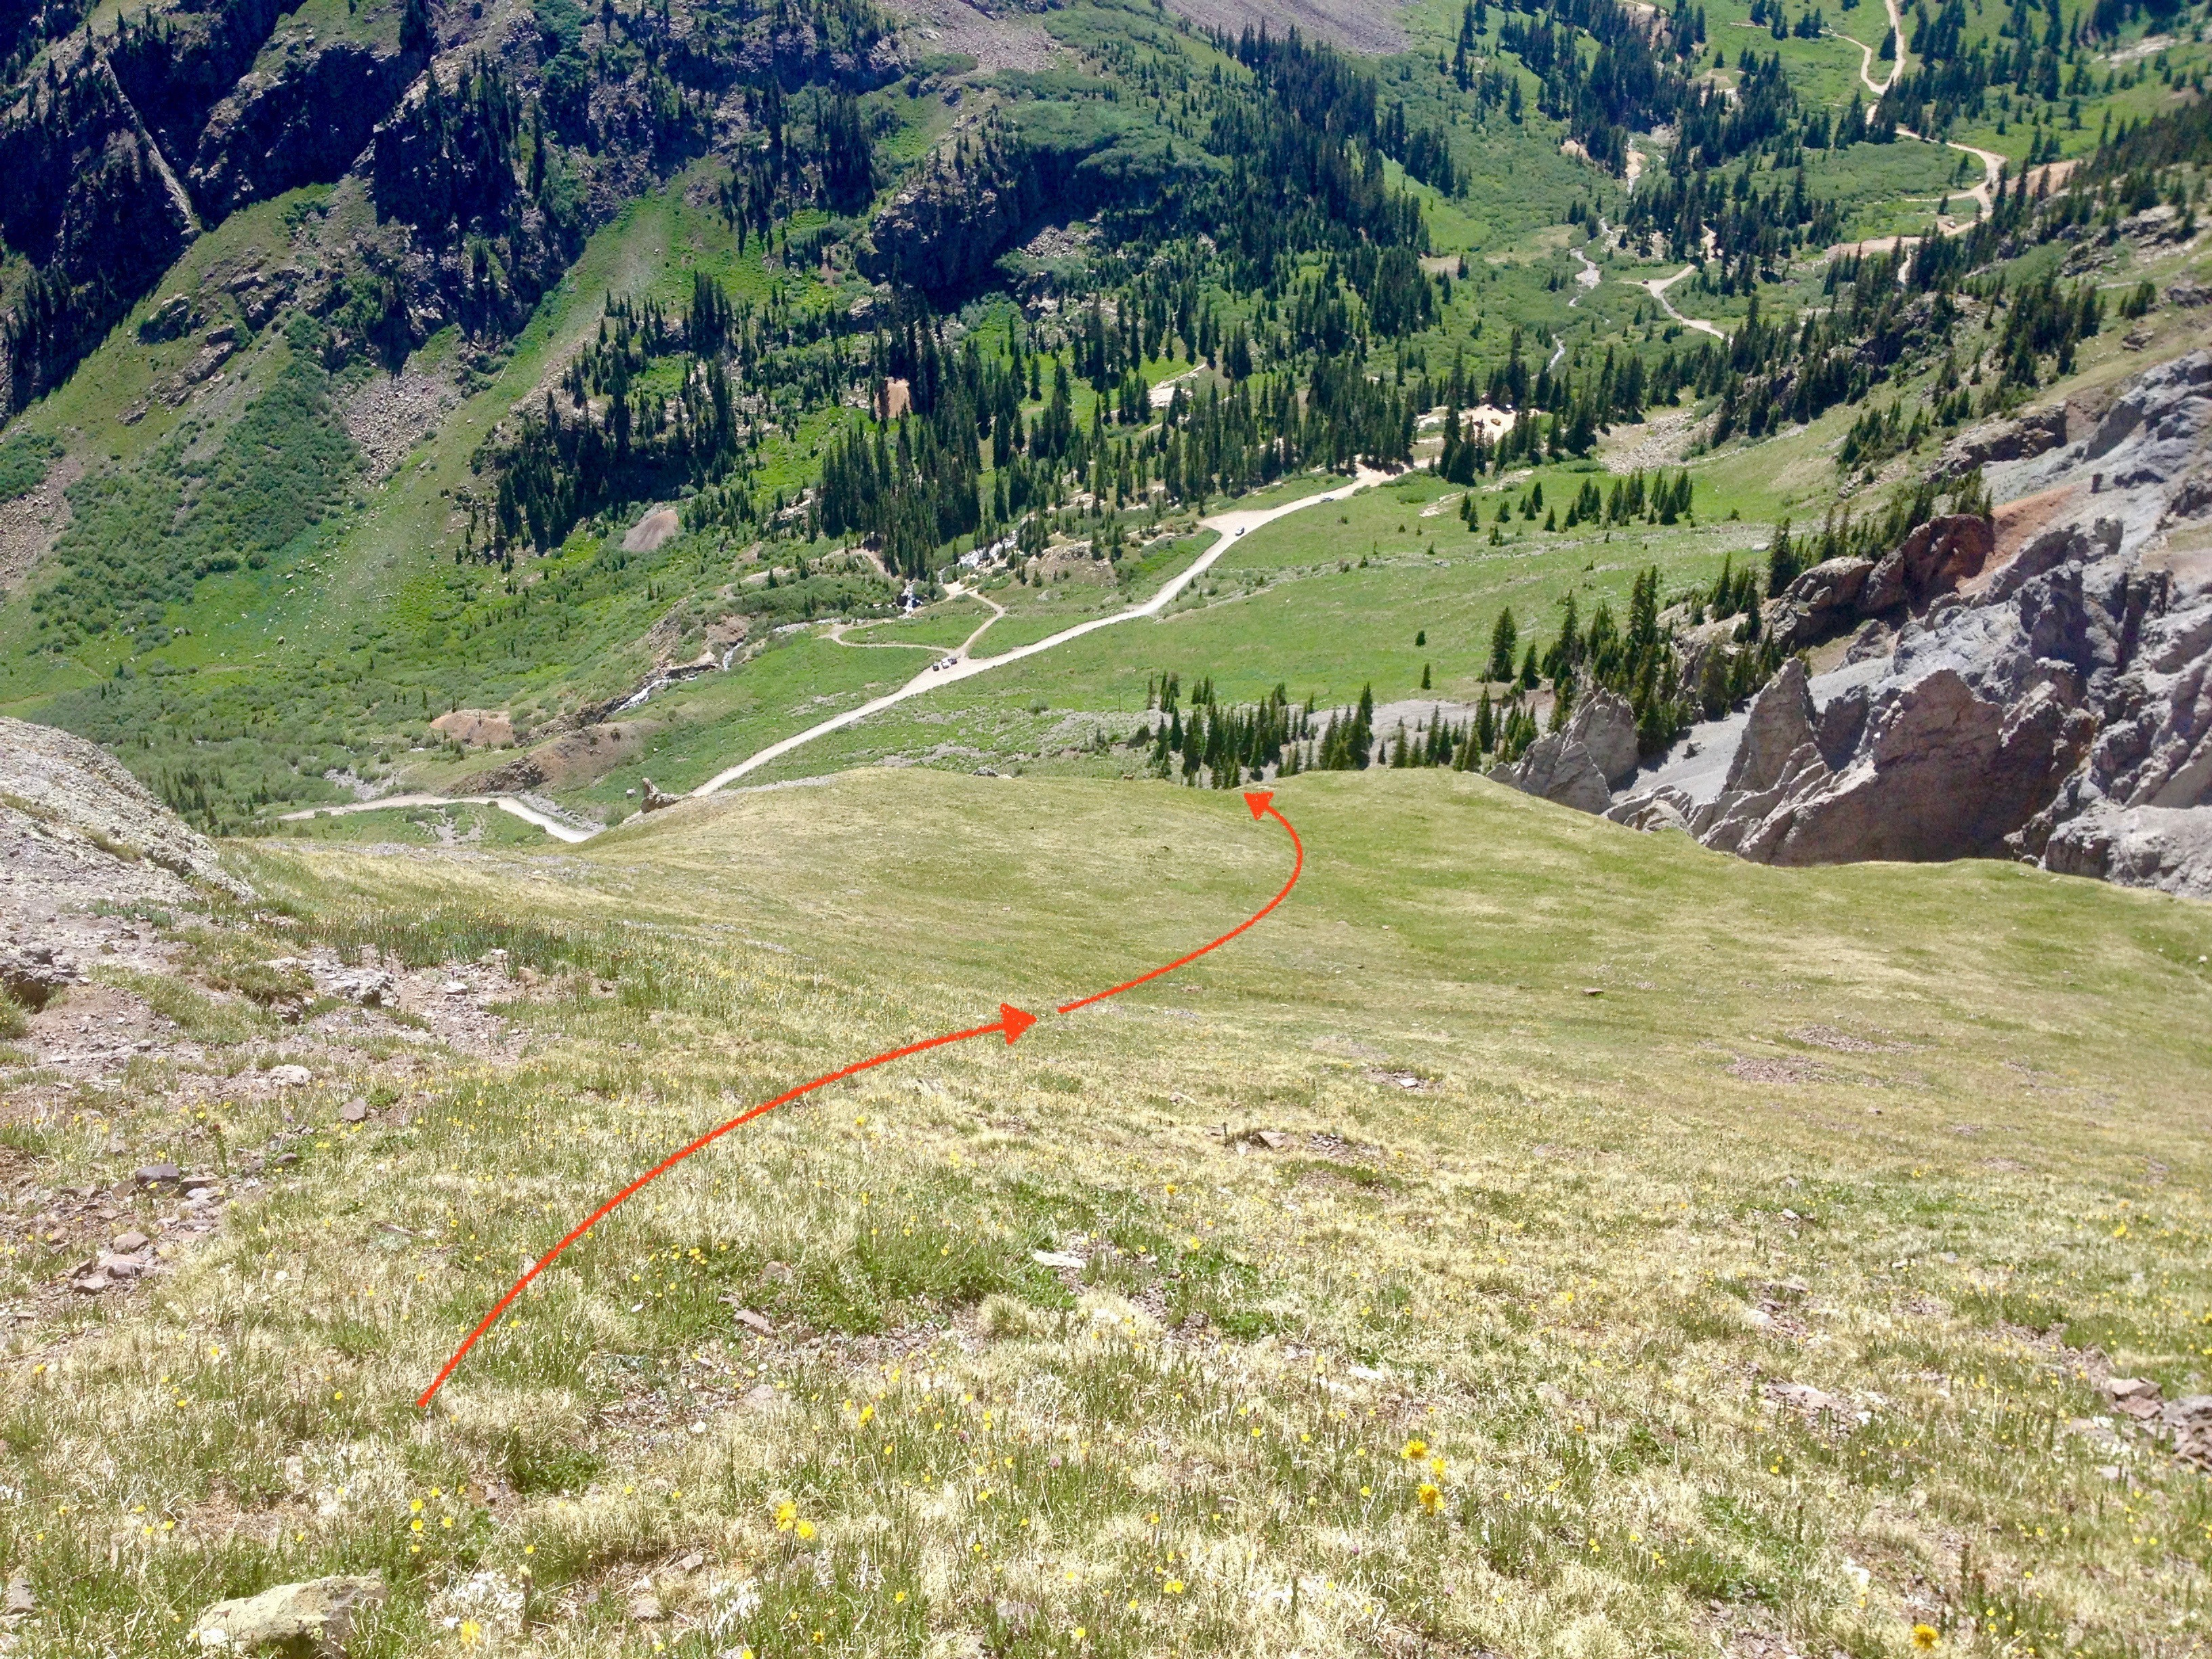
Exit the descent gully and begin angling left while carefully dropping a little lower. Aim for the top of a large area of gray dirt in the upper reaches of tundra just below the dark cliffs of Potosi's West face. There is a game trail that should be visible as it traverses across this slope. Find it and aim right for it, then use it to cross the gray dirt over into the tundra. The gray dirt is more of the increasingly familiar decomposed rock that sits at a precarious angle.
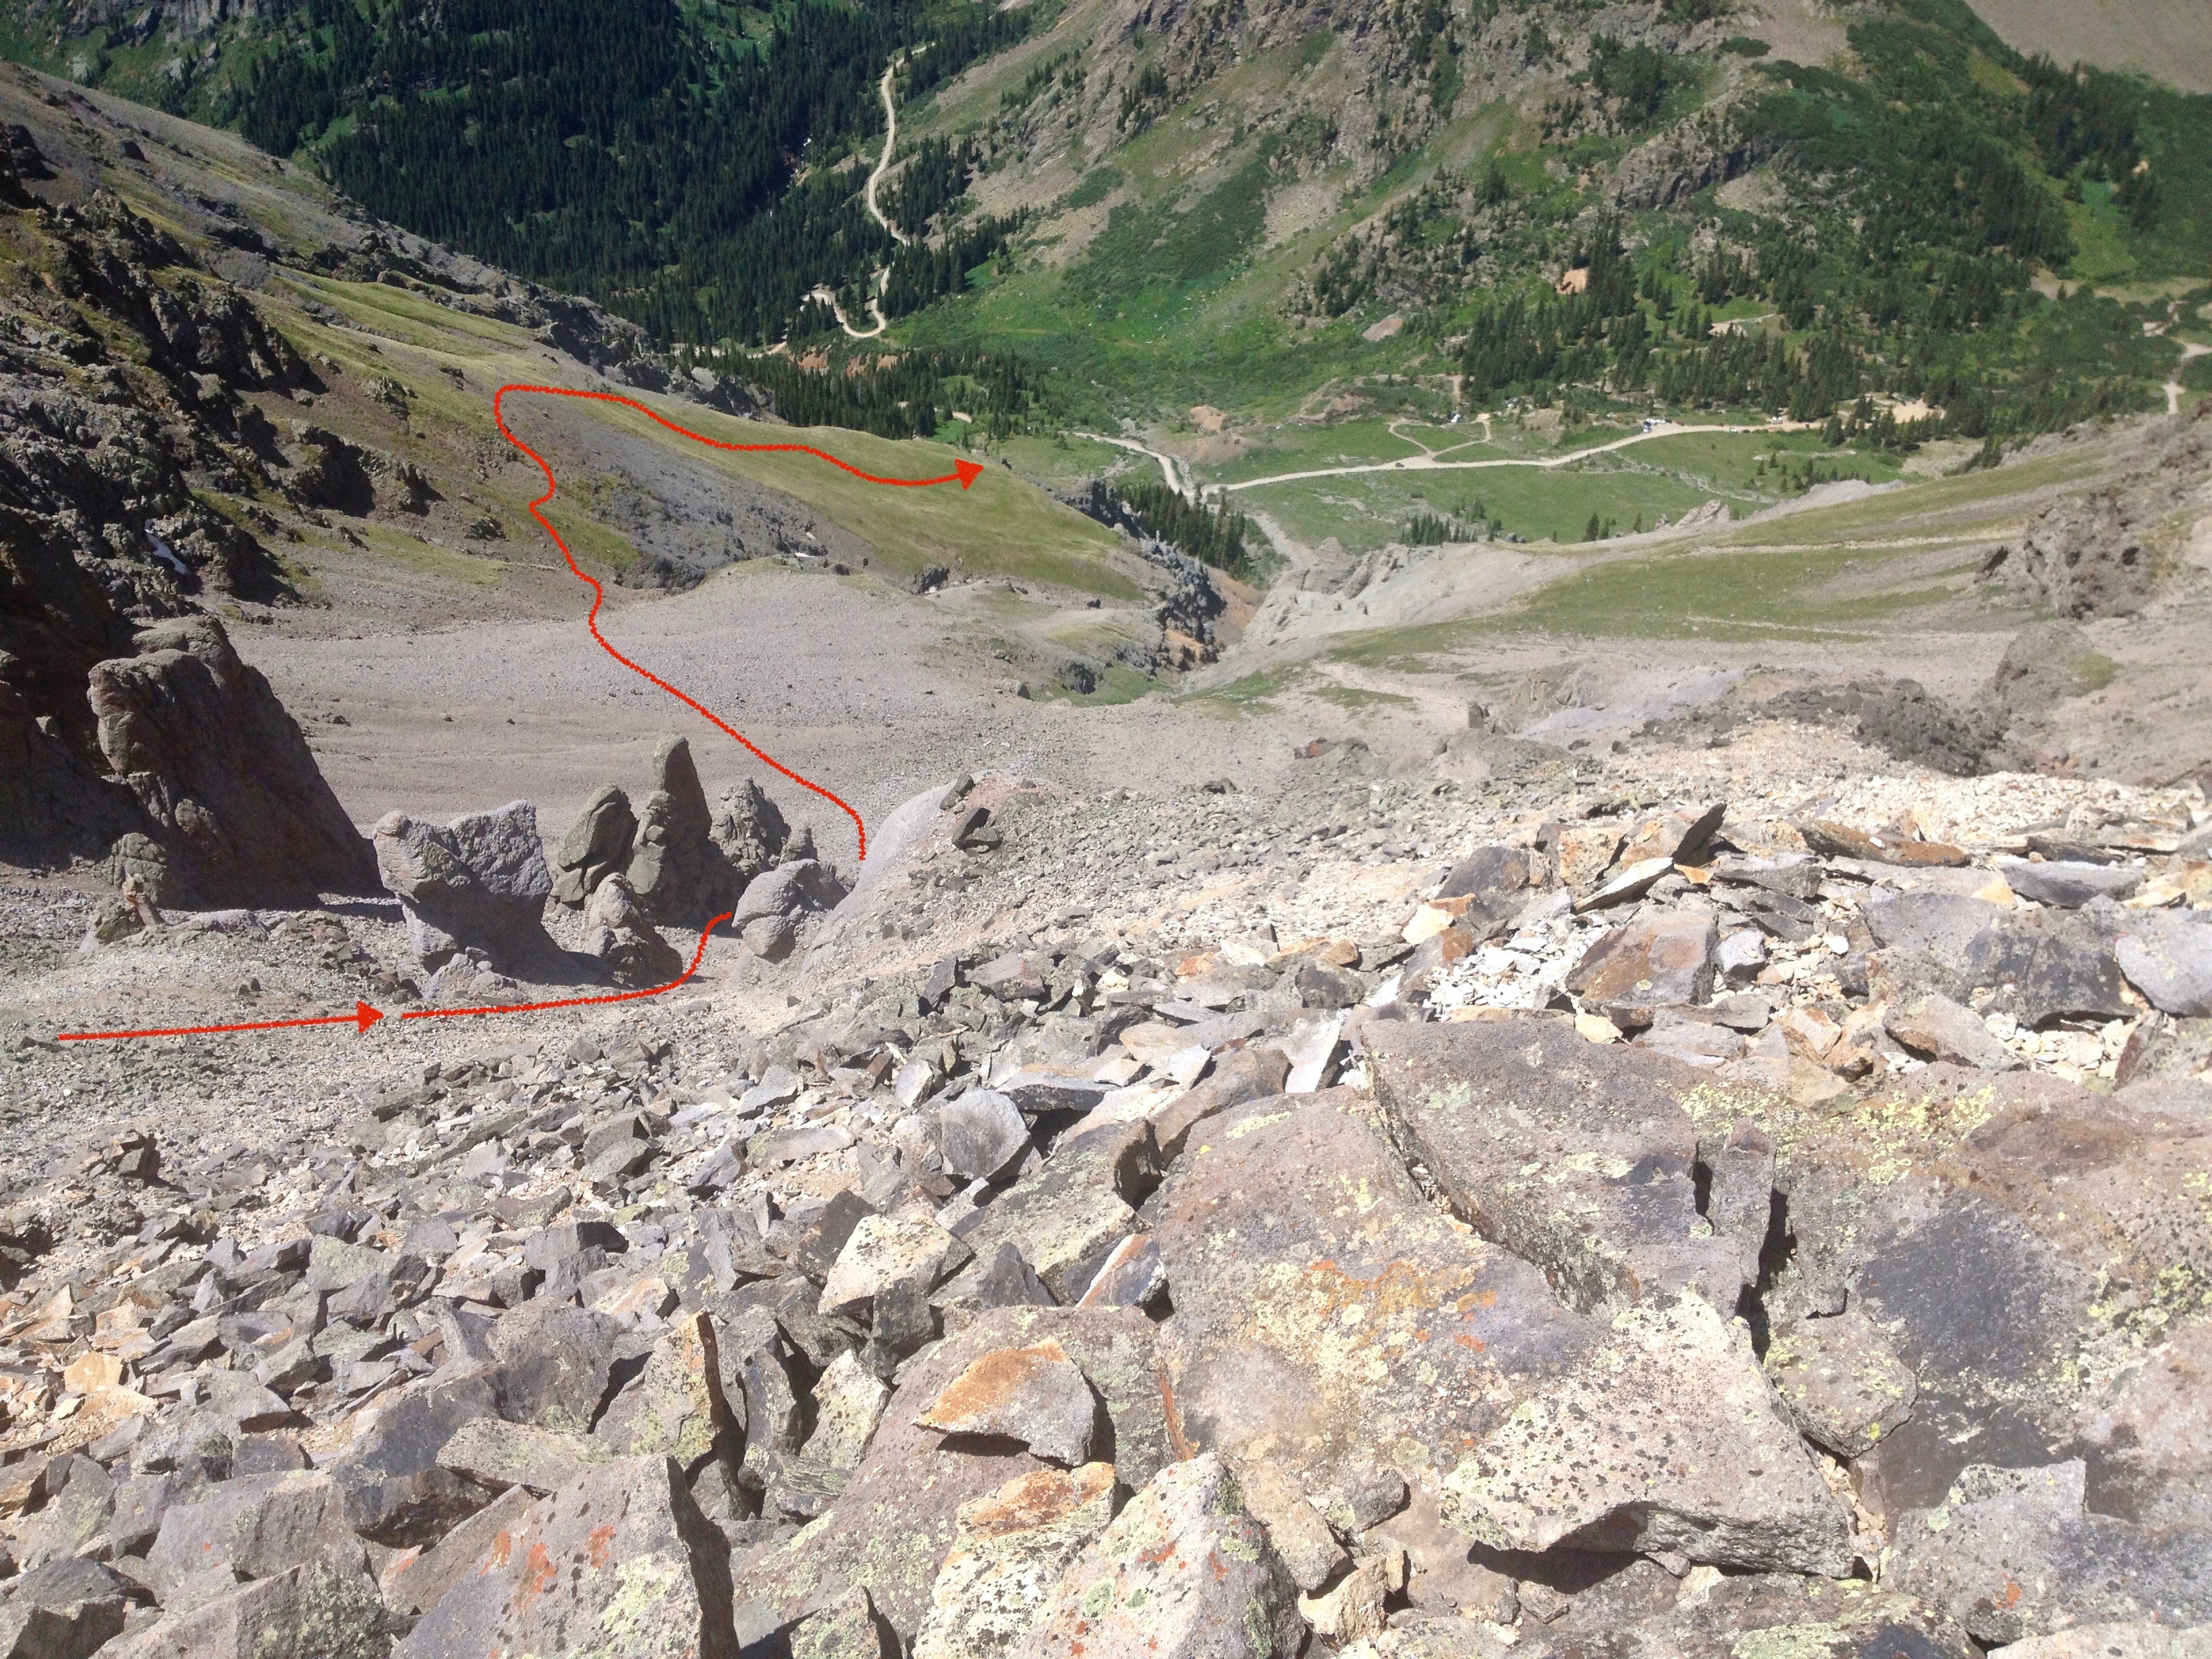
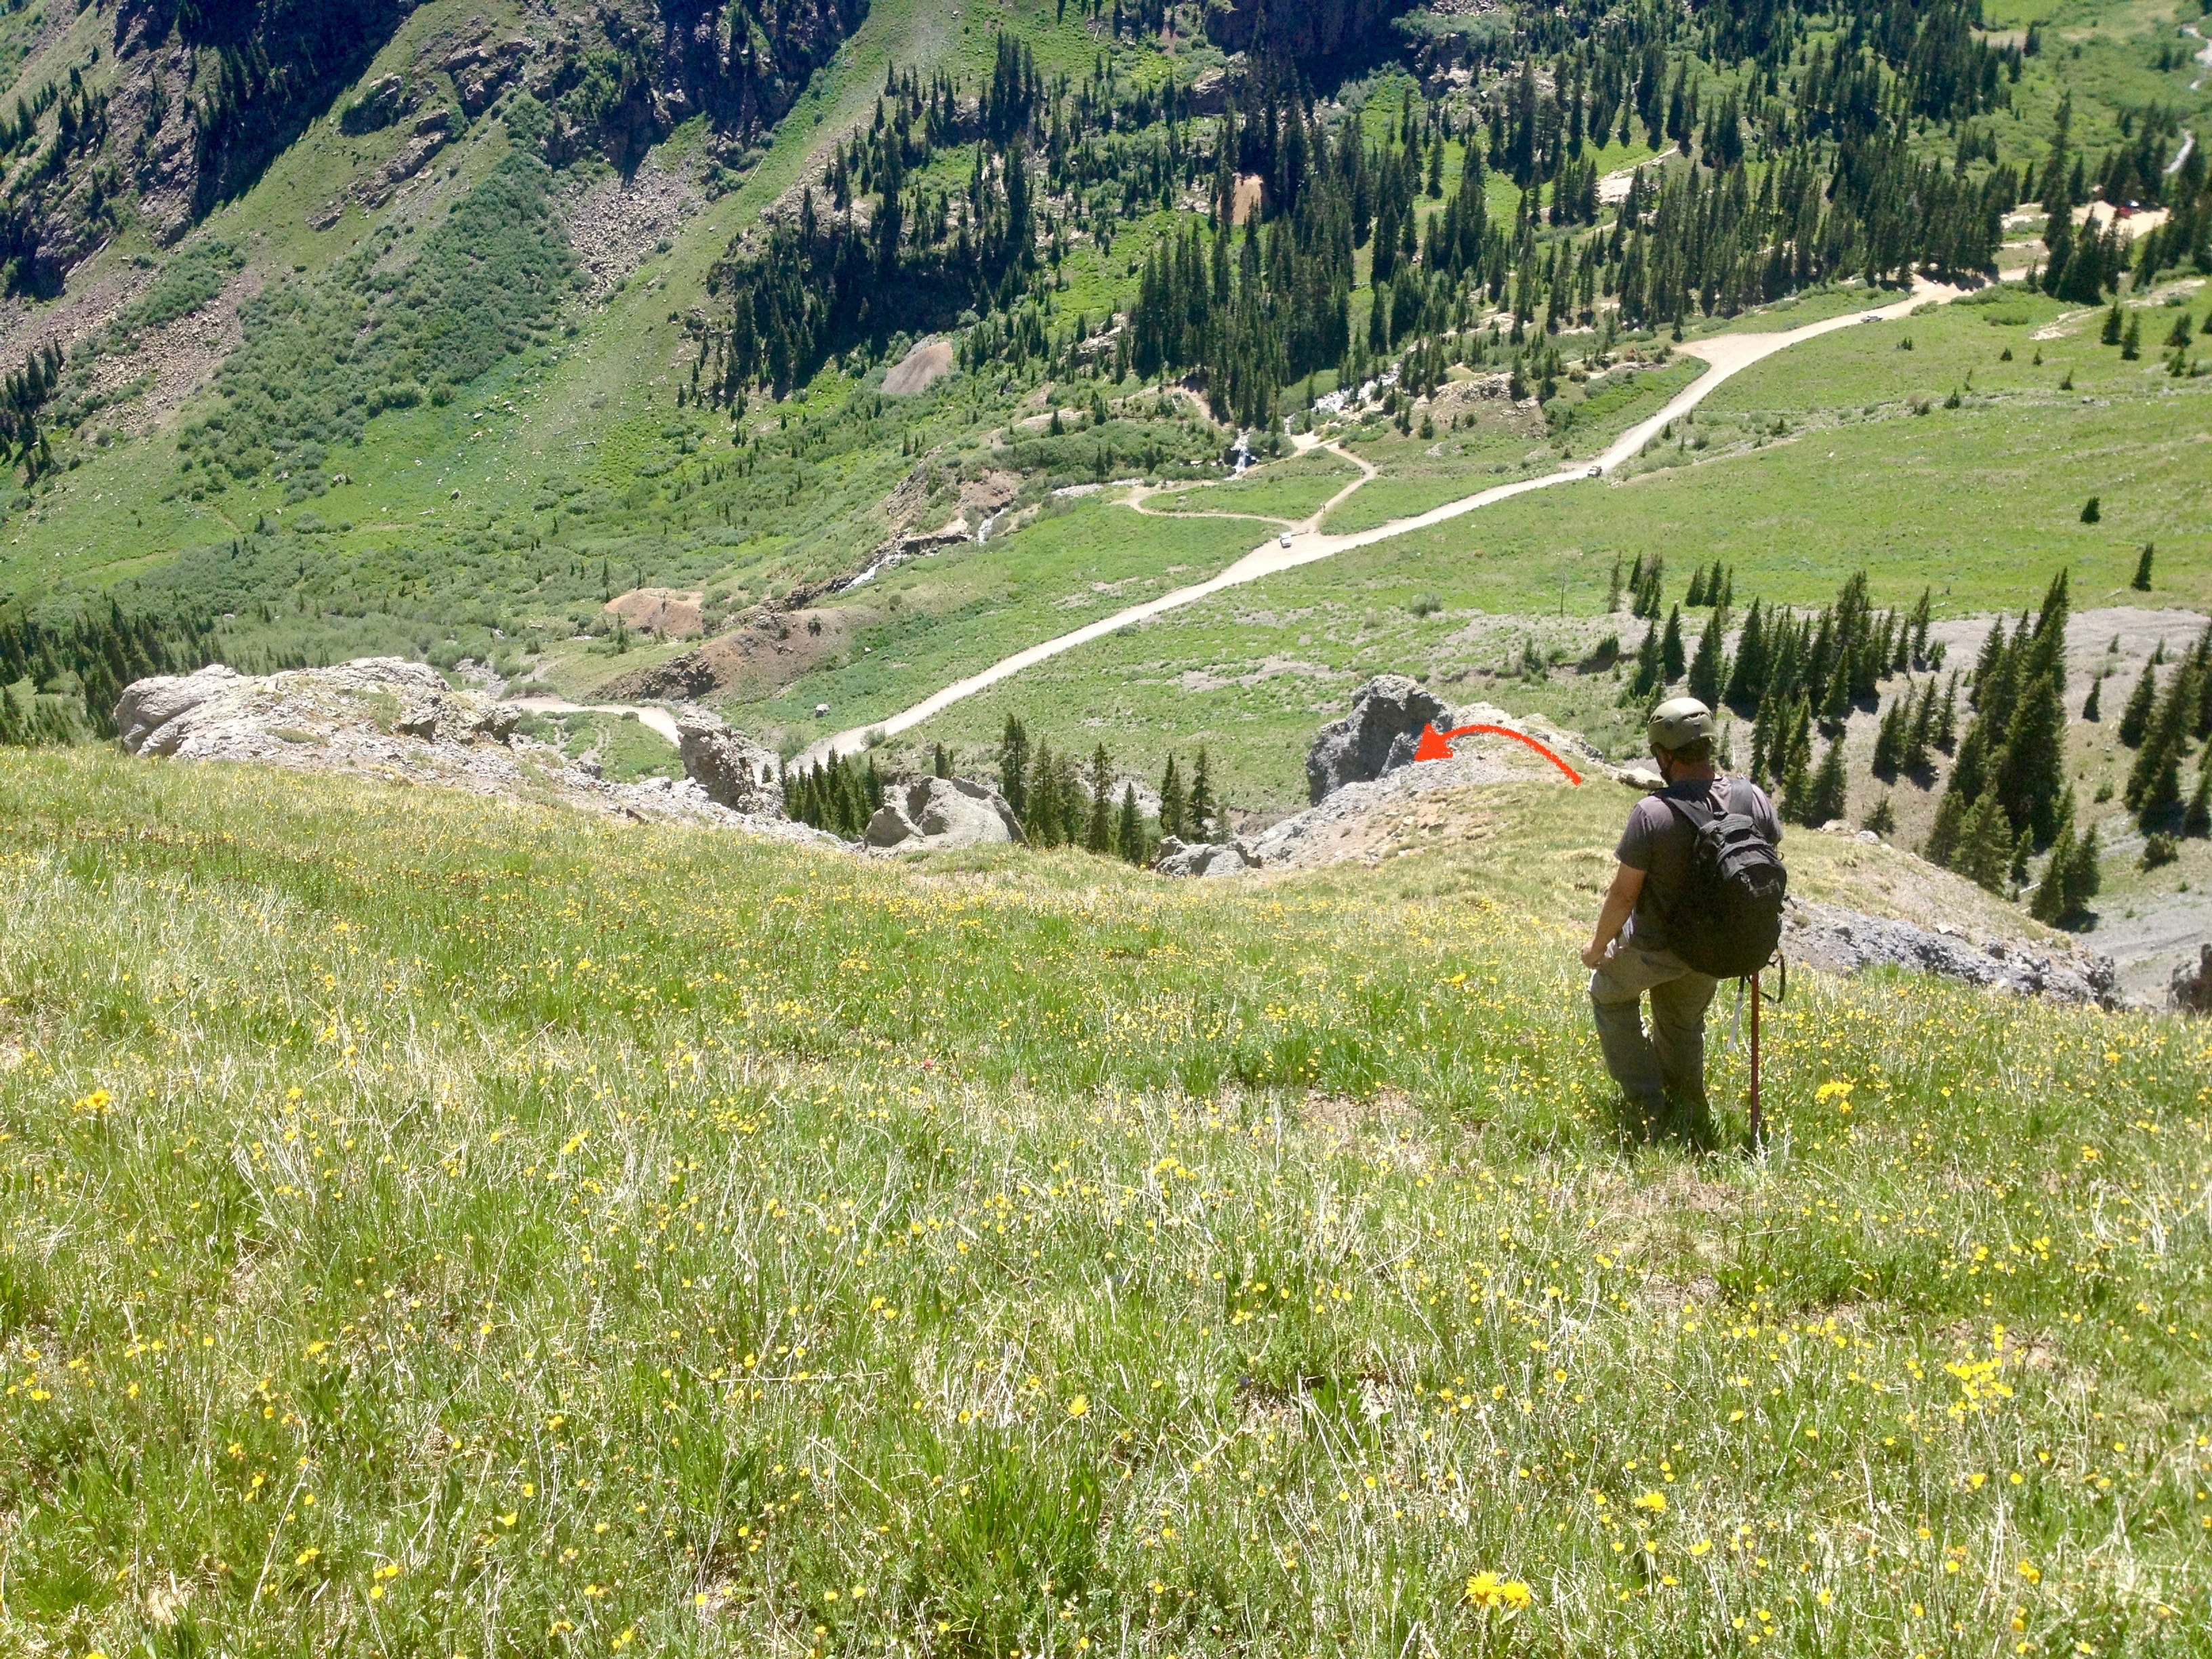
From the game trail, descend the tundra, aiming back to your right just a little. You're looking for the top of a specific gully. The easiest reference point is to find a gully with a small nub or finger right at its head that's visible from many angles. Set course just right of this mark to a small tundra protrusion that rests blissfully above the moiré of rubble below.
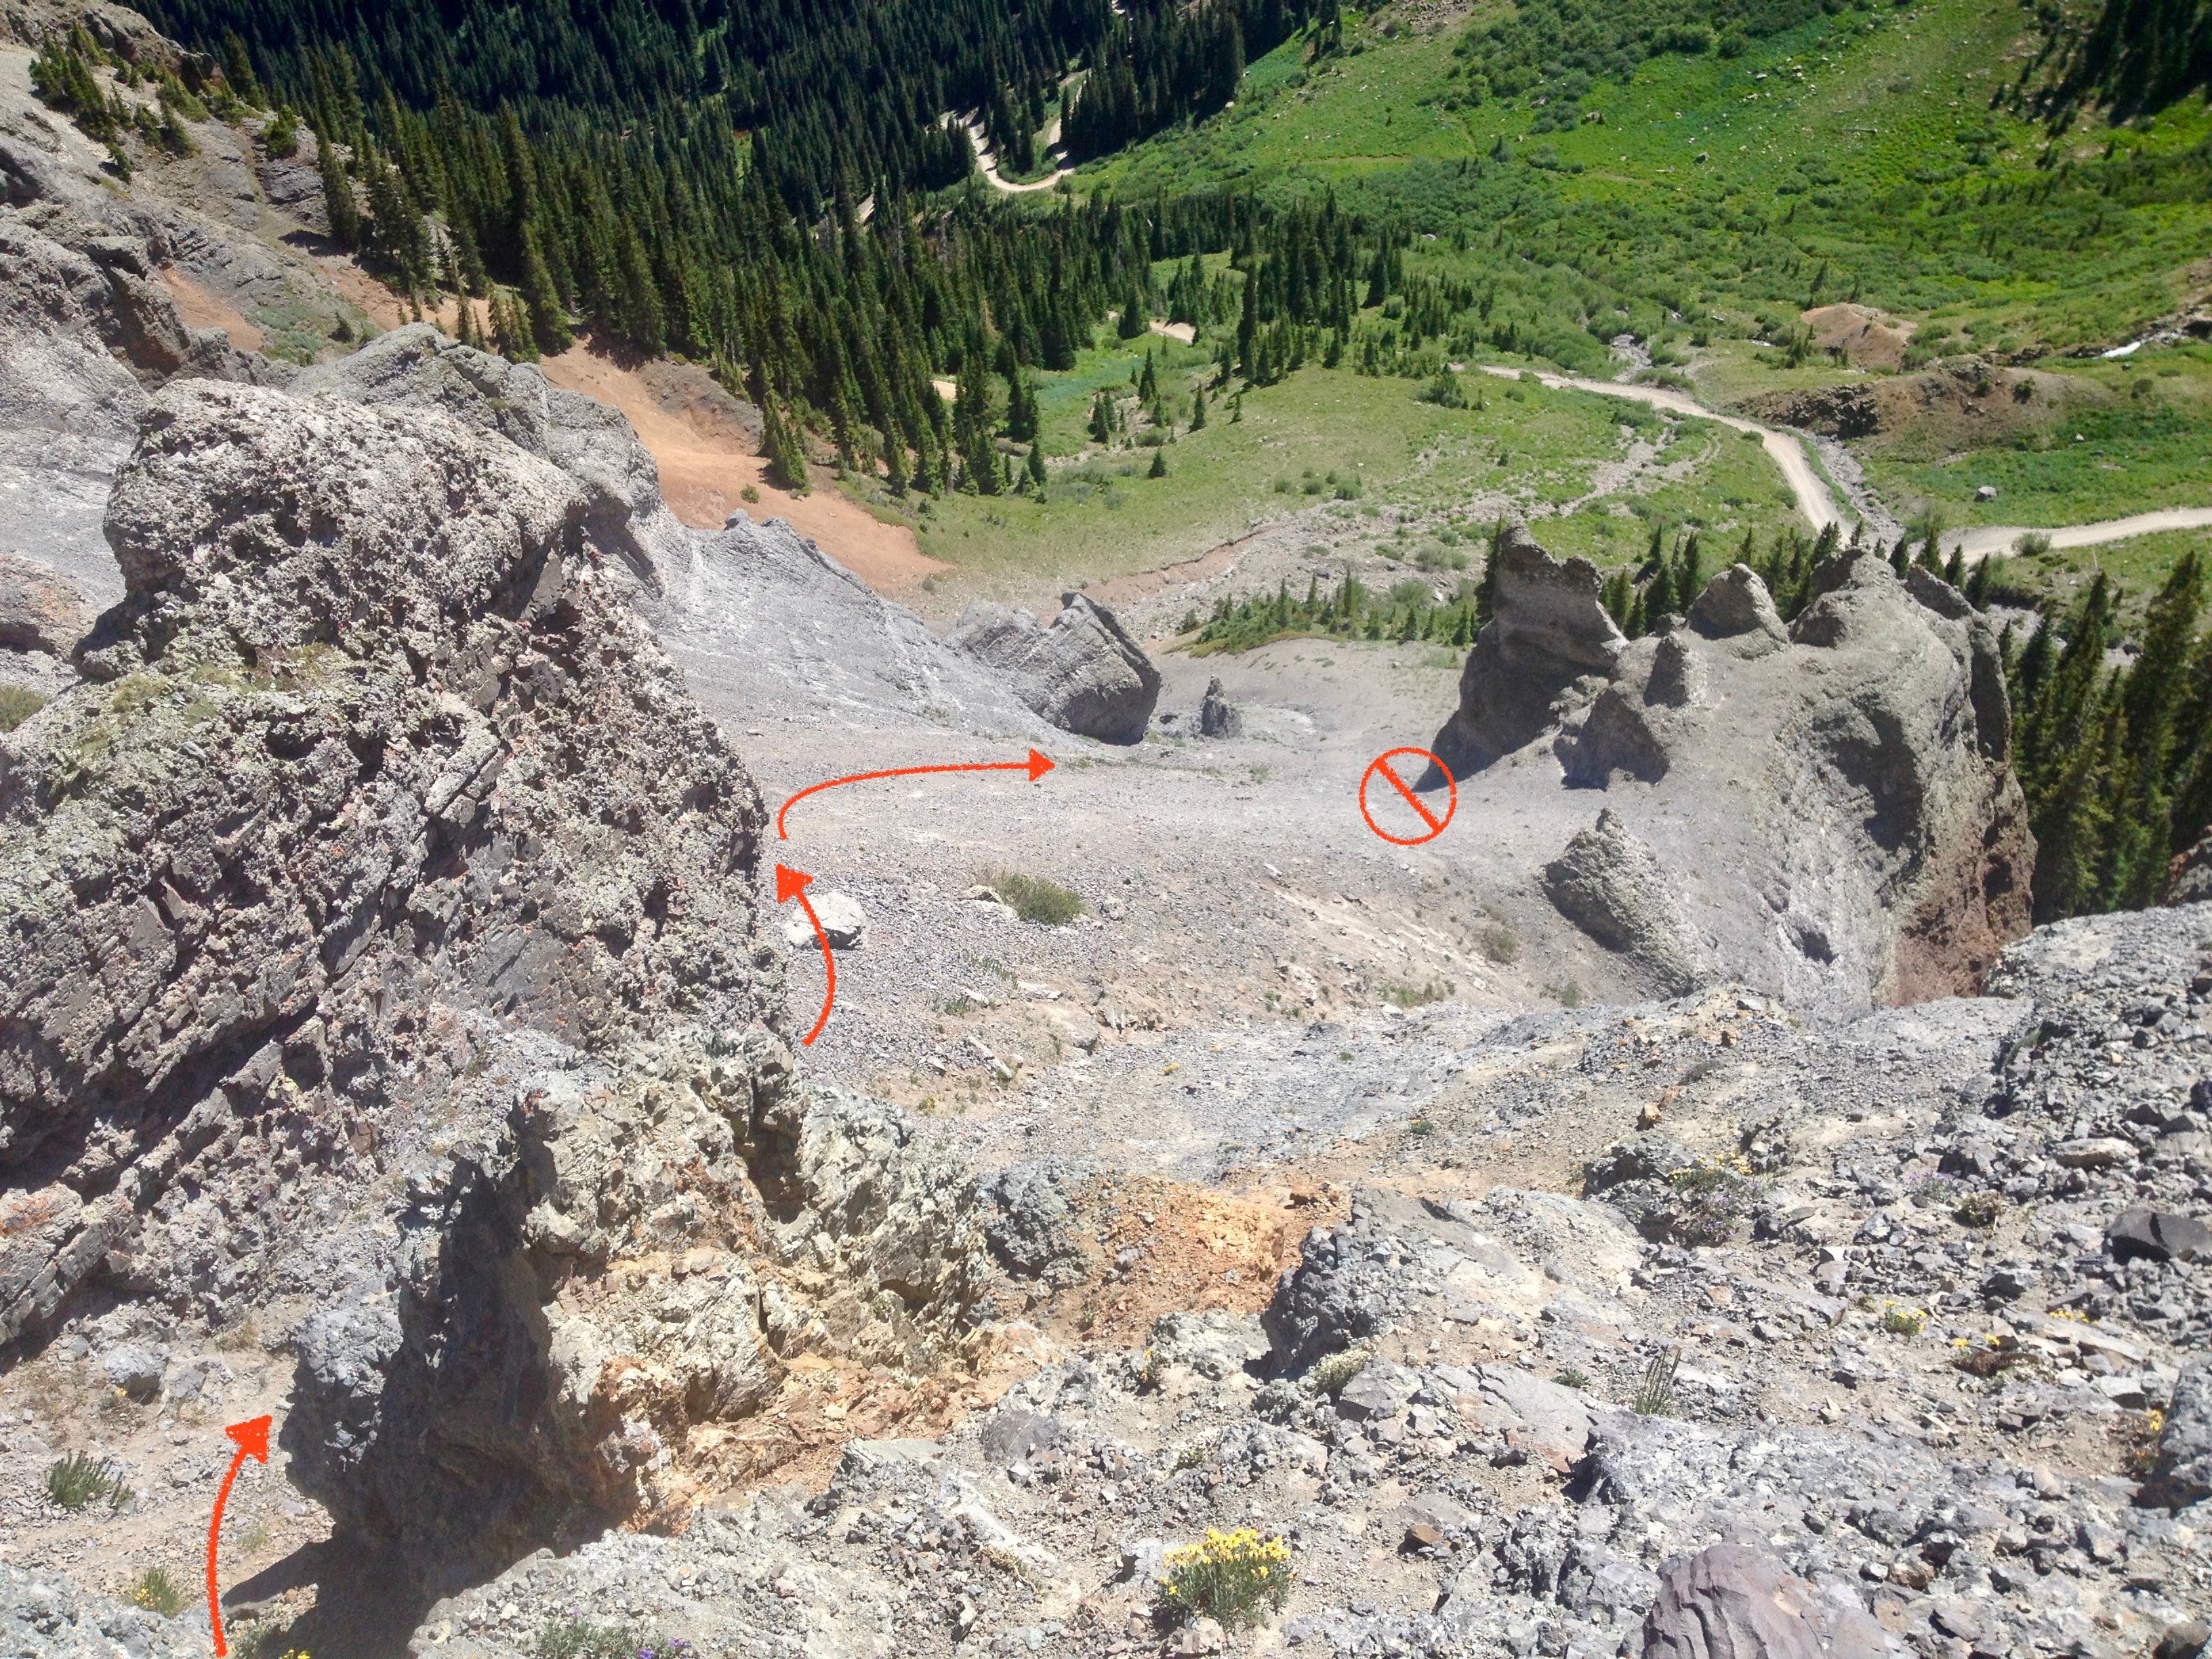
From this tundra, find a small ramp down into the gully (2+). Descend into the gully and proceed down carefully. When the gully briefly splits, the left branch is a bit more stable. Take it. You may be tempted to rejoice with glee as the terrain opens up and softens up below you. Don't rejoice yet. Proceed carefully in high-stepping scree dance down the slope a short distance (stay to your left). Before you reach the last wide-open section of this gully, STOP. You are only a few hundred feet above the road, but your are not safe yet. Continuing your high-stepping scree dance without careful observation will likely send you rocketing down out of control to the road below. While this slope, from above, appears to be more of the same soft scree you were just joyfully descending, IT IS NOT. The further right you go, the more this slope gives way to flaking sheets of rock covered in a thin veil of loose gravel that looks like scree from above, but is not. The pitch of the slope is enough to send you rocketing down the remainder of the gully were you to come into this section with any speed. DO NOT go to your right in the direction of a flat bench and more inviting-looking terrain. Instead, bear left toward a small strip of mixed tundra and rock. Step carefully. This terrain has a little more dirt below the veil of rubble than that to the right, but it can be difficult to distinguish what's truly dirt from the flaky, sandy rock that lurks below.
Once clear of the last cliffs, you may now rejoice! You're free of the rubble! Pick your line through a little more tundra, then a stand of trees, and continue rejoicing as you attain level, stable ground below the trees. Peer back triumphantly at your accomplishment as civilized onlookers gaze in awe. Intersect the road and follow to your vehicle.
If you choose #1, this is the descent route Tim & Carrie took in 1994. Our notes were sketchy. Like Shaun, we returned around Potosi to the saddle below the 13,115 mark on the NW ridge of Potosi. Head down the very steep gully which splits as Shaun mentions. We likely took the more northern one which contained large enough rocks to be a hazard to one's health should they begin to tumble, of which several did. Bypass a rocky outcrop on the right. The gully will pan out onto a larger talus slope. At about 12,600 feet, begin to contour west to regain the track you followed up in the morning just off the ridge that leads up toward Coffee Pot. You will cross a few minor ribs. Once back on that SW ridge route that accesses Coffee Pot, simply follow your morning route back down.
Additional BETA
Links to other information, routes & trip reports for this peak that may be helpful. -